background image

Over priming may cause flooding, 
preventing the engine from starting. If you 
do flood the engine, wait a few minutes 

before attempting to start and do not push 
the primer.   


5.  Grasp recoil starter handle and pull rope out 

slowly until it pulls harder. Let rope rewind 
slowly. 

6.  Pull rope with a rapid continuous full arm 

stroke. Do not allow starter rope to snap back. 

7.  Repeat steps 5 and 6 until engine starts. 
8.  When the engine starts, release the recoil 

starter handle and slowly move the choke 
control to the FULL position.   

 
Warm Start 

Follow the steps above, keeping the choke control 
in the FULL position and do not use primer. 
 

Allow the engine to warm up for a few 
minutes, Engine will not develop full power 
until it has reached normal operating 

temperature.   


In snowy and cold conditions, some 
controls and moving parts may freeze. Do 
not use excessive force when trying  to 

operate frozen controls. If you have difficulty 
operating any control or part, start the 
engine and let is run for a few minutes. 


Snow Blowing


It is easier and more efficient to remove snow 
immediately after it falls. 
 
The best time to remove snow is the early morning. 
At this time the snow is usually dry and has not 
been exposed to the direct sun and warming 
temperatures. 
 
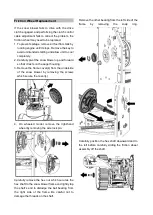
Slightly overlap each successive path to ensure all 
snow will be removed. 
 

For large areas, start tin the middle and throw 
snow to each side, so snow is not cleared more 
than once. 
 
For extremely heavy snow, reduce the width of 
snow removal by overlapping previous path and 
moving slowly. 
 
Throw snow downwind whenever possible. 
 
Keep engine clean and clear of snow during use. 
This will help air flow and extend engine life. 
 

IMPORTANT!

  After snow-blowing  is completed, 

let the engine run for a few minutes to help dry off 
the moisture on the engine and prevent moving 
parts from freezing. Engage the auger/impeller to 
clear any remaining snow from inside the housing. 
Rotate the discharge chute to prevent it from 
freezing. Stop the engine, wait for all moving parts 
to stop, and remove all ice and snow from the 
snow blower. With the engine off, pull the recoil 
starter handle several times to prevent the recoil 
starter from freezing up. 
 

Traveling


To travel from one work area to another: 
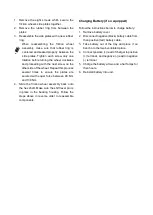
1.  Set throttle to slow or part-throttle position. 
2.  On wheeled model, press down on handle 

bars enough to raise front of unit slightly off 
surface; on tracked model, move the track lock 
lever into the transport position.   

3.  Engage drive clutch without engaging auger 

clutch. 


Transport


Always shut off engine, remove key, and 
close fuel shut-off valve when transporting 
unit on a truck or trailer. Do not transport 

machine while engine is running. 

 
Use extra care when loading or unloading unit 
onto trailer or truck. 

Содержание XTP121

Страница 1: ...Bruksanvisning vers ttning av bruksanvisning i original SNOW BLOWER Instruction manual Translation of the original instructions Isojoen Konehalli Oy Keskustie 26 61850 Kauhajoki As Finland Tel 358 0 2...

Страница 2: ...ni v hint n 98 oktaania Polttoaines ili n tilavuus 6 l ljytyyppi SAE10W 30 ljys ili n tilavuus 1 1 l Vaihteet 6 eteen 2 taakse Ty leveys 720 mm Ty korkeus 535 mm Max linkouset isyys 10 m Linkouss de 1...

Страница 3: ...is ist sen ohjeet sek koneeseen kiinnitettyjen merkint jen merkitys Opettele koneen k ytt sovellukset ja rajoitukset sek sen k ytt n liittyv t mahdolliset vaaratekij t Tutustu l pikotaisin ohjaimiin j...

Страница 4: ...jan N in pid t koneen paremmin hallinnassa my s odottamattomissa tilanteissa V lt tahatonta k ynnistyst Varmista ett kaasuvipu on pois p lt ennen koneen kuljettamista huoltoa tai yll pitoa Koneen kulj...

Страница 5: ...Koneen k ytt ja huolto l koskaan nosta tai kuljeta konetta kun sen moottori on k ynniss l ylikuormita konetta K yt ty h n sopivaa konetta Oikeanlainen kone suorittaa ty n parhaiten ja turvallisimmin...

Страница 6: ...ot sanomalehdet kelkat laudat johdot ja muut vieraat esineet ty alueelta joita lumikierukka voisi singota ymp rilleen Tarkista heikot kohdat laitureilla rampeilla tai lattioilla Suunnittele lumenpoist...

Страница 7: ...hallintalaitteet irti ja sammuta moottori aina ennen kuin poistut k ytt paikalta kahvojen takaa Odota kunnes lumikierukka on t ysin pys htynyt ennen kuin puhdistat poistokourun tukoksia tai teet mit...

Страница 8: ...ulla pit isi olla seuraavat osat Viittaukset oikeaan ja vasempaan puoleen ovat k ytt j n n k kulmasta katsottuna 1 Lumilinkoyksikk 2 Poistokouru 3 Kahvat 4 Alempi kahvavarsi 5 Pitk poistokourun tanko...

Страница 9: ...l ja muttereilla sormin 4 Varmista ett kahvat ovat samalla korkeudella ja kirist kaikki ruuvit tiukkaan Renkaat Renkaat on t ytetty tehtaalla liian kovaksi toimitusta varten Tarkista rengaspaine Lis t...

Страница 10: ...illa Siirr liukukeng t mahdollisimman alas Varmista ett molemmat liukukeng t on s detty tasaisesti Kirist tiukkaan Poistokouru 1 Voitele poistokourun alaosan rengas jollei se ole jo voideltu 2 Asenna...

Страница 11: ...a poistokouru ja kourun ohjauslevy liikkuvat koko matkalla 11 Liu uta poistokourun tanko ilman tappia pylv n kannattimen l pi kuusiokoloreik n hammaspy r ss 12 Kiinnit poistokourun tanko hammaspy r n...

Страница 12: ...la aluslevyll on asetettu vaihtovarren rei n l pi lis toinen tasainen aluslevy vaihtotankoon ja kiinnit ne sokkapultilla 3 Nosta vaihtotanko yl s L ys vastamutteria karan alla ja kierr karaa vaihtotan...

Страница 13: ...ttu varaosana laitteistopussissa S ilyt niit varmassa paikassa Akku jos varusteena 1 Irrota akun kansi irrottamalla ruuvi ja mutteri 2 Liit plus kaapeli punainen akun liittimeen ensin ja sitten negati...

Страница 14: ...pistoke ljynt ytt korkki ljytikku Kaasuvipu S hk k ynnistin Turvavirtakytkin ON OFF virtakytkin Akku Hankileikkurit Poistokourun puhdistusty kalu Lumikierukan vaihdelaatikko Lumikierukka Kaavinlevy M...

Страница 15: ...Kaasukahva S hk k ynnistin Turvavirtakytkin ON OFF virtakytkin Akku Hankileikkurit Poistokourun puhdistusty kalu Lumikierukan vaihdelaatikko Lumikierukka Kaavinlevy Murtosokat Liukukeng t K ytt kytkim...

Страница 16: ...aksesi poistokouru ja ohjauslevy paikalleen Pid liipaisinkantta alhaalla ohjausvivussa ja k nn ohjausvipua oikealle tai vasemmalle kun haluat muuttaa poistokourun asentoa Pid liipaisinkantta alhaalla...

Страница 17: ...stokouru Lumi sinkoutuu kierukkakoteloon ja poistuu sielt poistokouruun Poistokourun puhdistusty kalu l koskaan k yt k si si tukkeutuneen poistokourun puhdistamiseen Sammuta moottori ennen puhdistust...

Страница 18: ...s varusteena Tasauspy r st lukitaan parhaan pidon saamiseksi Kun tasauspy r st on lukittu molemmat py r t telat vet v t samalla voimalla Tasauspy r st lukon liipaisin sijaitsee vasemman kahvan alapuol...

Страница 19: ...jos varusteena K ytet n moottorin pys ytt miseen Pys yt moottori siirt m ll kytkin OFF asentoon K ynnist moottori k nt m ll kytkin ON asentoon Virtakytkin 12 V k ynnistys jos varusteena Virtakytkint...

Страница 20: ...i rakennuksia Jos lumilinkoa on k ytett v sorapinnalla ole eritt in varovainen ja pid liukukeng t maksimiet isyydell alustan ja kaavinlevyn v lill S d aina liukukeng t kaavinlevyn s d n j lkeen jotta...

Страница 21: ...urun lukitussalpa Jos poistokouru ei lukitu haluttuun asentoon tai vapaudu sen liikuttamiseksi s d poistokourun lukitussalpaa Jos poistokouru ei lukitu L ys vaijeria l ys m ll taaksep in s t mutteria...

Страница 22: ...kireys voi l ysty ajan my t Jos kone vet vasemmalle kuljettaessa suoraan kirist vasenta telaa Jos laite vet oikealle kirist oikeanpuoleista telaa S d kireytt kirist m ll laipan lukkomutteria telan si...

Страница 23: ...nuutti ennen kuin yrit t k ynnist moottorin l k paina praimeria Kaikkia lumilinkomalleja ei ole varustettu praimerilla koska kyseinen moottori ei tarvitse sit 5 Liit jatkojohto moottoriin 6 Liit jatko...

Страница 24: ...asti FULL asentoon K ynnistys l mpim n Noudata yll olevia vaiheita ja pid rikastinvipu FULL asennossa Anna moottorin l mmet muutaman minuutin ajan Moottori ei tuota t ytt tehoa ennen kuin normaali k y...

Страница 25: ...koneen runko kuljetusajoneuvoon l koskaan kiinnit tangoista tai vivuista jotka voivat vaurioitua HUOLTO Moottori Katso lis tietoja moottorin k ytt ohjeesta englanninkielinen Voitelu Lumikierukan vaiht...

Страница 26: ...tia varten lumikauden p ttyess tai jos sit ei k ytet yli 30 p iv n seuraavalla tavalla 1 K yt moottoria kunnes polttoaines ili on tyhj ja moottori sammuu 2 Irrota virta avain ja anna moottorin j hty 3...

Страница 27: ...alla kiinnitysruuvit auki 6 Irrota hihna lumikierukan hihnapy r st ja asenna uusi hihna tukikannattimen ja lumikierukan hihnapy r n v liin 7 Asenna lumikierukan hihna k nteisess j rjestyksess Vetohihn...

Страница 28: ...k ytt hihna pois moottorin hihnapy r lt 4 K nn lumilinkoa varovaisesti yl s ja eteenp in niin ett se lep lumikierukan kotelon p ll 5 Irrota runkosuoja lumilingon alaosasta ruuvaamalla kiinnitysruuvit...

Страница 29: ...kourun lukitusvaijeri ohjauslevyn vaijeri ja poistokourun tanko 10 Asenna poistokourun hammaspy r n ja hihnan kansi Kitkapy r n vaihto Jos lumilinko ei toimi kun vetopy r n kytkin on kytketty p lle ko...

Страница 30: ...le ennen kuin liu utat kitkapy r n pois akselilta Telamallit Irrota kuusiomutteri ja naputtele kevyesti akselin p ty irrottaaksesi kuulalaakerin rungon vasemmalta puolelta Varo vahingoittamasta akseli...

Страница 31: ...my t p iv n ja uuden ruuvin kirist mist Toista t t toimenpidett useita kertoja varmistaaksesi ett levyt on kiinnitetty yht kire lle 90 130 Nm 4 Liu uta kitkapy r n kokoonpano takaisin kuusioakselin p...

Страница 32: ...rtakytkin ON asentoon 6 Kytke ja kirist sytytystulpan johto kiinni 7 T yt s ili uudella puhtaalla polttoaineella 8 Puhdista s d v lyst tai vaihda 9 Aseta virta avain paikalleen 10 Lis tai tyhjenn ljy...

Страница 33: ...pea vauhti lumen poistamiseen 8 Liian paljon lunta 9 Yritet n lingota eritt in raskasta tai m rk lunta 10 Lumikierukka on j tynyt paikalleen 1 Puhdista poistokouru 2 Poista roskat tai vieraat esineet...

Страница 34: ...nsletankens volym 6 l Oljetyp SAE10W 30 Oljetankens volym 1 1 l V xlar 6 fram t 2 bak t Arbetsbredd 720 mm Arbetsh jd 535 mm Max kastdistans 10 m Utkastr rets vridning 180 Driv hjuldriven Hjulstorlek...

Страница 35: ...r inte anv nda apparaten L s bruksanvisningen och f rst anvisningarna samt betydelsen hos markeringarna p maskinen L r dig anv ndningen och begr nsningar s v l som m jliga risker med maskinen Bekanta...

Страница 36: ...balans hela tiden Detta ger dig b ttre kontroll ver maskinen ven i ov ntade situationer F rhindra oavsiktlig start Se till att motorns gasreglage r avst ngt innan du transporterar maskinen eller utf...

Страница 37: ...n n r motorn r ig ng verbelasta inte maskinen Anv nd en l mplig maskin f r jobbet Maskinen utf r arbetet b st och s krast med den effekt den r konstruerad f r ndra inte motorjusterarens inst llningar...

Страница 38: ...undviker slunga sn n ver m nniskor eller omr den d r egendomsskador kan h nda K r inte n ra branter diken eller vallar Maskinen kan pl tsligt v lta om ett hjul r utanf r kanten eller om kanten brister...

Страница 39: ...utkastare eller utf r n gra justeringar eller inspektioner Handkontakt med roterande delar i utkastaren r den vanligaste orsaken till personskador i samband med sn slungor Reng r inte utkastaren n r m...

Страница 40: ...f ljande delar Referenserna till h ger och v nster sida betraktas fr n anv ndarens synvinkel 1 Sn slungaenhet 2 Utkastare 3 Handtag 4 Nedre handtag 5 L ng arm f r utkastare 6 V xelst ng 7 Bruksanvisni...

Страница 41: ...r och muttrar med fingerkraft 4 S kerst ll att handtagen r i samma h jd och dra t alla skruvar ordentligt D cken D cken r verfyllda i fabriken f r leverans Kontrollera trycket i d cken ka eller minska...

Страница 42: ...rar F r medarna s l gt som m jligt S kerst ll att b da medarna r j mnt justerade Dra t ordentligt Utkastare 1 Sm rj undersidan av ringen f r utkastare om inte redan smord 2 Montera utkastaren p ppning...

Страница 43: ...utkastaren rakt fram t 10 Se till att styrspaken r i mittl get f r att ge utkastaren och styrpl ten full r relse 11 F r in utkastarstaven utan stift genom f sten p stativen och i det sexkantiga h let...

Страница 44: ...med en planbricka har monterats genom h len i v xelarmen s tt den andra planbrickan p v xelstaven och l s fast sedan med en saxsprint 3 Lyft upp v xelstav Lossa sp nnmuttern under axeltappen och skru...

Страница 45: ...beh vs Batteri om ing r Ta bort locket till batteriet genom att lossa skruven och muttern 1 Montera och dra t den positiva r da batterikabeln f rst sedan den negativa svarta batterikabeln Kontrollera...

Страница 46: ...kastare Str lkastare Handtag f r utkastarens styrpl t Utkastarens styrpl t Utkastare Spak f r differentiall s Kopplingsspak f r sn skruven Drivremsk pa Styrspakar Utkastarens riktningskontroll Batteri...

Страница 47: ...Brytpinnar Medar Kopplingsspak Uppv rmt handtag V xelspak Styrst ng f r utkastare Str lkastare Handtag f r utkastarens styrpl t Utkastarens styrpl t Utkastare Spak f r differentiall s Kopplingsspak f...

Страница 48: ...er v nster f r att ndra utkastarens l ge H ll ned avtryckaren p styrspaken och vrid spaken fram t eller bak t f r att ndra vinkeln avst ndet f r vart sn n slungas Kopplingsspak Pressa in kopplingsspak...

Страница 49: ...i inmatningsk pan slungas ut genom utkastaren Reng ringsverktyget f r utkastaren Anv nd aldrig h nderna f r att rensa en blockerad utkastare St ng av motorn och st bakom handtagen tills alla r rliga d...

Страница 50: ...rr om ing r Differentialsp rren l ses f r max effekt N r differentialsp rren r l sta drivs b da hjulen banden med samma kraft Spaken f r differentialsp rren ligger p undersidan av v nster handtag Tryc...

Страница 51: ...rytaren till ON l ge f r att starta motorn T ndningsl s 12 V start om ing r T ndningsl set anv nds med l stagbar nyckel som har tre l gen STOP RUN och START Elstart startknapp om ing r Elstarten start...

Страница 52: ...kruven Justera medarna 1 Lossa de fyra sexkantmuttrarna tv p varje sida och l sskruvarna F r medarna till nskat l ge 2 S kerst ll att medarnas hela undre yta ligger an mot underlaget f r att undvika o...

Страница 53: ...t lossa den bakre justeringsmuttern och dra t den fr mre justeringsmuttern mot f stet tills l ssp rren griper in i v xelt nderna Om utkastaren inte g r att frisl ppas Dra t kabeln genom att lossa just...

Страница 54: ...den Om maskinen drar mot v nster trots att man k r rakt fram sp nn det v nstra bandet Om maskinen drar sig mot h ger sp nn det h gre bandet Justera sp nningen genom att dra t fl nsmuttern framf r band...

Страница 55: ...ing inte beh vs p dessa motorer 1 Anslut f rl ngningskabeln p motorn 2 Anslut n tsladdens andra nda till ett skyddsjordat v gguttag 3 Tryck startknappen tills motorn startar F r att f rhindra skador p...

Страница 56: ...n g i tomg ng under n gra minuter Sn slungning Det r l ttare och effektivare avl gsna sn n direkt efter sn fall Den b sta tiden f r sn r jning r tidigt morgon D r sn n oftast torr och har inte blivit...

Страница 57: ...85 95 EP v xelolja Anv nd inte syntetiska oljor Allm n sm rjning Sm rj alla r rliga delar av maskinen l tt i slutet av s songen eller efter varje 25 driftstimmar L t inte fett eller olja komma i konta...

Страница 58: ...rant motorns och sn slungans utv ndiga ytor 5 Reng r alla rostade ytor eller ytor d r f rgen flakar slip ytorna f re m lning och anv nd rostskyddsmedel f r att skydda om lade metallytor fr n rostning...

Страница 59: ...adad g r enligt f ljande f r att byta remmen 1 T m br nsletanken helt genom att k ra motorn tills den stannar Avl gsna startnyckeln f r att undvika oavsiktlig start och l t maskinen kylas ner helt 2 L...

Страница 60: ...na startnyckeln dra loss t ndningskabeln och l t maskinen svalna helt 2 Demontera remskyddet 3 Demontera skyddet f r utkastaren och koppla loss kabeln fr n utkastaren styrpl ten och utkastarstaven 4 D...

Страница 61: ...vens k pa 3 Demontera det fr mre skyddet fr n botten av sn slungan genom att lossa skruvarna f r skyddet 4 D ckmodeller Demontera hjulen fr n h gersida genom att ta bort l ssprinten fr n axeln Lossa f...

Страница 62: ...inte skadar g ngorna p axeln Demontera den andra lagringen fr n ramens v nstersida genom att lossa l sringen Lossa den andra l sringen p den sexkantiga axelns h gra sida F r den sexkantiga axeln f rs...

Страница 63: ...moment av 90 Nm 130 Nm 4 F r in friktionshjulenheten tillbaka p den sexkantiga axeln S kerst ll att tappen f r v xel verf ring sitter p sin plats i lagerhuset F lj f reg ende steg i omv nd ordning f...

Страница 64: ...ill FAST l ge eller brytaren till ON l ge 6 Anslut och f st t ndstiftskabeln 7 Fyll tanken med nytt och rent br nsle 8 Reng r justera glappet eller byt ut 9 Stoppa in startnyckeln 10 P fyll eller tapp...

Страница 65: ...F r mycket sn 9 F rs ket att r ja mycket tungt eller bl t sn 10 Sn skruven har frusit fast 1 Avl gsna blockeringen ur utkastaren 2 Avl gsna skr p eller fr mmande f rem l fr n sn skruven eller l phjul...

Страница 66: ...cm3 Fuel unleaded gasoline 98 octane or higher Fuel tank volume 6 L Oil type SAE10W 30 Oil tank volume 1 1 L Gears 6 forward 2 reverse Working width 720 mm Working height 535 mm Max blowing distance...

Страница 67: ...nual and labels affixed to the machine Learn its application and limitations as well as the specific potential hazards peculiar to it Be thoroughly familiar with the controls and their proper operatio...

Страница 68: ...imes This enables better control of the machine in unexpected situations Avoid accidental starting Be sure the engine s throttle control is off before transporting the machine or performing any mainte...

Страница 69: ...the engine governor settings or over speed the engine The governor controls the maximum safe operating speed of the engine Do not put hands or feet near rotating parts Avoid contact with hot fuel oil...

Страница 70: ...e property damage can occur Do not operate near drop offs ditches or embankments Machine can suddenly turn over if a wheel is over the edge of a cliff or ditch or if an edge caves in Keep all bystande...

Страница 71: ...y making any adjustments or inspections Hand contact with the rotating parts inside the discharge chute is the most common cause of injury associated with snow blowers Do not unclog chute assembly whi...

Страница 72: ...been removed from the carton you should have All references to the left or right side of the snow blower are from the operator s position 1 Snow Blower Unit 2 Discharge Chute 3 Handlebars 4 Lower Hand...

Страница 73: ...hey are finger tight 4 Ensure that the handles are at the same height and then tighten the fasteners securely Tires The tires are over inflated at factory for shipping purposes Check the pressure in t...

Страница 74: ...skid shoes down as far as possible Be sure both skid shoes are adjusted evenly Tighten securely Discharge Chute 1 Grease underside of discharge chute ring if not already greased 2 Install discharge ch...

Страница 75: ...harge chute straight ahead 10 To ensure the discharge chute and chute deflector follow their full range of travels make sure the joystick is in the center position 11 Slide chute rod without a pin thr...

Страница 76: ...fter the shift rod with a flat washer has been inserted through the hole in the shift arm add the other flat washer on the shift rod and secure with a clevis pin 3 Lift up on the shift rod Loose the j...

Страница 77: ...ace until needed Battery if so equipped 1 Remove the battery cover by loosening the screw and nut 2 Connect positive red battery cable to the battery terminal first then negative black battery cable C...

Страница 78: ...KNOW YOUR MACHINE Features and Controls Model XTP121 NOTE Some of these parts are not standard accessories so they might be missing from the Snow blower model you have purchased...

Страница 79: ...Model XTP122 NOTE Some of these parts are not standard accessories so they might be missing from the Snow blower model you have purchased...

Страница 80: ...the discharge chute and chute deflector into position To change the chute position hold the trigger cap down on the joystick and pivot the joystick to the right or to the left To change the angle dis...

Страница 81: ...to the auger housing is discharged out the discharge chute Chute Clean Out Tool Never use your hands to clear a clogged discharge chute Shut off engine and remain behind handles until all moving parts...

Страница 82: ...cked power is applied equally to both wheels tracks The differential lock trigger is located on the underside of the left handle Squeeze the trigger to release the differential lock for easier turning...

Страница 83: ...UN and START Electric Starter Start Button if so equipped The electric starter will start a properly choked and cranked engine when the key is turned 12V DC or start button 120V or 230V AC is pushed T...

Страница 84: ...r damage to auger housing To adjust the skid shoes 1 Loosen the four hex nuts two on each side and carriage bolts Move skid shoes to desired position 2 Make sure the entire bottom surface of skid shoe...

Страница 85: ...chute does not unlock Tighten the cable by loosening the forward adjustment nut and then tightening the rear adjustment nut against the bracket until all cable slack is removed Deflector Control If d...

Страница 86: ...ck nut on the front of track side plate This pulls the J bolt attached to the axle and tightens the tracks OPERATION Freewheeling and Self Propelling Left wheel equipped with the axle lock pin can be...

Страница 87: ...han 5 continuous seconds each time you try to start Wait 10 seconds between each attempt 8 When the engine starts release the starter button and slowly move the choke control to the FULL position 9 Di...

Страница 88: ...h successive path to ensure all snow will be removed For large areas start tin the middle and throw snow to each side so snow is not cleared more than once For extremely heavy snow reduce the width of...

Страница 89: ...ion drive and cause the traction drive belt to slip When lubricating auger shaft remove shear pins to apply oil inside the shaft and around spacers and flange bearings found at either end of the shaft...

Страница 90: ...ing and use a rust preventative to prevent the metal parts from rusting 6 Tighten all loose screws bolts and locknuts Repair or replace any damaged parts 7 Cover the machine and store it in a clean dr...

Страница 91: ...order Drive Belt If the drive belt becomes worn oil soaked or otherwise damaged proceed as follows to replace the belt 1 To prevent spillage remove all fuel from tank by running engine until it stops...

Страница 92: ...me assembly to replace belts 1 Shut off engine remove key disconnect spark plug wire and allow unit to cool completely 2 Remove belt cover 3 Remove chute gear cover and disconnect chute lock cable def...

Страница 93: ...the auger housing 3 Remove the frame cover s from the underside of the snow blower by removing the screws which secure the cover s 4 On wheeled model remove the right hand wheel by removing the axle l...

Страница 94: ...other bearing from the right hand side of the frame by removing the snap ring Remove the other snap ring from the right hand side of the hex shaft Carefully position the hex shaft downward and to the...

Страница 95: ...ates are secured with equal force between 90 Nm and 130 Nm 4 Slide the friction wheel assembly back onto the hex shaft Make sure the shift lever pin is in place in the bearing housing Follow the steps...

Страница 96: ...ion key 10 Add or drain oil to adjust the oil level in the engine crankcase Engine idles or runs roughly 1 Engine running on CHOKE 2 Fuel tank is nearly empty or stale fuel 3 Contaminated fuel supply...

Страница 97: ...t drive control cable 4 Replace auger belt 5 Replace with new shear pin s 6 Move throttle to FAST position 7 Shift into a lower gear 8 Reduce speed and width of swath 9 Do not overload with extremely...

Страница 98: ...__________ Harri Altis ostop llikk valtuutettu kokoamaan teknisen tiedoston EG f rs kran om verensst mmelse vers ttning av original EG f rs kran om verensst mmelse Vi Isojoen Konehalli Oy Keskustie 26...

Страница 99: ...inaisuuksia muutetaan ilman valmistajan suostumusta EU vaatimustenmukaisuusvakuutus lakkaa olemasta voimassa ja takuu raukeaa Isojoen Konehalli Oy ei vastaa laitteen k yt st aiheutuvista v litt mist t...

Отзывы: