background image

TARGA TM-2100

English

2

Troubleshooting

With the numerous connector jacks and controls of the TARGA TM-2100 it is not easy 

for a newcomer who may even find themselves lost in the jumble of cables. Read the 

following section and if necessary the relevant section on connectors or operation of the 
controls again, and try to solve any problems with these basic solution ideas.

Problem

Possible cause

Solution

No sound

The mixing console 
is powered off.

Power on the mixing console. Press the POW-

ER switch on the back panel of the device.

Connect the power adapter firmly to the mix

-

ing console and a properly-functioning power 
socket.

The power adapter 
may not be properly 
connected.

Connect the power adapter firmly to the mix

-

ing console and a properly-functioning power 
socket.

Sound source con-
nected wrongly.

Connect the sound source (microphone, in

-

strument, input device) to the correct input 
jack.

Control on mini

-

mum.

Adjust the input levels with the corresponding 

TRIM and LEVEL controls of the channels to 

which the corresponding devices have been 
connected.
Also adjust the output level of the mixing 

signal using the MAIN L/R control (5) on the 

lower right of the mixing console.

Humming or 
crackling noises

Faulty grounding

It is possible that the earth wire of one or 

several connectors or cables is loose. Pull the 
connectors out of the jacks one at a time to 

find out which cable is causing the noise dis

-

turbance. Use another cable for connection.

Turn the TRIM and LEVEL controls of all input 

channels on which NO devices are connected 
anti-clockwise as far as they will go.

You can only 
hear one stereo 
channel

Wrong balance

Turn the PAN or BALANCE controls of the 

corresponding channels until you can hear the 
sound on both stereo channels.

Sound very dis-
torted

Signal overboost

Check the level indicators (4). Adjust the out

-

put level (MAIN L/R control in the lower right 

corner) so that the indicator does not hit the 
red area.
Adjust the levels of the individual input chan-

nels (TRIM controls) so that the PEAK indica

-

tor of each channel only lights occasionally, 
not continuously.

Содержание TM-2100

Страница 1: ...mation Update 08 2008 Ident No 082008 GB IE CY MT TARGA GmbH Lange Wende 41 D 59494 Soest Art Nr 16374 Sound Mixer Sound Mixer Operation and Safety Notes 4722_Musik Mischpult_GB indd 1 2 07 08 2008 16...

Страница 2: ...Front Panel Connector Jacks see page 6 Rear Panel see page 8 Controls see page 12 Master Control Panel see page 14...

Страница 3: ...y never be immersed do not place any objects filled with liquids such as vases or drinks near the device no fire sources e g burning candles are placed on or near the device no foreign bodies are intr...

Страница 4: ...from the wall outlet In this case the device should not be used further and should be inspected by authorized service personnel Please contact qualified personnel when servicing is needed Never open t...

Страница 5: ...um permitted noise level is 100 dB Using the loudspeakers headphones at a higher sound volume can damage your hearing and cause nuisance to your surroundings The output voltage on the HEAD PHONE jack...

Страница 6: ...ts 4 Features and Characteristics 5 Overview 6 Jacks and Controls 6 Getting Started 9 Installation Location 9 Connecting Audio Devices 10 Connecting the Power Adapter 11 Powering On the Mixing Console...

Страница 7: ...channel out put From there the stereo signal can be forwarded to an external sound effect device e g reverb effect and then fed into the Return AUX input of the TM 2100 Please check that delivery con...

Страница 8: ...red via the Phantom power supply when optionally powered on via the microphone input The mixing console has INSERT jacks for the input channels 1 and 2 Via these jacks the signals of various effect pr...

Страница 9: ...NING Never connect two devices at the same time to the same input channel For example do not connect the first to a Cinch input 2 and the other device via a phone jack of the same channel 3 AUX RETURN...

Страница 10: ...he connection of external devices such as for example amplifiers You can adjust the levels of the mixed signals to these jacks via the MAIN L R control 27 of the master control panel 9 EFX out phone j...

Страница 11: ...To do this first plug in and gently turn the outside metal ring clockwise till tight WARNING When operating your TARGA TM 2100 mixing console use only the sup plied adapter and never use the adapter...

Страница 12: ...g console you should select a suitable location On the one hand it should be comfortable to operate and on the other hand the numerous con nected cables and devices should never be in anyone s way Tak...

Страница 13: ...find the allocation of the jacks as well as the possible connectors with some examples of devices and cables that typically occupy such con nector plugs You will find some practical examples of use in...

Страница 14: ...ble of the power adapter that no body can trip over it TIP When not using the audio mixer for a long time we recommend that you discon nect the power adapter from the mains in order to cut any power c...

Страница 15: ...Q signal and lights red when the level reaches 5dB below the clipping level For stereo channels with XLR jacks 3 4 and 5 6 it measures the post EQ level and the pre amplified mic levels The display li...

Страница 16: ...the different frequency bands and the possible boosting cutting Controls Curve Base frequency Maximum boost cut LF Shelving 80 Hz 12 dB MF Peaking 2 5 kHz 12 dB HF Shelving 12 kHz 12 dB 19 AUX control...

Страница 17: ...der from the center position position 5 up to approx posi tion 8 maximum Master Control Panel In the Master Control Panel you can find the controls that simultaneously affect all channels the level in...

Страница 18: ...can adjust the levels of the signal that is directed from the TAPE IN 4 jacks on the Stereo bus Mixing the Sound Signals Before you can mix the signals of the different sound sources you must correct...

Страница 19: ...tively you can use the recording possibilities of the computer to compile radio plays remixes etc with your TARGA TM 2100 If your sound source has a LINE standard output if necessary read the manual o...

Страница 20: ...he mic inputs and the instruments to the Mono e g E guitar or Stereo phone jacks e g synthesizer Connect the recording device e g DAT to the REC OUT stereo output 5 To listen to the results connect th...

Страница 21: ...s one For output however you connect the mixing console to an amplifier and not to a recording device As a DJ you simply replace the stereo instrument for a tape deck CD player or similar device If ne...

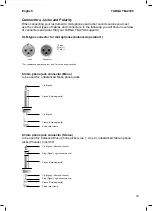
Страница 22: ...onnector For unbalanced operation pins 1 and 3 must be short circuited 6 3mm phone jack connector Mono to be used for unbalanced Mono phone jacks Tip Signal Sleeve Shielding earth Tip Signal Sleeve Sh...

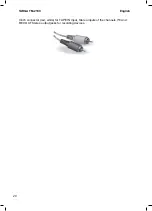
Страница 23: ...TARGA TM 2100 English 20 Cinch connector red white for TAPE IN input Stereo inputs of the channels 7 8 and REC OUT Stereo output jacks for recording devices...

Страница 24: ...ith the corresponding TRIM and LEVEL controls of the channels to which the corresponding devices have been connected Also adjust the output level of the mixing signal using the MAIN L R control 5 on t...

Страница 25: ...rol indicator Peak LED for channels 1 2 3 4 5 6 5dB before clipping level Control indicator 2 x 10 LEDs for Stereo output signal Phantom power 48V for channels 1 2 3 4 5 6 to connect con denser microp...

Страница 26: ...TARGA TM 2100 English 23 Block Diagram...

Страница 27: ...TARGA TM 2100 English 24 Manufacturer TARGA GmbH Lange Wende 41 59494 Soest Germany...

Страница 28: ...of purchase Manufacturer TARGA GmbH Postfach 2244 D 59482 Soest www targa online com UK 1191514 Important warranty information Dear Customer Thank you for purchasing a TARGA product Please carefully...

Отзывы: