background image

Installazione

Guida di avvio rapida

8

Collegamento della stampante

Verificare che la stampante sia impostata sul valore di tensio-
ne corretto (ad esempio 220–240 V in Europa, 120 V negli 
Stati Uniti). A questo proposito, vedere la targhetta presente 
in corrispondenza della presa di rete sul retro della stampan-
te.

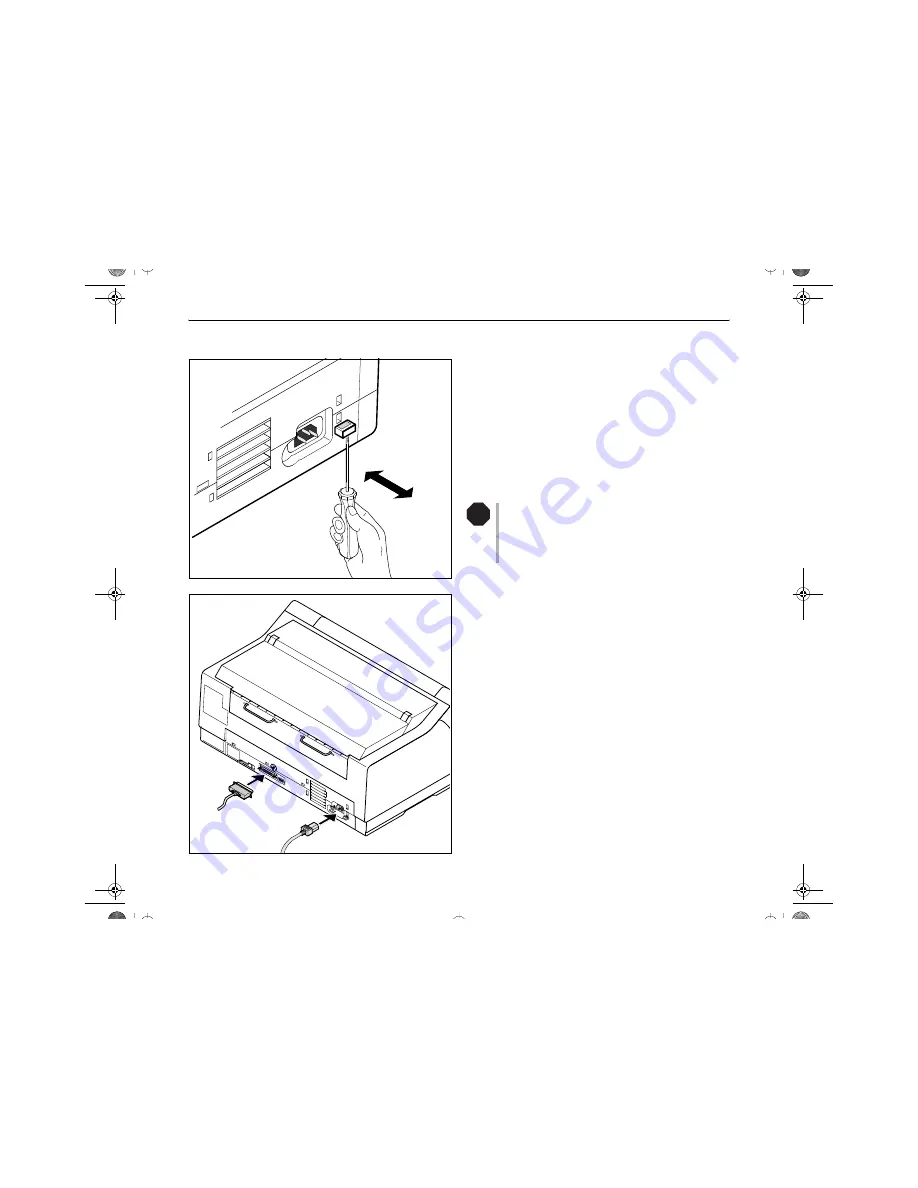
Se la stampante non è impostata sul valore di tensione corret-
to, impostare in maniera adeguata l’interruttore colorato po-
sto sul retro dell’apparecchio servendosi di un oggetto 
appuntito (ad esempio un cacciavite, una penna a sfera o del-
le pinzette).

Prima di impostare la tensione, verificare che la 
stampante sia spenta, altrimenti possono verificar-
si seri danni. Non accendere mai la stampante se il 
valore di tensione impostato non è corretto; rischio 
di seri danni.

Verificare che la stampante e il computer siano spenti e col-
legarli con l’apposito cavo di trasmissione dati.

Collegare il cavo di rete, come mostrato nella figura, al con-
nettore della stampante. Inserire quindi il connettore del cavo 
di rete in una presa di alimentazione.

120

V

STOP

Quick Start-it.fm  Seite 8  Donnerstag, 17. Juni 2004  9:40 09

Содержание LA800

Страница 1: ...inter Kurzanleitung Matrixdrucker Guide de d marrage rapide Imprimante matricielle Guida di avvio rapida Stampante a matrice Gu a de instalaci n Impresora matricial LA650 LA800 U1 2 multi fm Seite 1 D...

Страница 2: ...ules which are designed to provide reasonable protection against such interference in a residential installation However there is no guarantee that interference will not occur in a partial installatio...

Страница 3: ...t mode 5 View from the rear 5 Installation 6 Unpacking the printer 6 Placing your printer 7 Connecting the printer 8 Switching on the printer 9 Control panel 10 Online mode 10 Offline mode 10 Setup mo...

Страница 4: ...etting the first printing line TOF 27 Setting the print head gap 28 Selecting character density and font 29 Printing out status page 30 Technical data 31 Printer specifications 31 Paper specifications...

Страница 5: ...re starting up your printer in order to prevent injuries and avoid damage to the device Keep this Quick start guide in a place which is easily accessible at all times Place the printer on a solid and...

Страница 6: ...For Windows 95 98 Windows ME Windows NT 4 Windows 2000 XP Additional documentation Programming instructions and descriptions of the available options If your CD ROM is be defective or missing please c...

Страница 7: ...or mode Printer in single sheet mode View from the rear Interface connectors Power cord connector Single sheet feeder Paper guide Rear cover Paper support Tractors Bottom cover Front cover Soundproofi...

Страница 8: ...out of the cardboard box towards you and remove the remaining packaging material Check the printer for any visible transport damage and miss ing items In addition to this Quick start guide the CD ROM...

Страница 9: ...ng the printer location observe the following additional instructions Never place the printer in the vicinity of inflammable gas or explosive substances Do not expose the printer to direct sunlight If...

Страница 10: ...rewdriver ball pen or tweezers Make sure that the printer is switched off before setting the correct voltage otherwise severe dam age Never switch on the printer if the voltage setting is incorrect si...

Страница 11: ...ion 9 ENGLISH Switching on the printer The power switch for switching on the printer is located at the bottom left at the front of the printer when viewed from the front Quick Start en fm Seite 9 Donn...

Страница 12: ...ded paper will be transported to printing position If the printer is set to online mode by pressing the Online key again the printer transports the paper in tear position Please consider that your pri...

Страница 13: ...ets the Tear position first printing line and print head gap Paprpath key 3 Sets the Paper path Char key 4 Font and number of characters per inch Access to the other menu settings Menu may be dependin...

Страница 14: ...utomatic preparations for ribbon changing widening the print head gap Move the paper to the park position Open the printer top cover Cautiously slide the print head carriage to the left stop viewed fr...

Страница 15: ...friction tabs on the right and on the left into the direction of the respective arrows shown in the figure and raise the friction mechanism Remove the used cassette We recommend use of genuine ribbon...

Страница 16: ...d insertion tongue A Insert the coloured ribbon tension knob into the right hand front location of the new ribbon cassette Turn the knob in the direction of the arrow in order to take up slack of the...

Страница 17: ...port transparent plastic plate Align and insert the cassette into the guides on the left and right then press down until it clicks into place Insert the coloured tension knob into one of the two loca...

Страница 18: ...nd forth several times If the ribbon is correctly seated there must be no perceptible resistance The ribbon should be transported during the travel from left to right If this is not the case you shoul...

Страница 19: ...Quick start guide Changing the ribbon cassette 17 ENGLISH Press the friction mechanism down until it clicks into place Close the top cover Quick Start en fm Seite 17 Donnerstag 17 Juni 2004 9 36 09...

Страница 20: ...d to the tear position The text Tear paper off appears in the display After having torn off the paper press any key If a single sheet is loaded in the printer it is ejected Use one of the marked keys...

Страница 21: ...and single sheets For information on the supported paper sizes please refer to page 32 Paper specifications Only use dust free or low dust paper Many paper qualities are suitable for this printer For...

Страница 22: ...t to the paper width Insert the fanfold paper into the right hand tractor Make sure that it is inserted by the same length as on the left hand tractor in order to avoid any paper jam Close the tractor...

Страница 23: ...nt cover Switch the printer on The active paper source Front1 tractor 1 appears in the display The paper is automatically loaded when the printer is in online mode and receives data from the computer...

Страница 24: ...he printer is set to single sheet mode If nec essary change the paper type see Changing the paper type page 18 Press the latch at the middle of the front cover The single sheet input tray opens downwa...

Страница 25: ...several ways Make sure that the printer is in offline mode Pause press the Online key if necessary Key Park 1 If fanfold paper is loaded in the printer it is fed to the park posi tion or the tear pos...

Страница 26: ...de Ready If necessary press the On line key Press the Tear 4 key The printer moves the perforation edge of the fanfold paper to the tear edge of the top cover After having torn off the paper press the...

Страница 27: ...de Pause press the Online key if necessary Press the Park 1 key If fanfold paper is loaded in the printer it is fed to the tear position The text Tear paper off appears in the display Then press any k...

Страница 28: ...key Swing the soundproofing cover towards the front see Printer at a glance page 5 The tear edge is located at the front side of the paper output opening Press the 2 or 3 key to move the perforation...

Страница 29: ...e TOF 3 key The paper is fed to the position where the bottom edge of the first printing line A is aligned with the tear edge B of the printer The factory setting for the first printing position TOF i...

Страница 30: ...c gap adjustment function must be set to ON For more de tailed information refer to the User guide on the Online CD ROM Press the Setup key The printer changes to setup mode Press the Adjust 2 key Pre...

Страница 31: ...ssed the Font 2 key use the 2 or 3 key to select the desired font Confirm the selection by pressing the Set key You can cancel the selection and leave the setting unchanged by pressing the Exit 4 key...

Страница 32: ...per source default is Tractor1 Keep the key 4 depressed for approx 5 seconds while turning on the printer After completion of the initialization the printer pulls the paper in print po sition and begi...

Страница 33: ...cps Printing rate 540 pages h 9 pages min ECMA 600 pages h 10 pages min ECMA Character densities 10 cpi 12 cpi 15 cpi 17 1 cpi 20 cpi Max resolution horizontal 360 dpi vertical 360 dpi Emulations ESC...

Страница 34: ...ms Single set of forms requires individual testing Paper weight No of copies Form thickness max 60 120 g m2 1 6 0 60 mm Single sheet feeder Single sheets Single set of forms requires individual testin...

Страница 35: ...im Einzelblattbetrieb 5 Ansicht von hinten 5 Installation 6 Drucker auspacken 6 Drucker aufstellen 7 Drucker anschlie en 8 Drucker einschalten 9 Bedienfeld 10 Online Modus 10 Offline Modus 11 Setup M...

Страница 36: ...27 Druckkopfabstand einstellen 28 Zeichendichte und Schriftart w hlen 29 Statusseite beim Einschalten ausdrucken 30 Technische Daten 31 Druckerspezifikationen 31 Papierspezifikationen 32 Daten zur La...

Страница 37: ...ie den Drucker in Betrieb nehmen Dadurch sch tzen Sie sich und vermeiden Sch den an dem Ger t Bewahren Sie diese Kurzanleitung an einem jederzeit zug nglichen Ort auf Den Drucker auf stabilem und eben...

Страница 38: ...smerkmale Treiber f r Windows 95 98 Windows ME Windows NT 4 Windows 2000 XP weitere Dokumentationen Programmieranleitungen und Beschreibung der Optionen F r den Fall da die CD ROM fehlerhaft ist oder...

Страница 39: ...Einzelblattbetrieb Ansicht von hinten Schnittstellenanschl sse Netzanschlu buchse Einzelblattzuf hrung Randsteller Hintere Abdeckung Papierst tzen Traktoren Untere Abdeckung Vordere Abdeckung Schalld...

Страница 40: ...s dem Karton herausziehen und die restliche Verpackung entfernen berpr fen Sie den Drucker auf sichtbare Transportsch den und Vollst ndigkeit Neben dieser Kurzanleitung mu die CD ROM befindet sich auf...

Страница 41: ...de Punkte Stellen Sie den Drucker keinesfalls in der N he von leicht entz ndlichen Gasen oder explosiven Stoffen auf Den Drucker keiner direkten Sonneneinstrahlung aussetzen L t es sich nicht vermeide...

Страница 42: ...instellen Vor der Einstellung der richtigen Spannung sicher stellen da der Drucker ausgeschaltet ist da sonst schwere Sch den auftreten k nnen Niemals den Drucker einschalten wenn er nicht auf die ric...

Страница 43: ...9 DEUTSCH Drucker einschalten Der Netzschalter mit dem der Drucker eingeschaltet wird befindet sich von vorne aus betrachtet links unten auf der Vorderseite des Druckers Quick Start de fm Seite 9 Donn...

Страница 44: ...llel oder seriell an weitere Informationen finden Sie im Benutzerhandbuch auf der Online CD ROM Taste Load 4 Zeigt das an da kein Papier im Drucker ist oder der Drucker sich in Parkposition befindet I...

Страница 45: ...etup Schaltet den Drucker in den Setup Modus Taste Online Schaltet den Drucker Online Setup Modus In diesem Modus sind folgende Einstellungen m glich Taste Setup Setzt den Drucker in den Setup Modus i...

Страница 46: ...Druck kopfabstand vergr ern ausf hren kann Fahren Sie das Papier in Parkposition Die obere Abdeckung des Druckers aufklappen Den Druckkopfschlitten vorsichtig bis zum Anschlag nach links von der Druck...

Страница 47: ...ieber der Friktion wie im Bild gezeigt nach links in Pfeilrichtung bewegen und die Friktion nach oben klappen Die verbrauchte Kassette herausnehmen Wir empfehlen die Benutzung von Original Farb bandka...

Страница 48: ...Die farbige Einlegehilfe A anheben Den farbigen Spannknopf in rechte vordere Aufnahme der neuen Farbbandkassette setzen Den Knopf in Pfeilrichtung drehen um das Farbband zu spannen A Quick Start de f...

Страница 49: ...Kunststoffscheibe einf deln Die Kassette parallel in ihre F hrung einlegen und nach unt en dr cken bis sie einrastet Den farbigen Spannknopf in eine der beiden Aufnahmen ein setzen Durch Drehen des S...

Страница 50: ...ls hin und herbewegen Sitzt das Farbband richtig darf kein Widerstand sp rbar sein Bei der Bewegung von links nach rechts wird das Farbband transportiert Wenn dies nicht der Fall ist sollten Sie pr fe...

Страница 51: ...Kurzanleitung Farbbandkassette wechseln 17 DEUTSCH Die Friktion nach unten dr cken bis sie einrastet Die obere Abdeckung schlie en Quick Start de fm Seite 17 Donnerstag 17 Juni 2004 9 58 09...

Страница 52: ...t In der Anzeige erscheint Papier abrei en Dann eine beliebige Taste dr cken Befindet sich ein Einzelblatt im Drucker wird es ausge worfen Mit einer der markierten Tasten den gew nschten Papierweg w h...

Страница 53: ...n betrieben werden Informationen ber zul ssige Papierformate finden Sie auf Seite 32 Pa pierspezifikationen Bitte verwenden Sie nur staubfreies bzw staubarmes Papier Viele Papiersorten sind f r diesen...

Страница 54: ...echten Traktors l sen und auf Papierbreite ausrichten Endlospapier in den rechten Traktor einlegen Darauf achten da es auf gleicher H he wie im linken Trak tor liegt da sonst Papierstau auftritt Die T...

Страница 55: ...ordere Abdeckung nach unten klappen Den Drucker einschalten Der aktive Einzugsschacht Trak1 erscheint in der An zeige Papier wird automatisch eingezogen wenn der Drucker im Betriebszustand Online ist...

Страница 56: ...ngestellt ist Gegebenenfalls die Papierart wechseln siehe Papierart wechseln Seite 18 Auf den Druckverschlu in der Mitte der vorderen Abdek kung dr cken Die Einzelblattzuf hrung klappt nach unten auf...

Страница 57: ...er im Betriebszustand Offline Pause befindet gegebenenfalls Taste Online dr cken Taste Park 1 Befindet sich Endlospapier im Drucker wird es auf Parkpositi on oder in Abrei position transportiert Befin...

Страница 58: ...Ready Gegebenenfalls die Taste Online dr cken Die Taste Tear 4 dr cken Der Drucker f hrt die Perforationskante des Endlos papiers an die Abrei kante Nach Abrei en des Papiers die Taste Online dr cken...

Страница 59: ...Taste On line dr cken Die Taste Park 1 dr cken Befindet sich Endlospapier im Drucker wird es in Abrei position transportiert In der Anzeige erscheint Papier abrei en Dann eine beliebige Taste dr cken...

Страница 60: ...r cken Das Schalld mmelement nach vorne klappen siehe Auf einen Blick Seite 5 Die Abrei kante befindet sich auf der Vorderseite des Papieraustritts Durch Dr cken der Taste 2 oder 3 die Perforation in...

Страница 61: ...e Taste TOF 3 dr cken Das Papier wird so weit vortransportiert bis die Unterkante der ersten Druckzeile A auf H he der Abrei kante B des Druckers liegt Werkseitig ist die erste Druckposition auf 12 72...

Страница 62: ...zelheiten dazu finden Sie im Benutzerhandbuch auf der Online CD ROM Die Taste Setup dr cken Der Drucker wechselt in den Setup Modus Die Taste Adjust 2 dr cken Die Taste Kopf 1 dr cken Mit Taste 2 oder...

Страница 63: ...Wurde die Taste Font 1 gedr ckt mit der Taste 2 oder 3 die gew nschte Schriftart ausw hlen Die Auswahl durch Dr cken der Taste Setze 1 best tigen Durch Dr cken der Taste Exit 4 kann die Auswahl ohne n...

Страница 64: ...dardvoreinstellung ist Traktor 1 unbedrucktes Papier eingelegt ist Halten Sie beim Einschalten des Druckers Taste 4 f r ca 5 Sekunden gedr ckt Nach Abschlu der Initialisierung zieht der Drucker das Pa...

Страница 65: ...cps Druckleistung 540 Seiten h 9 Seiten min ECMA 600 Seiten h 10 Seiten min ECMA Zeichendichten 10 cpi 12 cpi 15 cpi 17 1 cpi 20 cpi Aufl sung maximal horizontal 360 dpi vertikal 360 dpi Emulationen...

Страница 66: ...D ROM Endlospapier Traktor1 Einfachformat Formularsatz mu individuell getestet werden Papiergewicht Zahl der Durchschl ge Formularsatzdicke max 60 120 g m2 1 6 0 60 mm Einzelblattzufuhr Einzelblatt Fo...

Страница 67: ...Ger t ist zur Verarbeitung von Recyclingpapier ent sprechend DIN 19 309 geeignet R cknahme von Drucker und Verbrauchsmaterial Unsere Ger te mit Umweltzeichen und Verbrauchsmaterial werden in unserem...

Страница 68: ...urzanleitung 34 Zubeh r Weiteres Zubeh r finden Sie im Benutzerhandbuch auf der Online CD ROM Farbbandkassetten Bestellnummer Farbbandkassette schwarz LA80R KA Quick Start de fm Seite 34 Donnerstag 17...

Страница 69: ...l imprimante 6 Mise en place de l imprimante 7 Connexion de l imprimante 8 Mise sous tension de l imprimante 9 Panneau de commande 10 Mode Online 10 Mode Offline 11 Mode Setup 11 Remplacement de la c...

Страница 70: ...gne d impression TOF 27 R glage de l cartement de la t te d impression 28 S lection de la densit des caract res et de la police 29 Impression de la page de statut 30 Donn es techniques 31 Sp cificatio...

Страница 71: ...de mettre l imprimante en ser vice pour viter de vous blesser et d endommager l imprimante Veiller ce que le pr sent manuel soit toujours parfaitement accessible Placer l imprimante sur un support sta...

Страница 72: ...dows 95 98 Windows ME Windows NT 4 Windows 2000 XP Autres documentations instructions de programmation et description des opti ons Si le CD ROM est d fectueux ou manque contacter votre revendeur La do...

Страница 73: ...en mode feuille feuille Vue de l arri re Connecteurs d interface Prise secteur Alimentation feuille feuille Margeur Capot arri re Guide papier Tracteurs Capot inf rieur Capot avant El ment insonorisa...

Страница 74: ...encreur Sortir vers vous l imprimante du carton d emballage et enlever les restes de l emballage V rifier que l imprimante est compl te et en parfait tat Out re le guide de d marrage rapide le CD ROM...

Страница 75: ...Pour le choix de l emplacement de l imprimante observer ce qui suit Ne jamais placer l imprimante proximit de sources de gaz ais ment inflamma bles ou de substances explosives Eviter d exposer l impr...

Страница 76: ...incette Avant de r gler la tension correcte s assurer que l imprimante est hors tension pour viter de graves endommagements Ne jamais mettre l imprimante sous tension quand elle n est pas r gl e sur l...

Страница 77: ...FRAN AIS Mise sous tension de l imprimante L interrupteur secteur qui sert la mise sous tension de l im primante se trouve sur la face avant de l imprimante en bas gauche vu de devant Quick Start fr f...

Страница 78: ...C indique l emulation choisi de l interface active parall le ou s rie an pour d autres informations consulter le guide d utilisateur sur le CD ROM Online Touche Load 4 Il n y a pas de papier dans l im...

Страница 79: ...ngement de ligne LF appuyer longuement sur la touche changement de page FF Touche Setup commute l imprimante en mode Setup Touche Online commute l imprimante Online Mode Setup Dans ce mode les r glage...

Страница 80: ...t de ruban agrandissement de l cart de la t te d impression Amenez le papier en position de parcage Ouvrir en rabattant le capot sup rieur de l imprimante Pousser avec pr caution le chariot de t te d...

Страница 81: ...placer le poussoir de friction de couleur comme illustr sur la figure dans le sens de la fl che et relever le dispositif de friction D poser la cartouche usag e Nous conseillons l emploi de cassettes...

Страница 82: ...Lever l aide l insertion A Placer la molette de tension de couleur dans le logement de vant droite de la nouvelle cartouche de ruban encreur Tourner la molette dans le sens de la fl che pour tendre le...

Страница 83: ...reur plaque de plastique transparente Introduire la cartouche parall lement dans sa glissi re et l enfoncer vers le bas jusqu ce qu elle s enclenche Introduire la molette de tension de couleur dans un...

Страница 84: ...sieurs fois le chariot de t te d impres sion Quand le ruban encreur est correctement install au cune r sistance ne doit tre perceptible Le ruban encreur est transport au mouvement de gauche droite Si...

Страница 85: ...placement de la cartouche du ruban encreur 17 FRAN AIS Appuyer le dispositif de friction vers le bas jusqu ce qu il s enclenche Fermer la partie avant du capot sup rieur Quick Start fr fm Seite 17 Don...

Страница 86: ...le papier s affiche Apr s coupe du papier appuyer ensuite sur une touche de votre choix Si une feuille simple se trouve dans l imprimante elle est alors ject e Avec une des touches indiqu es Insert 2...

Страница 87: ...e sur du papier feuille feuille Pour des informations concernant les formats de papier autoris s consulter la page 32 Sp cifications du papier Veuillez n utiliser que du papier sans poussi re Plusieur...

Страница 88: ...r le levier de verrouillage du tracteur de droite et l ajuster sur la largeur du papier Charger du papier continu dans le tracteur de droite Veiller ce qu il soit la m me hauteur que dans le tracteur...

Страница 89: ...le capot inf rieur Rabattre le capot avant vers le bas Mettre l imprimante sous tension Le bac de chargement actif Tract 1 s affiche Le papier est charg automatiquement si l imprimante est Online et s...

Страница 90: ...assurer que l imprimante est r gl e sur le mode feuille feuille Si n cessaire changer le type de papier voir Chan gement du type de papier la page 18 Appuyer sur le verrouillage au milieu du capot av...

Страница 91: ...re ap puyer sur la touche Online Touche Park 1 Si du papier continu est charg dans l imprimante il est ali ment dans la position de s paration Si une feuille simple est charg e dans l imprimante elle...

Страница 92: ...n cessaire appuyer sur la touche Online Appuyer sur la touche Coupe 4 L imprimante d place l ar te de perforation du papier continu sur l ar te de s paration Apr s coupe du papier appuyer sur la touch...

Страница 93: ...yer sur la touche Online Appuyer sur la touche Park 1 Si du papier continu se trouve dans l imprimante il est transport en position de s paration Couper le papier s affiche Appuyer ensuite sur une tou...

Страница 94: ...ster 2 Appuyer sur la touche Coupe 4 Rabattre vers l avant l l ment insonorisant voir Vue d ensemble la page 5 L ar te de s paration se trouve l avant de la sortie du papier Appuyer sur la touche 2 ou...

Страница 95: ...2 Appuyer sur la touche TOF 3 Le papier est transport jusqu ce que l ar te inf rieure de la premi re ligne A se trouve la hauteur de l ar te de s para tion B La position de la premi re ligne d impres...

Страница 96: ...ns types de papier La fonction AGA doit tre r gl e sur Oui Pour plus de d tails consulter le gui de d utilisateur sur le CD ROM Online Appuyer sur la touche Setup L imprimante passe en mode Setup Appu...

Страница 97: ...sur la touche Quit 4 permet de quitter la s lection sans modification Si la touche Police 2 est actionn e s lectionner la police souhait e avec la touche 2 ou 3 Valider la s lection en appuyant sur l...

Страница 98: ...de papier active r glage initial Tract 1 Tenez la touche 4 enfonc e pendant environ 5 secondes la fin de l initialisation l imprimante tire le papier en position impression et commence par l impressi...

Страница 99: ...700 cps 330 cps 245 cps 120 cps Capacit d impression 540 pages h 9 pages mn ECMA 600 pages h 10 pages mn ECMA Densit des caract res 10 cpi 12 cpi 15 cpi 17 1 cpi 20 cpi R solution maximale Horizontale...

Страница 100: ...Papier continu tracteur1 Formulaire simple Liasse de formulaires doit tre test e individuellement Grammage Nombre de copies Epaisseur de formulaire maxi 60 120 g m2 1 6 0 60 mm Alimentation feuille f...

Страница 101: ...teriore 5 Installazione 6 Rimozione dell imballaggio 6 Installazione della stampante 7 Collegamento della stampante 8 Accensione della stampante 9 Pannello comandi 10 Modo Online 10 Modo Offline 11 Mo...

Страница 102: ...riga di inizio stampa Top Of Form TOF 27 Regolazione della distanza della testina di stampa 28 Selezione della densit dei caratteri e del font 29 Pagina di stato 30 Dati tecnici 31 Specifiche della st...

Страница 103: ...eguenti indi cazioni In questo modo si possono evitare rischi per la propria incolumit perso nale e danni all apparecchio Conservare la presente guida di avvio rapida in un luogo sempre accessibile Co...

Страница 104: ...s 95 98 Windows ME Windows NT 4 Windows 2000 XP altra documentazione Istruzioni di programmazione e descrizione delle opzioni Se il CD ROM difettoso o non allegato alle istruzioni per l uso rivolgersi...

Страница 105: ...e della stampante per l uso di fogli singoli Vista posteriore Connettori di interfaccia Presa di collegamento alla rete Guida fogli singoli Riscontro bordo Coperchio posteriore Supporti carta Trascina...

Страница 106: ...muovere gli altri elementi dell imballaggio Verificare che la stampante non mostri danni visibili dovuti al trasporto e che non manchi nessun componente della dota zione Oltre alle presente guida di a...

Страница 107: ...uogo di installazione della stampante rispettare le seguenti indicazioni Non collocare la stampante in prossimit di gas facilmente infiammabili o di sos tanze esplosive Non esporre la stampante alla l...

Страница 108: ...chio servendosi di un oggetto appuntito ad esempio un cacciavite una penna a sfera o del le pinzette Prima di impostare la tensione verificare che la stampante sia spenta altrimenti possono verificar...

Страница 109: ...ne 9 ITALIANO Accensione della stampante L interruttore di rete che consente di accendere la stampante posto in basso sul pannello anteriore della stampante vista dal davanti Quick Start it fm Seite 9...

Страница 110: ...ta dell interfaccia attiva parallela o seriale per maggiori informazio ni si rimanda al manuale dell utente sul CD ROM online Tasto Load 4 Significa che nella stampante manca la carta o che la carta i...

Страница 111: ...tasto Avanzamento riga per riga LF Pressione prolungata del tasto Avanzamento di una pagina FF Tasto Setup Commuta la stampante nel modo Setup Tasto Online Commuta la stampante nel modo Online Modo S...

Страница 112: ...to della distanza della testina di stampa Portare la carta nella posizione di parcheggio Aprire il coperchio superiore della stampante Far scorrere con delicatezza il cursore della testina di stampa a...

Страница 113: ...tare il cursore colorato della frizione verso sinistra come mostrato nella figura direzione della freccia e solle vare la frizione Estrarre la cartuccia consumata Utilizzare esclusivamente cartucce co...

Страница 114: ...levare la guida di inserimento colorata A Inserire il pomello tendinastro colorato nel foro anteriore de stro della cartuccia colore Ruotare il pomello nella direzione della freccia per tendere il nas...

Страница 115: ...upporto finestrella in plastica trasparente Inserire la cartuccia parallelamente nella rispettiva guida e spingerla verso il basso in modo da fissarla Inserire il pomello tendinastro colorato in uno d...

Страница 116: ...un lato all altro il cursore della te stina di stampa Se il nastro posizionato correttamente non deve avvertirsi alcuna resistenza Lo spostamento da sinistra verso destra determina il trasporto del n...

Страница 117: ...rapida Sostituzione della cartuccia colore 17 ITALIANO Spingere la frizione verso il basso per fissarla Richiudere il coperchio superiore della stampante Quick Start it fm Seite 17 Donnerstag 17 Juni...

Страница 118: ...ndicazione Strappo carta Dopo avere strappato la carta premere un tasto a piacere Se nella stampante sono caricati fogli singoli ne viene espulso uno Con uno dei tasti indicati dalle frecce selezionar...

Страница 119: ...i Per mag giori informazioni sui formati di carta compatibili si rimanda alla pagina 32 Dati tecnici Utilizzare esclusivamente carta priva di polvere o con un ridotto contenuto di pol vere La stampant...

Страница 120: ...i destro e po sizionarlo in funzione della larghezza della carta Agganciare i moduli continui al trascinamoduli destro Fare attenzione a rispettare la stessa altezza del trascinamo duli sinistro altri...

Страница 121: ...operchio superiore Accendere la stampante Sul display compare il cassetto di alimentazione attivo trascinamoduli Se la stampante nella condizione Online nel momento in cui comincia a ricevere dati dal...

Страница 122: ...mpostata sul funzionamento con fogli singoli Se necessario cambiare il tipo di carta ve dere Cambio del tipo di carta pagina 18 Esercitare pressione al centro del coperchio anteriore La guida fogli si...

Страница 123: ...e secondo modalit diverse Verificare che la stampante si trovi nel modo Offline se necessario premere il ta sto Online Tasto Park 1 Se nella stampante caricata carta a moduli continui questa viene tra...

Страница 124: ...rovi nel modo Online Ready Se necessario pre mere il tasto Online Premere il tasto Stp 4 La stampante posiziona il bordo perforato dei moduli continui in corrispondenza della posizione di strappo Dopo...

Страница 125: ...io pre mere il tasto Online Premere il tasto Park 1 Se nella stampante sono caricati moduli continui questi vengono trasportati nella posizione di strappo Sul display compare l indicazione Strappo car...

Страница 126: ...Premere il tasto Stp 4 Richiudere il calotta insonorizzante vedere Configurazione della stampante pagina 5 La posizione di strappo si trova sul lato anteriore dell uscita della carta Premendo il tast...

Страница 127: ...e il tasto Regolaz 2 Premere il tasto TOF 3 La carta viene trasportata nella posizione in cui il bordo infe riore della prima riga di stampa A coincide con la posizione di strappo B della stampante La...

Страница 128: ...La funzione AGA deve essere impostata su Si Per maggiori dettagli si rimanda al manuale dell utente sul CD ROM online Premere il tasto Setup La stampante si commuta nel modo Setup Premere il tasto Re...

Страница 129: ...Font 2 selezionare il font desiderato con il tasto 2 o 3 Confermare la scelta premendo il tasto OK 1 Premendo il tasto Esci 4 si pu uscire dalla procedura senza apportare alcuna mo difica Premere il t...

Страница 130: ...onte di carta valida regolazione di difetto Trat1 Tenere premuto il tasto 4 per ca 5 secondi Dopo che la compi lazione dell inizio lo stampatore tiri la carta nella posizione di stampa e comincia a st...

Страница 131: ...Capacit di stampa 540 pagine ora 9 pagine min ECMA 600 pagine ora 10 pagine min ECMA Densit caratteri 10 cpi 12 cpi 15 cpi 17 1 cpi 20 cpi Risoluzione massima orizzontale 360 dpi verticale 360 dpi Emu...

Страница 132: ...dell utente sul CD ROM online Trascinamoduli modulicontinui 1 Formato semplice Modulistica multicopia da testare caso per caso Grammatura carta Numero di copie Spessore modulo max 60 120 g m2 1 6 0 6...

Страница 133: ...modo de hojas sueltas 5 Vista desde atr s 5 Instalaci n 6 Desembalar la impresora 6 Colocar la impresora 7 Conectar la impresora 8 Encender la impresora 9 Panel de mando 10 Modo Online 10 Modo Offline...

Страница 134: ...imera l nea de impresi n TOF 27 Ajustar la distancia de cabeza grabadora 28 Seleccionar densidad y fuente 29 P gina del estado 30 Datos t cnicos 31 Especificaciones de la impresora 31 Especificaciones...

Страница 135: ...o antes de poner la impresora en servi cio Con sto se protege Ud a si mismo y evita da ar el equipo Guarde la presente gu a de instalaci n en un lugar de f cil acceso en cualquier momento Ponga la imp...

Страница 136: ...sti cas de rendimiento driver para Windows 95 98 Windows ME Windows NT 4 Windows 2000 XP m s documentaciones instrucciones para la programaci n y una descripci n de las opciones En el caso que el dis...

Страница 137: ...hojas sueltas Vista desde atr s Enchufe de interfaces Enchufe de alimentaci n de red Alimentaci n de hojas sueltas Gu a lateral Tapa trasera Soporte de papel Tractores Tapa inferior Tapa delantera El...

Страница 138: ...rt n hacia delante y quite el resto del material de embalaje Compruebe la impresora en cuanto a da os evidentes de transporte y en cuanto a integridad Adem s de la presente gu a de instalaci n deben e...

Страница 139: ...preste tambi n atenci n en los siguientes puntos Nunca coloque la impresora en la vecindad de gases de f cil inflamabilidad o sunstancias explosivas No exponga la impresora a radiaci n solar directa...

Страница 140: ...dor bol grafo o pinzas Antes de ajustar la tensi n correcta aseg rese de que la impresora est apagada ya que de otra for ma pueden surgir da os graves Nunca encienda la impresora si su ajuste de ten s...

Страница 141: ...OL Encender la impresora El interruptor de la red con el que se enciende la impresora se encuentra visto desde la parte delantera a la izquierda abajo en el frente de la impresora Quick Start sp fm S...

Страница 142: ...o serial para m s informaci n consul te la gu a del usuario en l nea en el disco CD ROM Pulsador Load 4 Significa que no hay papel en la impresora o la impresora est en la posici n de aparcamiento En...

Страница 143: ...pulsador Avance de l nea LF Pulsaci n larga del pulsa dor Avance de p gina FF Pulsador Setup Pone la impresora al modo Setup Pulsador Online Pone la impresora al modo Online Modo Setup En este modo se...

Страница 144: ...cinta alargar la distancia de cabeza de impresi n Transporte el papel en posici n de aparcamiento Abra la cubierta superior de la impresora Empuje con cuidado el carro de cabeza grabadora a la iz qui...

Страница 145: ...asador de color de la fricci n hacia la izquier da en direcci n de la flecha como se muestra en la figura y abra la fricci n hacia arriba Quite el cartucho usado Le recomendamos el uso de cartuchos de...

Страница 146: ...ispositivo de carga A Coloque el bot n tensor colorado en la apertura delantera de la derecha que se encuentra en el cartucho de cinta nuevo Gire el bot n en el sentido de la flecha para tensar la cin...

Страница 147: ...a de material sint tico transparente Introduzca el cartucho paralelamente en su gu a y presione hacia abajo hasta que se engatille Introduzca el bot n tensor colorado en una de las dos apertu ras Tens...

Страница 148: ...es el carro de cabeza grabadora Si la cinta se encuentra en su posici n correcta no se debe sentir ningu na resistencia La cinta se transporta movi ndola de la izquierda a la derecha En el caso que no...

Страница 149: ...stalaci n Cambiar el cartucho de cinta 17 ESPA OL Presione la fricci n hacia abajo hasta que enganche Cierre la parte delantera de la cubierta superior Quick Start sp fm Seite 17 Donnerstag 17 Juni 20...

Страница 150: ...o pulse cualquier pulsador Si se encuentra una hoja suelta en la impresora se la ex pulsa Seleccione el origen de papel deseado con uno de los pulsadores marcados en nuestro ejemplo Sueltas 2 La indic...

Страница 151: ...Para m s in formaciones sobre los tama os de papel admisibles v ase p gina 32 Datos t cni cos S lo utilice papel sin polvo o con poco contenido de polvo Hay muchos tipos de papel que se pueden proces...

Страница 152: ...tractor derecho y aj stelo para alinearlo a la anchura del papel Coloque papel continuo en el tractor derecho Aseg rese de que est posicionado igual como en el tractor izquierdo para evitar cualquier...

Страница 153: ...a tapa delantera Encienda la impresora Aparece el origen de papel activo Tractor1 en el visua lizador Se carga el papel autom ticamente si la impresora est en modo Online y recibe datos del ordenador...

Страница 154: ...a hojas sueltas Si fuese necesario cambie el tipo de papel v ase Cambiar tipo de papel p gina 18 Presione sobre el punto de cierre en el centro de tapa delan tera El dispositivo de alimentaci n de hoj...

Страница 155: ...maneras en la impresora Aseg rese de que la impresora est en estado Offline Si fuese necesario presione el pulsador Online Pulsador Park 1 Si se encuentra papel continuo en la impresora se lo trans p...

Страница 156: ...Si fuese necesario presione el pulsador Online Presione el pulsador Tiro 4 La impresora posiciona la l nea de perforaci n del papel continuo a la hoja de corte Despu s de cortar el papel presione el...

Страница 157: ...fuese necesario presione el pulsador Online Presione el pulsador Park 1 Si se encuentra papel continuo en la impresora se transporta a la posici n de corte Aparece Tire papel en el visualizador Luego...

Страница 158: ...pulsador Tirar 4 Abra la elemento insonoro hacia delante v ase Vista de conjunto p gina 5 La hoja de corte se encuentra en el frente de la salida de papel Por medio del pulsador 2 o 3 ponga la perfora...

Страница 159: ...ador TOF 3 Se avanza el papel hasta que el borde inferior de la primera l nea de impresi n A est alineado con la hoja de corte B de la impresora Se ha ajustado la primera posici n de impresi n a 12 72...

Страница 160: ...encendido Para m s detalles v ase gu a del usuario en el disco CD ROM Presione el pulsador Setup La impresora cambia al modo Setup Presione el pulsador Ajustar 2 Presione el pulsador Ajust 1 Por medio...

Страница 161: ...eleccione la fuente deseada con el pul sador 2 o 3 Confirme la selecci n presionando el pulsador Set 1 Puede cancelar la selecci n presionando Salir 4 Presione el pulsador Setup La impresora vuelve al...

Страница 162: ...el v lida va lor b sico Tractor 1 Mantenga presionado el pulsador 4 por cerca de 5 segundos Despu s de que la terminaci n de la inicializaci n la impresora tire del papel en la posici n de impresi n y...

Страница 163: ...Rendimiento de impresi n 540 p ginas h 9 p ginas min ECMA 600 p ginas h 10 p ginas min ECMA Densidad de caracteres 10 cpp 12 cpp 15 cpp 17 1 cpp 20 cpp Resoluci n m xima horizontal 360 ppp vertical 3...

Страница 164: ...isco CD ROM Papel continuo tractor1 Papel simple Copias m ltiples requieren pruebas individuales Peso de papel N mero de copias Espesor de formulario m x 60 120 g m2 1 6 0 60 mm Alimentaci n hojas sue...

Страница 165: ...n EPSON EPSON ESC P and EPSON P2 are registered trademarks of SEIKO EPSON Corporation IBM IBM XL 24e and IBM XL 24e AGM are trademarks of International Business Machines Corporation MS DOS is a tradem...

Страница 166: ...ted Rutherford Road Basingstoke Hampshire RG24 8PD England U K Phone 44 870 872 2888 Fax 44 870 872 2889 http www tallygenicom co uk CANADA TallyGenicom 125 Traders Boulevard 9 Missisauga Ontario L4Z...

Отзывы: