background image

S

ETTING

 U

P

 Y

OUR

 P

RINTER

2.

9

2

2

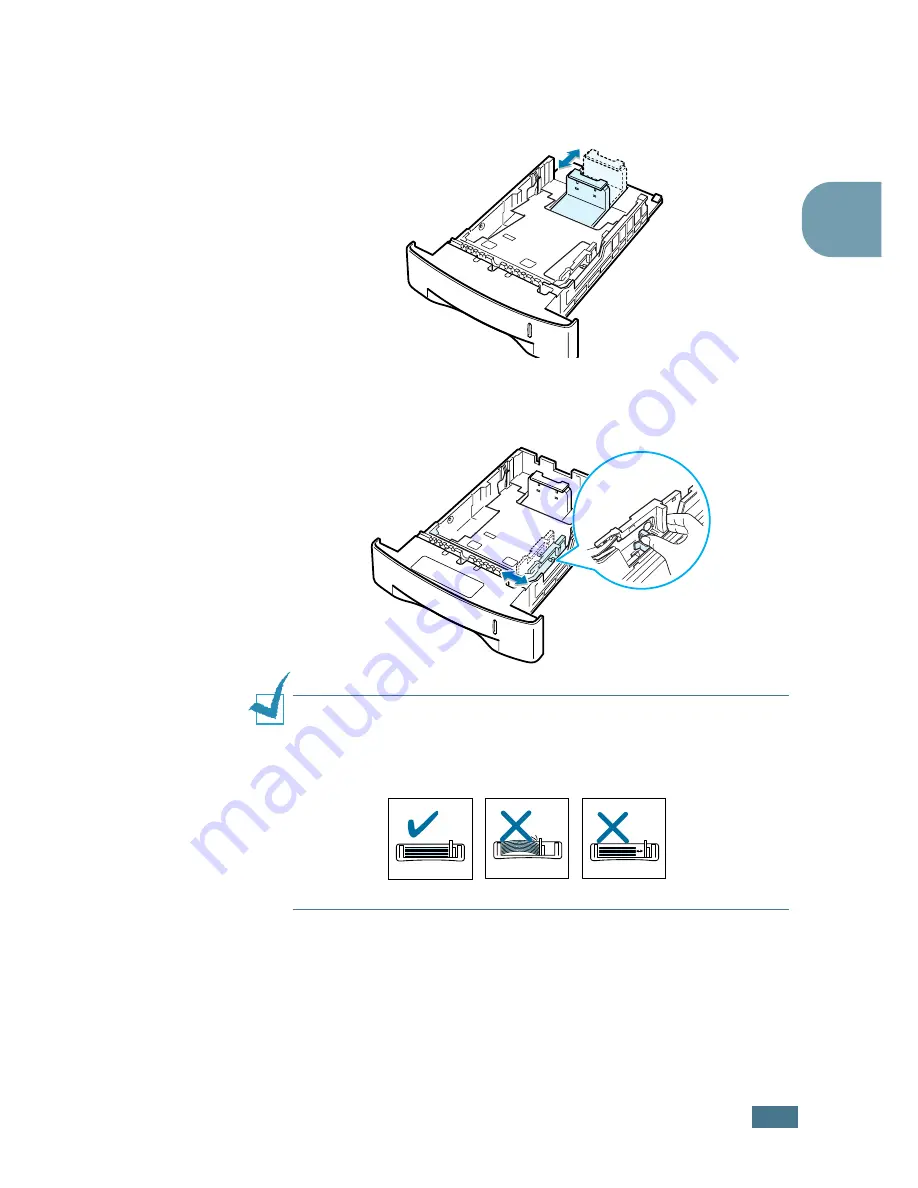
Squeeze the tab on the paper length guide and adjust it, so 
that it fits to the desired paper size marked at the bottom of 
the tray.

3

Squeeze the paper width guide and adjust it to the desired 
paper size marked at the bottom of the tray.

N

OTES

• Do not push the width guide far enough to cause the material to 

warp. 

• If you do not adjust the width guide, it may cause paper jams.

Содержание 9025

Страница 1: ...User Guide Laser Printer TallyGenicom 9025 TallyGenicom 9025N ...

Страница 2: ... are trademarks of Hewlett Packard company Centronics is a trademark of Centronics Data Computer Corporation IBM and IBM PC are trademarks of International Business Machines Corporation Apple AppleTalk TrueType LaserWriter and Macintosh are trademarks of Apple Computer Inc Microsoft Windows Windows 9x Windows Me Windows 2000 Windows NT and Windows XP are registered trademarks of Microsoft Corporat...

Страница 3: ...For Local Printing 2 10 For Network Printing 2 12 Turning the Printer On 2 13 Printing a Demo Page 2 14 Changing the Display Language 2 14 Installing Printer Software 2 15 Printer Driver Features 2 16 Installing Printer Software in Windows 2 17 Installing the USB Driver in Windows 98 Me 2 20 Chapter 3 USING THE CONTROL PANEL Understanding the Control Panel 3 2 Display 3 2 Buttons 3 3 Using Control...

Страница 4: ...ional Tray2 4 8 Using the Multi Purpose Tray 4 8 Using the Manual Feed Mode 4 12 Printing on Envelopes 4 14 Printing on Labels 4 17 Printing on Transparencies 4 19 Printing on Preprinted Paper 4 21 Printing on Card Stock or Custom sized Materials 4 22 Chapter 5 PRINTING TASKS Printing a Document 5 2 Cancelling a Print Job 5 5 Using a Favorite Setting 5 6 Using Help 5 6 Setting Paper Properties 5 7...

Страница 5: ...tributing Toner 6 4 Replacing the Toner Cartridge 6 6 Cleaning the Printer 6 7 Cleaning the Outside 6 7 Cleaning the Inside 6 7 Consumables and Replacement Parts 6 10 Chapter 7 SOLVING PROBLEMS Troubleshooting Checklist 7 2 Solving General Printing Problems 7 3 Clearing Paper Jams 7 7 In the Paper Feed Area 7 7 Around the Toner Cartridge 7 10 In the Paper Exit Area 7 12 In the Duplex Area 7 13 Tip...

Страница 6: ...nstalling PS Drivers B 2 Using PS Printer Driver Features B 4 Accessing Printer Properties B 4 Appendix C PRINTING FROM DOS APPLICATIONS About the Remote Control Panel C 2 Installing the Remote Control Panel C 2 Uninstalling the Remote Control Panel C 3 Selecting Print Settings C 4 Starting the Remote Control Panel C 4 Using the Remote Control Panel Tabs C 5 Appendix D USING YOUR PRINTER ON A NETW...

Страница 7: ...a Network or Serial Interface Card E 6 Installing an Optional Paper Tray E 10 Appendix F SPECIFICATIONS Printer Specifications F 2 Paper Specifications F 3 Overview F 3 Supported Sizes of Paper F 4 Guidelines for Using Paper F 5 Paper Specifications F 6 Paper Output Capacity F 6 Printer and Paper Storage Environment F 7 Envelopes F 8 Labels F 10 Transparencies F 10 ...

Страница 8: ...t considered to be hazardous The laser system and printer are designed so there is never any human access to laser radiation above a Class I level during normal operation user maintenance or prescribed service condition WARNING Never operate or service the printer with the protective cover removed from Laser Scanner assembly The reflected beam although invisible can damage your eyes When using thi...

Страница 9: ... Part 15 of the FCC rules These limits are designed to provide reasonable protection against harmful interference in a residential installation This equipment generates uses and can radiate radio frequency energy and if not installed and used in accordance with the instructions may cause harmful interference to radio communications However there is no guarantee that interference will not occur in ...

Страница 10: ...ne of 20 cm 8 inches separation between the device and the body for use of a wireless device near the body this does not include extremities This device should be used more than 20 cm 8 inches from the body when wireless devices are on The power output of the wireless device or devices which may be embedded in your printer is well below the RF exposure limits as set by the FCC This transmitter mus...

Страница 11: ...minal connection to the analogue public switched telephone network PSTN in accordance with Directive 1999 5 EC The product has been designed to work with the national PSTNs and compatible PBXs of the European countries In the event of problems you should contact the Euro QA Lab of TallyGenicom Computerdrucker GmbH in the first instance The product has been tested against TBR21 and or TBR 38 To ass...

Страница 12: ... be present embedded in your printer system The following section is a general overview of considerations while operating a wireless device Additional limitations cautions and concerns for specific countries are listed in the specific country sections or country group sections The wireless devices in your system are only qualified for use in the countries identified by the Radio Approval Marks on ...

Страница 13: ...ncertain of the sanction to use wireless devices ask the applicable authority for authorization prior to use or turning on the wireless device Every country has different restrictions on the use of wireless devices Since your system is equipped with a wireless device when traveling between countries with your system check with the local Radio Approval authorities prior to any move or trip for any ...

Страница 14: ...1 INTRODUCTION Congratulations on the purchase of your printer This chapter includes Special Features Printer Components ...

Страница 15: ...y2 supports all standard sizes of paper Two output tray select either the top output face down or the rear output tray face up for the most convenient access Straight through paper path capability from the Multi Purpose Tray to the rear output tray Create professional documents You can customise your documents using Watermarks such as Confidential See page 5 18 Print Booklets This feature enables ...

Страница 16: ...ion when not printing This printer meets Energy Star guidelines for energy efficiency Expand the printer capacity This printer has 32 MB of memory which can be expanded to 160 MB An optional Serial interface card allows you to use the serial connection Network interface enables network printing You can add the optional network interface card to TallyGenicom 9025 TallyGenicom 9025N come with a buil...

Страница 17: ...ce TallyGenicom 9025N come with a built in network interface 10 100 Base TX But you need to add the optional network interface card to TallyGenicom 9025 Printer Features The table below lists a general overview of features supported by your printer S Standard O Option Features TallyGenicom 9025 TallyGenicom 9025N IEEE 1284 S S USB 2 0 S S Network Interface O S Wireless LAN O O PostScript Emulation...

Страница 18: ...Face down Control Panel see page 3 2 Tray1 500 sheet paper feeder Toner cartridge Top Cover Paper level indicator Control board cover needed to access the control board to install printer options Multi Purpose Tray Output Support Optional Tray2 500 sheet paper feeder ...

Страница 19: ... Parallel port USB port Power switch Network port TallyGenicom 9025 Option Wireless network antenna port Option Rear output tray Face up Optional Tray2 cable connector Power receptacle The figure above shows a TallyGenicom 9025N ...

Страница 20: ...setting up your printer This chapter includes Unpacking Installing the Toner Cartridge Loading Paper Connecting a Printer Cable Turning the Printer On Printing a Demo Page Changing the Display Language Installing Printer Software SETTING UP YOUR PRINTER ...

Страница 21: ...ith the following items NOTES If any items are missing or damaged notify your dealer immediately Components may differ from one country to another The CD ROM contains the printer driver the User s Guide and the Adobe Acrobat Reader programme 2 Carefully remove all of the packing tapes from the printer Toner Cartridge Power Cord CD ROM Setup Guide ...

Страница 22: ... Allow extra space for opening covers and trays The area should be well ventilated and away from direct sunlight or sources of heat cold and humidity Do not set the printer close to the edge of your desk or table Clearance Space Front 482 6 mm enough space so that trays can be removed Back 320 mm enough space to allow opening of the rear cover Right 100 mm Left 100 mm enough space for ventilation ...

Страница 23: ...ght scratch the drum of the cartridge 3 Locate the sealing tape at the end of the toner cartridge Carefully pull the tape completely out of the cartridge and discard it NOTE The sealing tape should be longer than 550 mm when correctly removed Holding the toner cartridge pull the sealing tape straight to remove it from the cartridge Be careful not to cut the tape If this happens you cannot use the ...

Страница 24: ...ge to light for more than a few minutes Cover it with a piece of paper if left exposed for more than a few minutes If toner gets on your clothing wipe it off with a dry cloth and wash clothing in cold water Hot water sets toner into fabric 5 Locate the cartridge slots inside the printer one on each side 6 Grasp the handle and insert the cartridge in the printer until it snaps into place ...

Страница 25: ...closed NOTE When printing text at 5 coverage you can expect a toner cartridge life of approximately 10 000 pages 5 000 pages for the toner cartridge that is shipped with the printer Loading Paper You can load approximately 500 sheets of paper in the tray 1 Pull the tray out of the printer ...

Страница 26: ...traighten the edges on a level surface 3 Load paper with the print side facing down You can load previously printed paper The printed side should be facing up with an uncurled edge at the top side If you experience problems with paper feed turn the paper around Make sure that all four corners are flat in the tray ...

Страница 27: ...want to change the paper size in the tray refer to Changing the Paper Size in the Tray below 5 Slide the tray back into the printer Changing the Paper Size in the Tray If you load long paper in the tray you should adjust the paper guides to the paper length 1 Push the back plate of the tray outwards completely so that it can extend the length of the tray ...

Страница 28: ...ts to the desired paper size marked at the bottom of the tray 3 Squeeze the paper width guide and adjust it to the desired paper size marked at the bottom of the tray NOTES Do not push the width guide far enough to cause the material to warp If you do not adjust the width guide it may cause paper jams ...

Страница 29: ...ect the printer to the parallel port of the computer requires a certified parallel cable You will need to buy a IEEE1284 compliant cable 1 Make sure that both the printer and the computer are turned off 2 Plug the parallel printer cable into the connector on the back of the printer Push the metal clips down to fit inside the notches on the cable plug 3 Connect the other end of the cable to the par...

Страница 30: ... USB printer cable into the connector on the back of the printer 3 Connect the other end of the cable to the USB port on your computer See your computer User s Guide if you need help NOTES For printing using the USB interface you must be running Windows 98 Me 2000 XP or Macintosh with the OS 8 6 and G3 processor or OS 10 2 x later If you want to print using the USB interface in Windows 98 Me you m...

Страница 31: ...nterface card to one supporting the wireless LAN interface For details about installing the card see see page E 6 Using an Ethernet Cable 1 Make sure that both the printer and the computer are turned off 2 Plug one end of the Ethernet cable into the Ethernet network port on the Printer 3 Plug the other end of the cable into a network LAN connection See your computer User s Guide if you need help U...

Страница 32: ...Turning the Printer On 1 Plug the power cord into the power receptacle on the back of the printer 2 Plug the other end into a properly grounded AC outlet and turn on the printer using the power switch CAUTIONS The fusing area at the rear portion of the inside of your printer is hot when powered Be careful not to be burned when accessing this area Do not disassemble the printer when it is powered D...

Страница 33: ... s features and capabilities prints out Changing the Display Language To change the language that is displayed on the control panel take the following steps 1 In ready mode press the Menu button on the control panel until you see Setup on the bottom line of the display 2 Press the Enter button to access the menu 3 Press the scroll button or until you see LCD Language on the bottom line 4 Press the...

Страница 34: ...Go to Appendix B Using Windows PostScript Driver for information about installing the PostScript driver Remote Control Panel for Dos applications Go to Appendix C Printing From DOS Applications for information about installing the DOS print software and printing from DOS applications USB driver for adding the USB port to Windows 98 Me You must first install the USB driver for the USB connection in...

Страница 35: ... drivers Driver Feature PCL PostScript Win 2000 XP Win 9x Win NT4 0 Win 2000 XP Win 9x Win NT4 0 Mac Toner Save Y Y Y Y Y Y N Print quality option Y Y Y Y Y Y Y Double sided printing Y Y Y Y Y Y Y Booklet printing Y Y Y Y N N N Poster printing Y Y Y N N N N Multiple pages per sheet N up Y Y Y Y Y N Y Scale printing Y Y Y Y Y Y Y Fit to page printing Y Y Y Y Y Y Y Different source for first page Y ...

Страница 36: ...e drive letter for the CD ROM drive and click OK NOTE If the New Hardware Found window appears during the installation procedure click the icon in the upper right corner of the window or click Cancel 2 When the language selection window appears select the appropriate language If you can t find the desired language from the window use the scroll button on the bottom right of the screen to display m...

Страница 37: ...2 18 SETTING UP YOUR PRINTER 3 Click Install the Software on your PC PCL 6 Driver 4 Click Next 5 When the installation is completed click Finish ...

Страница 38: ...When reinstallation is done click Finish Removing Printer Software 1 From the Start menu select Programs 2 Select TallyGenicom 9025 and then TallyGenicom 9025 PCL 6 Driver Maintenance 3 The TallyGenicom 9025 PCL 6 Driver Maintenance window appears Check Remove and then click Next 4 When you are asked to confirm your selection click OK The TallyGenicom 9025 PCL 6 printer driver and all of its compo...

Страница 39: ...rop down list and click OK Installing the USB Driver in Windows 98 Me 1 Connect the printer to your computer using the USB cable and turn them on For further details see page 2 11 2 The Add New Hardware Wizard window appears Click Next 3 Place the CD ROM in the CD ROM drive and check Search for the best driver for your device and click Next Once you have installed the Remote Control Panel programm...

Страница 40: ...selection window appears select the appropriate language NOTE If you already installed the printer software this window doesn t appear 8 Follow the instructions on the window to complete the printer software installation For more details see page 2 17 NOTES If you want to use your printer with a parallel cable remove the USB cable and connect the parallel cable Then reinstall the printer driver If...

Страница 41: ...2 22 SETTING UP YOUR PRINTER MEMO ...

Страница 42: ...3 This chapter describes how to use the printer s control panel This chapter includes Understanding the Control Panel Using Control Panel Menus USING THE CONTROL PANEL ...

Страница 43: ...printer switches to off line Offline The printer is off line and cannot print If you press On Line Continue the printer switches to on line Printing xxx xxx is the current emulation The printer is printing If you want to cancel printing press Cancel Sleeping The printer is in Power Save mode consuming less power When a print job is received from the computer or if any button is pressed the printer...

Страница 44: ...to off line Orange On The printer stops printing due to a major error Check the display message See page 7 20 for details on the meaning of the error message Blinking A minor error occurs and the printer is waiting an error to be cleared Check the display message When the problem is cleared the printer resumes printing If you want to ignore this warning press this button Off The printer is off lin...

Страница 45: ...mode is enabled and the printer uses less toner to print a document If the button backlight is off the mode is disabled and the printer will print in the normal quality For more information on the Toner Save mode see page 5 9 Press to enable or disable the double sided printing If the button backlight is on the printer print on both sides of paper with long edge binding If the button backlight is ...

Страница 46: ...esired menu item displays on the bottom line 2 Press the Enter button to access the menu 3 Press the scroll button or until the desired menu item displays on the bottom line 4 Press the Enter button to confirm the selected item 5 If the selected menu item has submenus repeat steps 3 and 4 6 Press the scroll button or until the desired setting option displays on the bottom line or enter the require...

Страница 47: ...covery Altitude Adj Auto CR Job Time Out RS 232C Maintenance Printer See page 3 13 Default Set Current Job Information See page 3 7 Configuration Menu Map Demo Page PS3 Font List PCL Font List EPSON Fonts Graphics See page 3 12 Resolution Image Enhance Toner Save Density EPSON IBM See page 3 18 Font Auto Wrap Character Set Character Tab LPI Pitch PCL See page 3 16 Typeface Symbol Lines Pitch Point...

Страница 48: ... settings of the control panel menu items Demo Page The demo page allows you to check if your printer properly performs printing PS3 Font List PCL Font List EPSON Fonts The font sample list shows all of the fonts currently available in the selected language Item Explanation Tray Source Using this item you can set the tray you will use If you select Auto Select the printer can automatically determi...

Страница 49: ...Select for plain paper Thick Select for thick paper Thin Select for thin paper Bond Select for thick paper Color Paper Select for coloured paper Card Stock Select for card stocks Labels Select for labels Transparency Select for transparencies Envelope Select for envelops Preprinted Preprinted is for paper with something else printed on it such as letterhead Item Explanation Values Letter Legal A4 ...

Страница 50: ...s from other trays If this menu item is set to Off the On Line Continue button backlight blinks in orange and the printer doesn t work until you insert paper into the specified tray WideA4 If this menu item is set to On 80 characters are printed in one line with 10cpi If set to Off the standard 76 characters are printed in one line Item Explanation Values Off On Values Off On ...

Страница 51: ...ing edge as followings Long Edge Flip on long edge Prints pages to read like a book Short Edge Flip on short edge Prints pages to read by flipping over like a note pad Select Off to print on one side of paper Values Portrait Landscape Portrait Landscape Values Off Long Edge Short Edge Long Edge in the Portrait orientation Long Edge in the Landscape orientation 2 5 3 2 5 3 2 5 3 2 5 3 Short Edge in...

Страница 52: ...t binding from 0 0 to 22 mm increasing by 1mm Long Binding Set the right margin of the rear side for long binding from 0 0 to 22 mm increasing by 1mm Simplex Margin Set the margin of print materials for one sided printing Top Margin Set the top margin from 0 0 to 9 9 inches increasing by 0 1 inches Left Margin Set the left margin from 0 0 to 9 9 inches increasing by 0 1 inches Copies Set the defau...

Страница 53: ...d photos or some business graphics that will benefit from enhanced line screening Image Enhance This item enhances the print quality Normal Doesn t enhance the quality Image Enhance Enhances bitmap images like scanned pictures Text Enhance Enhances letters and simple figures Toner Save To get the most from your toner supply set this menu to Off If you set this menu to On the print quality may be r...

Страница 54: ...CD Language setting determines the language of the text that appears on the control panel display and information printing Emulation The printer language defines how the computer communicates with the printer If you select Auto your printer can change the printer language automatically Power Save When the printer does not receive data for an extended period of time power consumption is automatical...

Страница 55: ...atically clear the message and continue printing Jam Recovery This item determines how the printer behaves when a paper jam occurs Off The printer does not reprint pages Printing performance might be increased with this setting On The printer automatically reprints pages after you clear the paper jam Altitude Adj You can optimise the print quality depending on the air pressure such as in a high gr...

Страница 56: ...ng a setting higher than 19200 bps with the COM port may cause unexpected errors in DOS mode Robust XON Turns use of XON OFF of serial communication control on or off When this item is set to On the printer sends a continuous stream of XONs to the computer to indicate that the serial port is ready to receive more data Maintenance This item allows you to maintain the toner cartridge OPC Cleaning Cl...

Страница 57: ...PCL46 PCL54 s interval and point size are fixed Symbol This item selects the symbol to be used in PCL emulation The symbol is the group of numbers marks and special signs being used when printing letters Lines This item allows you to set vertical spacing from 5 to 128 lines for the default paper size The lines may differ according to the paper size and printing orientation Pitch When you select on...

Страница 58: ...urier This item lets you select the version of Courier font to use Item Explanation Print PS Error You can select whether or not your printer prints an error list when a PS error occurs Select On to print PS 3 emulation errors If an error occurs the job stops processing the error message prints and the printer flushes the job If this menu is set to Off the job is flushed without an indication of t...

Страница 59: ...a of the print material Character Set This item allows you to select a character set of the desired language Character Tab This item selects the character set LPI You can set the number of lines printed in one vertical inch Pitch You can determine the font size by setting the number of characters that will print in one horizontal inch of type Values SANSERIF ROMAN Values On Off Values USA FRANCE G...

Страница 60: ...Get Method IP Address Subnet Mask and Gateway menu IP Get Method You can set this item only when you set Config TCP to Yes Static You can enter IP address subnetmask and gateway manually BOOTP The BOOTP server allots the IP address to you automatically DHCP The DHCP server allots the IP address to you automatically IP Address You can select this item only when you set IP Get Method to Static This ...

Страница 61: ...hen press the Enter button For the 2nd to the 4th byte you can set the value in the same way Config 802 11b Configure the Wireless Network environments If you select Yes the following options are available SSID Operation Mode Channel Authentication Encryption Using Key KeyType and Key See Configuring the Wireless Network on page D 12 AppleTalk This item lets you select whether or not you use the A...

Страница 62: ...automatically EN_8022 Select this value to use the IEEE 802 2 frame type EN_8023 Select this value to use the IEEE 802 3 frame type EN_II Select this value to use the ETHERNET II frame type EN_SNAP Select this value to use the SNAP frame type Reset Network This item reboots the network interface card Default Set This item restores the factory default of the network configuration This setting will ...

Страница 63: ...USING THE CONTROL PANEL 3 22 MEMO ...

Страница 64: ...the different paper trays for the best print quality This chapter includes Choosing Paper and Other Materials Selecting the Output Location Loading Paper Printing on Envelopes Printing on Labels Printing on Transparencies Printing on Preprinted Paper Printing on Card Stock or Custom sized Materials USING PRINT MATERIALS ...

Страница 65: ...ny size paper that fits easily within the paper adjusters of the paper tray Weight Your printer supports paper weight as follows 16 28 lbs 60 105 g m2 bond for the Tray1 or optional Tray2 16 43 lbs 60 163 g m2 bond for the Multi Purpose Tray Brightness Some papers are whiter than others and produce sharper more vibrant images Surface smoothness The smoothness of the paper affects how crisp the pri...

Страница 66: ...A5 148 x 210 mm A6 105 x 148 mm Statement 5 5 x 8 5 in 500 500 500 500 500 500 200 100 100 100 100 100 100 100 100 100 1 1 1 1 1 1 1 1 1 Envelopes No 10 4 12 x 9 5 in Monarch 3 87 x 7 5 in C5 162 x 229 mm C6 114 x 162 mm DL 110 x 220 mm ISO B5 176 x 250 mm 10 10 10 10 10 10 1 1 1 1 1 1 Labels b Letter 8 5 x 11 in A4 210 x 297 mm b If you are experiencing excessive jamming feed one sheet at a time ...

Страница 67: ...per with embossed lettering perforations or texture that is too smooth or too rough Coloured paper should be of the same high quality as white photocopy paper The pigments must withstand the printer s fusing temperature of 400 F 205 C for 0 1 second without deterioration Do not use paper with a coloured coating that was added after the paper was produced Preprinted forms must be printed with nonfl...

Страница 68: ... problems such as excessive curl try printing to the rear output tray To avoid paper jams do not open or close the rear output tray while the printer is printing Printing to the Top Output Tray Face down The top output tray collects paper face down in correct order The top output tray should be used for most print jobs NOTE If you continuously print many pages the surface of the output tray may be...

Страница 69: ... the following over 100 sheets of paper continuously envelopes labels small custom size paper postcards paper lighter than 60 g m2 16 lb or heavier than 105 g m2 28 lb transparencies some special transparencies may have stacking problem by curl In that case please use the top output tray face down To open the rear output tray 1 Open the rear door by pulling it down The cover functions as the outpu...

Страница 70: ...overloaded with printed pages it may fall from the printer Remove the pages so that the tray is not overloaded Loading Paper Proper paper loading helps prevent paper jams and ensure trouble free printing Do not remove the paper tray while a job is printing Doing so may cause a paper jam See Sizes and Capacities on page 4 3 for acceptable paper size and capacities for each tray The paper level bar ...

Страница 71: ...urpose Tray is located in the front of your printer It can be closed when you are not using it making the printer more compact The Multi Purpose Tray can hold several sizes and types of paper such as transparencies cards and envelopes You may also want to use the Multi Purpose Tray for single page print jobs on letterheads coloured paper for use as separator sheets or other special materials that ...

Страница 72: ...terials should be loaded face up with the top edge going into the Multi Purpose Tray first and be placed on the centre of the tray Do not place objects on the Multi Purpose Tray Also avoid pressing down or applying excessive force on it The tray may fall apart from the printer To load paper in the Multi Purpose Tray 1 Pull the Multi Purpose Tray down towards you 2 Slide the extender to extend the ...

Страница 73: ...h the print side face up If you want to print on previously printed paper from the Multi Purpose Tray the printed side should be facing down with an uncurled edge to the printer If you experience problems with paper feed turn the paper around NOTE Make sure that you have not loaded too much print materials The print material buckles if you load a stack that is too deep or push it in too far ...

Страница 74: ...rpose Tray with the correct paper size allows you to select paper by size rather than paper source when you print from your software application You do not have to check which paper is loaded in the Multi purpose Tray before printing 6 Press the scroll button or until the size of paper you loaded appears on the bottom line of the display 7 Press the Enter button Now you are ready to print 8 When y...

Страница 75: ...lpful when you want to check the print quality after each page is printed This loading procedure is almost the same as the procedure for loading in the Multi Purpose Tray except you load paper sheet by sheet in the Tray send print data to print the first page and press the On Line Continue button on the control panel to print each following page 1 Load a sheet of print material on the centre of th...

Страница 76: ... Print a document The display shows a message prompting you to load paper and press the On Line Continue button 5 Press the On Line Continue button The printer picks up the paper and prints After one page is printed the message appears again 6 Insert the next sheet into the Multi Purpose Tray and press the On Line Continue button Repeat this step for every page to be printed ...

Страница 77: ...y and pull the extender Guidelines Only use envelopes recommended for laser printers Before loading envelopes in the Multi Purpose Tray make sure that they are undamaged and are not stuck together Do not feed stamped envelopes Never use envelopes with clasps snaps windows coated lining or self stick adhesives These envelopes may severely damage the printer ...

Страница 78: ...ack to separate the pages before loading 4 Load the envelopes onto the Multi Purpose Tray with the flap side down The stamp area is on the left side and the end of the envelope with the stamp area enters the tray first 5 Adjust the guide to the edge of the envelope stack ...

Страница 79: ...on envelopes configure the paper source type and size properly in the software application For details see page 5 7 For details about setting on the control panel see page 3 5 7 After printing close the Multi Purpose Tray and the rear output tray ...

Страница 80: ...using temperature of 200 C 392 F for 0 1 second Make sure that there is no exposed adhesive material between the labels Exposed areas can cause labels to peel off during printing which can cause paper jams Exposed adhesive can also cause damage to printer components Do not feed a sheet of label through the printer more than once The adhesive backing is designed for one pass through the printer Do ...

Страница 81: ...roperly in the software application For details see page 5 7 For details about setting on the control panel see page 3 5 4 After printing close the Multi Purpose Tray and the rear output tray NOTE To prevent labels from sticking do not let the printed label sheets stack up as they are printed out ...

Страница 82: ... first Adjust the guide to fit the width of the transparencies Guidelines Only use transparencies recommended for use in laser printers Ensure that transparencies are not wrinkled curled or have any torn edges Hold the transparencies by the edges and avoid touching the print side Oils deposited on the transparency can cause print quality problems Be careful not to scratch or leave fingerprints on ...

Страница 83: ... close the Multi Purpose Tray and the rear output tray NOTES If you print on thin transparencies to the rear output tray they can be curled In this case use the top output tray If the problem persists check if your transparencies meets the printer s specifications To prevent transparencies from sticking do not let the printed sheets stack up as they are printed out Place transparencies on a flat s...

Страница 84: ...nt ink that will not melt vaporize or release hazardous emissions when subjected to the printer s fusing temperature of 400 F 205 C for 0 1 second Ink on letterheads must be non flammable and should not adversely affect any printer rollers Forms and letterheads should be sealed in a moisture proof wrapping to prevent changes during storage Before you load preprinted paper as forms and letterheads ...

Страница 85: ... printer The minimum size is 76 by 127 mm 3 by 5 in and the maximum size is 216 by 356 mm 8 5 by 14 in Guidelines Always insert the short edge into the Multi Purpose Tray first If you want to print in landscape mode make this selection through your software Inserting paper long edge first may cause a paper jam Do not load more than 10 cards into the Multi Purpose Tray at a time Do not print on med...

Страница 86: ...application For details see page 5 7 NOTE If the size of your print material is not listed in the Size box in the Paper tab of the printer driver properties click the Custom button and set the size manually See page 5 7 CAUTIONS When you use 76 by 127 mm 3 by 5 in paper and it is too thin a paper jam may occur Use the card stock heavier than 105g m2 For details about setting on the control panel s...

Страница 87: ...USING PRINT MATERIALS 4 24 MEMO ...

Страница 88: ...s Using the Toner Save Mode Printing on Both Sides of Paper Printing Multiple Pages on One Sheet of Paper N Up Printing Printing the Reduced or Enlarged Document Fitting Your Document to a Selected Paper Size Printing Posters Printing Booklets Using Watermarks Using Overlays Setting Graphic Properties Using Output Options PRINTING TASKS ...

Страница 89: ...n about printing from a Macintosh computer see Appendix A Using Your Printer with a Macintosh 1 Open the document you want to print 2 Select Print from the File menu The Print window is displayed It may look slightly different depending on your application The basic print settings are selected within the Print window These settings include the number of copies and print range 3 To take advantage o...

Страница 90: ...select the Orientation option The Orientation option allows you to select the direction in which information is printed on a page Portrait prints across the width of the page letter style Landscape prints across the length of the page spreadsheet style If you want to rotate the page in 180 degrees select Rotate 180 Degrees 5 From the Paper tab select the paper source size and type For further deta...

Страница 91: ...the printer driver The settings you change remain in effect only while you are using the current programme To make your changes permanent make them in the Printers folder Follows this procedure 1 Click the Windows Start menu 2 For Windows 95 98 Me NT 4 0 2000 select Settings and then Printers For Windows XP select Printers and Faxes 3 Select the TallyGenicom 9025 PCL 6 printer 4 Click the right mo...

Страница 92: ...nt job Pressing the button cancels only the current job in the printer If more than one print job is in the printer memory the button must be pressed once for each job To stop a print job from the Printers folder 1 From the Windows Start menu select Settings 2 Select Printers to open the Printers window and double click the TallyGenicom 9025 PCL 6 icon 3 From the Document menu select Cancel Printi...

Страница 93: ...ng just select the item from the Favorites drop down list To delete a Favorites item select it from the list and click Delete You can also restore the printer driver s default settings by selecting Printer Default from the list Using Help Your printer has a help screen that can be activated by the Help button in the printer s properties window These help screens give detailed information about the...

Страница 94: ...ies Property Description Copies Copies allows you to choose the number of copies to be printed You can enter up to 999 Size The Size option allows you to choose the size of paper loaded in the tray If the required size is not listed in the Size box click Custom When the Custom Page Size window appears set the paper and click Ok The size setting appears in the Size list so that you can select it 1 ...

Страница 95: ... materials select the corresponding paper type For more information on print materials refer to Chapter 4 Using Print Materials If you use cotton paper set the paper type to Thick for the best printing To use recycled paper which weights from 20lb to 24lb or other colored paper select Color paper First Page This property allows you to print the first page using a different paper type from the rest...

Страница 96: ...ntrol panel button Press the Toner Save button on the control panel The printer must be in ready mode the On Line Continue button is on in green and Ready is shown on the display If the button backlight is on the mode is enabled and the printer uses less toner to print a page If the button backlight is off the mode is disabled and the printer prints in normal mode Using the control panel menu You ...

Страница 97: ...Mode option You can select from Printer Setting If you select this option the Toner Save feature is determined by the setting you ve made on the control panel of the printer On Select this option to allow the printer to use less toner on each page Off If you don t need to save toner to print a document select this option 3 Click OK NOTE The setting in the software application overrides that on the...

Страница 98: ...paper size A4 Letter Legal and Folio Paper jam occurs if duplexing with rear tray open There are three ways to enable or disable the double sided printing Using the control panel button Press the Duplex button on the control panel If the button backlight is on the printer prints on both sides of paper with long edge binding by the default setting If the button backlight is off the printer prints o...

Страница 99: ...age 5 2 2 From the Layout tab select the paper orientation 3 From the Double sided Printing section select the desired binding option 4 Click the Paper tab and select the paper source size and type 5 Click OK and print the document The printer prints on both sides of paper NOTE The setting in the software application overrides that on the control panel ...

Страница 100: ...ation access the printer properties See page 5 2 2 From the Layout tab choose Multiple Pages per Side in the Type drop down list 3 Select the number of pages you want to print per sheet 1 2 4 6 9 or 16 in the Pages per Side drop down list 4 Select the page order in the Page Order drop down list if necessary Check Print Page Border to print a border around each page on the sheet Print Page Border i...

Страница 101: ... your print job on a page 1 When you change the print settings from your software application access the printer properties See page 5 2 2 From the Paper tab select Reduce Enlarge in the Type drop down list 3 Enter the desired scaling rate in the Percentage input box You can also click the or button 4 Select the paper source size and type 5 Click OK and print the document ...

Страница 102: ... This can be useful when you want to check fine details on a small document 1 When you change the print settings from your software application access the printer properties See page 5 2 2 From the Paper tab select Fit to Page in the Type drop down list 3 Select the correct size from the Target Paper drop down list 4 Select the paper source size and type 5 Click OK and print the document A ...

Страница 103: ...oster size document 1 When you change the print settings from your software application access the printer properties See page page 5 2 2 From the Layout tab select Poster in the Type drop down list 3 Configure the poster option You can select the page layout from 2x2 3x3 4x4 or Custom If you select 2x2 the output will be automatically stretched to cover 4 physical pages 2 x 2 3 x 3 ...

Страница 104: ...Booklets Booklet printing feature allows you to print your document a double sided job and arrange the pages so that the paper can be folded in half after printing to produce a booklet 1 When you change the print settings from your software application access the printer properties See page 5 2 2 From the Layout tab choose Booklet Printing in the Type drop down list NOTE The booklet printing optio...

Страница 105: ...AL printed diagonally across the first page or all pages of a document There are several predefined watermarks that come with your printer and they can be modified or you can add new ones to the list Using an Existing Watermark 1 When you change the print settings from your software application access the printer properties See page 5 2 2 Click the Extras tab and select the desired watermark in th...

Страница 106: ...e preview image is provided so that you can see how the watermark will appear on the printed page If the First Page Only box is checked the watermark will be printed on the first page only 4 Select the desired watermark options You can select the font name style and size and grayscale level from the Font Attributes section and set the angle of the watermark from the Message Angle section 5 Click A...

Страница 107: ... the Current Watermarks list and change the watermark message and the options Refer to Creating a Watermark on page 5 19 4 Click Update to save the changes 5 Click Ok Deleting a Watermark 1 When you change the print settings from your software application access the printer properties See page 5 2 2 From the Extras tab click the Edit button in the Watermark section The Edit Watermarks window appea...

Страница 108: ...ot need to load preprinted letterhead paper in the printer You need only tell the printer to print the letterhead overlay on your document Creating a New Page Overlay To use a page overlay you must create a new page overlay containing your logo or image 1 Create or open a document containing text or an image for use in a new page overlay Position the items exactly as you wish them to appear when p...

Страница 109: ... destination path if necessary The default is C My Documents 6 Click Save You will see the name in Overlay List 7 Click OK or Yes until you complete creating The file is not printed out Instead it will be stored on your computer HDD disk Note The overlay document size must be the same as documents you will print with the overlay Do not create an overlay with a watermark ...

Страница 110: ...Click the Extras tab 4 Select the desired overlay from the Overlay drop down list box 5 If the desired overlay file does not appear in the Overlay list click the Edit button and Load Overlay and select the overlay file If you have stored the overlay file you want to use into an external source you can also load the file when you access this Load Overlay window After you select the file click Open ...

Страница 111: ...as been selected the overlay will be automatically printed with your document 7 Click OK or Yes until the printing starts The selected overlay will be downloaded with your print job and printed on your document Note The resolution of the overlay document must be the same as that of the document you will print with the overlay Deleting a Page Overlay You can delete page overlays that are no longer ...

Страница 112: ...out accessing printer properties Click the Graphics tab to display the properties shown below Property Description Resolution You can select the printing resolution by choosing from 1200 dpi Best 600 dpi Normal or 300 dpi Draft The higher the setting the sharper the clarity of printed characters and graphics Higher settings may increase time it takes to print a document 1 2 3 4 1 ...

Страница 113: ...s setting refines the print quality of characters by smoothing out jagged edges that can occur on the angles and curves of each character Image Enhance This setting refines the print quality of photo images Toner Save Mode Selecting this option will extend the life of your toner cartridge and reduce your cost per page without a significant reduction in the print quality For detailed information ab...

Страница 114: ...is selected the driver will download the font data as bitmap images Documents with complicated fonts such as Korean or Chinese or various types of fonts will print faster in this setting Print as Graphics When this option is selected the driver will download any fonts as graphics When printing documents with high graphic content and relatively few TrueType fonts printing performance speed may be e...

Страница 115: ...prints in normal order Reverse All Pages Your printer prints all pages in reversed order This setting is helpful when you are using the rear output tray Print Odd Pages Your printer prints only the odd pages of the document Print Even Pages Your printer prints only the even pages of the document Use Printer Fonts When this option is checked the printer uses the fonts that are stored in its memory ...

Страница 116: ...and economical printing and information for maintaining the toner cartridge and the printer This chapter includes Printing a Configuration Page Maintaining the Toner Cartridge Cleaning the Printer Consumables and Replacement Parts MAINTAINING YOUR PRINTER ...

Страница 117: ...inter problems or to verify installation of optional accessories such as memory optional tray and printer languages To print a configuration page 1 In ready mode press the Menu button on the control panel until you see Information on the bottom line of the display 2 Press the Enter button to access the menu 3 Press the Enter button when Configuration displays on the bottom line A Configuration pag...

Страница 118: ...er cartridge life expectancy The life of the toner cartridge depends on the amount of toner that print jobs require When printing text at 5 coverage a new toner cartridge lasts an average of 10 000 pages The original toner cartridge supplied with the printer lasts an average of 5 000 pages Saving toner To save toner press the Toner Save button on the printer control panel The button backlight will...

Страница 119: ...intenance displays on the bottom line and press the Enter button 4 Press the scroll button or to select the required option Remain Toner 5 Press the Enter button The display shows the percentage of the toner remains Redistributing Toner When the toner cartridge is nearly empty Low Toner appears on the display and faded or light areas may appear on a printed page You may be able to temporarily impr...

Страница 120: ...ner cartridge from side to side 5 for 6 times to redistribute the toner evenly NOTE If toner gets on your clothing wipe it off with a dry cloth and wash clothing in cold water Hot water sets toner into fabric 4 Reinstall the cartridge and close the cover When Ready Replace Cart appears on the display you need to replace the toner cartridge Refer to the procedures under Replacing the Toner Cartridg...

Страница 121: ...MAINTAINING YOUR PRINTER 6 6 Replacing the Toner Cartridge 1 Open the top cover 2 Remove the old cartridge 3 Install a new toner cartridge See page 2 4 ...

Страница 122: ...ith surfactants containing large amounts of alcohol solvent or other strong substances can discolor or crack the cabinet Cleaning the Outside Clean the cabinet of the printer with a soft lint free cloth You can dampen the cloth slightly with water but be careful not to be let any water drip onto the printer or inside of it Cleaning the Inside During the printing process paper toner and dust partic...

Страница 123: ...do not expose it to light for more than a few minute Cover it with a piece of paper if necessary Also do not touch the black transfer roller inside the printer 4 Locate the long strip of glass LSU inside the top of the cartridge compartment and gently swab the glass to see if dirt turns the white cotton black 5 Reinsert the toner cartridge and close the cover 6 Plug in the power cord and turn the ...

Страница 124: ...iscarded 1 Ensure that the printer is turned on and in ready mode with paper loaded in the tray 2 In ready mode press the Menu button on the control panel until you see Setup on the bottom line of the display 3 Press the Enter button to access the menu 4 Press the scroll button or until Maintenance displays on the bottom line and press the Enter button 5 Press the scroll button or to select the re...

Страница 125: ...owing items should be replaced after you have printed a specified number of pages See the table below To purchase the consumables and replacement parts contact your TallyGenicom dealer or the retailer where you bought your machine We strongly recommend that items be installed by a trained service professional except for the toner cartridge Items Yield Average Regi roller 100 000 Transfer roller 12...

Страница 126: ...or while using your printer This chapter includes Troubleshooting Checklist Solving General Printing Problems Clearing Paper Jams Solving Print Quality Problems Understanding Display Messages Common Windows Problems Common Macintosh Problems Troubleshooting PS Errors SOLVING PROBLEMS ...

Страница 127: ...ssage appears on the display go to Understanding Display Messages on page 7 20 Check the demo page to see if it is printed correctly If there is a print quality problem go to Solving Print Quality Problems on page 7 15 Print a short document from a software application to verify that the computer and printer are connected and are communicating correctly If the page does not print check the cable c...

Страница 128: ...y be in manual feed mode and out of paper Check the display message add paper to the Multi Purpose Tray and press the On Line Continue button on the printer s control panel The connection cable between the computer and the printer is not connected properly Disconnect the printer cable and reconnect it The connection cable between the computer and the printer is defective If possible attach the cab...

Страница 129: ...b may be very complex Reduce the complexity of the page or try adjusting the print quality settings The maximum print speed of your printer is 24 PPM pages per minute for A4 sized paper or 25 PPM for Letter sized paper If using Windows 9x Me the Spooling Setting may be set incorrectly From the Start menu choose Settings and Printers Right click the TallyGenicom 9025 PCL 6 printer icon choose Prope...

Страница 130: ... to another computer and try a print job that you know works Finally try a new printer cable The wrong printer driver was selected Check the application s printer selection menu to ensure that your printer is selected The software application is malfunctioning Try printing a job from another application The operating system is malfunctioning If printing from Windows any version exit to a DOS promp...

Страница 131: ...must contact the customer service to replace the transfer roller The illustrations print incorrectly in Adobe Illustrator The setting in the software application is wrong Print the document with selecting Download as Bit Image in the Truetype Options window of the graphic properties Problem Possible Cause Solution ...

Страница 132: ...am and to clear it In the Paper Feed Area 1 Slide out the Tray1 to expose the jammed paper 2 Remove any misfed paper by pulling it out by the visible edge from the tray Make sure that all of the paper is properly aligned in the tray Message Location of Jam Go to Jam0 In the paper feed area below Jam1 Around the toner cartridge page 7 10 Jam2 In the paper exit area page 7 12 Duplex Jam 1 2 In the d...

Страница 133: ...per remove the tray from the printer and carefully pull the jammed paper free from the printer 3 Slide the tray back into the printer 4 Open and close the top cover to resume printing In the Optional Tray2 1 Pull the optional Tray2 out of the printer 2 If you see the jammed paper remove the paper from the tray ...

Страница 134: ...ay out of the printer and remove the paper 4 Slide the trays back into the printer Open and close the top cover Printing can be resumed In the Multi Purpose Tray 1 Open the Multi Purpose Tray 2 Carefully remove the jammed paper from the tray 3 Open and close the top cover Printing can be resumed ...

Страница 135: ...e printer If not continue to Step 2 2 Open the top cover and remove the toner cartridge CAUTION To prevent damage to the toner cartridge do not expose it to light for more than a few minutes Place a piece of paper over the top of the toner cartridge to shield it while it is out of the printer 3 Carefully lift up the guide feed ...

Страница 136: ...isible or there is resistance when you pull the paper go to In the Paper Exit Area on page 7 12 5 Flip down the guide feed and reinstall the toner cartridge NOTE If the toner cartridge is difficult to reinstall make sure that the guide feed has been flipped back down into position 6 Close the top cover Printing can be resumed ...

Страница 137: ...f the paper is visible pull it straight out If not continue to Step 2 2 Open the rear output tray 3 Loosen the paper if it is caught in the feed rollers Then gently pull the paper out 4 Close the rear output tray 5 Open and close the top cover Printing can be resumed ...

Страница 138: ... Remove the jammed paper 3 Close the rear output cover 4 Open and close the top cover Printing can be resumed Duplex Jam 2 1 Pull the paper tray out of the printer 2 Pull down the metal plate inside of the printer CAUTION Pulling the plate may do you an injury Use the lever on the left ...

Страница 139: ... page 2 6 Ensure that the adjustable guides are positioned correctly Do not overload the paper tray Ensure that the paper is below the paper limit mark on the inside wall of the tray Do not remove the paper from the tray while printing Flex fan and straighten the paper before loading Do not use creased damp or highly curled paper Do not mix paper types in the tray Use only recommended print materi...

Страница 140: ...pecifications on page F 3 If the entire page is light the print resolution setting is too light or Toner Save Mode is on Adjust the print resolution and Toner Save Mode in the printer properties See page 5 25 and page 5 9 respectively A combination of faded or smeared defects may indicate that the toner cartridge needs cleaning See Cleaning the Inside on page 6 7 The surface of LSU may be dirty Cl...

Страница 141: ...the toner cartridge has probably been scratched Install a new toner cartridge Gray background If the amount of background shading becomes unacceptable the procedures below may fix the problem Change to a lighter weight pages See Paper Specifications on page F 3 Check the printer s environment very dry low humidity or high humidity higher than 80 RH conditions can increase the amount of background ...

Страница 142: ...aper does not absorb too much moisture If background scatter occurs on an envelope change the printing layout to avoid printing over areas that have overlapping seams on the reverse side Printing on seams can cause problems If background scatter covers the entire surface area of a printed page adjust the print resolution through your software application or the printer properties Misformed charact...

Страница 143: ...ifications on page F 3 Open the rear cover and try printing to the rear output tray face up Turn over the stack of paper in the paper tray Also try rotating the paper 180 in the tray Back of printouts are dirty The transfer roller may be dirty Cleaning the Inside on page 6 7 Check for leaking toner Clean the inside of the printer Black pages The toner cartridge may not be installed properly Remove...

Страница 144: ...arency Because of the composition of the transparency some character voids are normal You may be printing on the wrong surface on the paper Remove the paper and turn it around The paper may not meet paper specifications See Paper Specifications on page F 3 Horizontal stripes If horizontally aligned black streaks or smears appear The toner cartridge may be installed improperly Remove the cartridge ...

Страница 145: ...tridge designed for your printer Jam 0 A paper jam occurs in the paper feed area Remove the jammed paper from the tray in use referring to page 7 7 Jam 1 A paper jam occurs around the toner cartridge Remove the jammed paper from the printer referring to page 7 10 Jam 2 A paper jam occurs in the paper exit area Remove the jammed paper from the output tray referring to page 7 12 Duplex JAM 1 2 A pap...

Страница 146: ...e In Tray The displayed tray is empty Load the corresponding size of paper into the tray Ready Close Tray 1 The Tray1 is open Close the Tray1 to clear the message Ready Close Tray 2 The Tray2 is open Close the Tray2 to clear the message Ready Low Toner The toner cartridge in your printer is nearly empty Redistribute the toner referring to page 6 4 Ready Replace Cart The life of some parts on the t...

Страница 147: ...irmware programme in the printer has been damaged You need to download the programme to the printer again Contact your local TallyGenicom dealer Message Status Do this Problem Possible Cause and Solution File in Use message appears during installation Exit all software applications Remove all software from the StartUp Group then restart Windows Reinstall the printer driver Error Writing to LPTx me...

Страница 148: ...cables are connected correctly and the printer is turned on Check if Ready appears on the display of the control panel If not press the On Line Continue button to switch your printer to on line Make sure that the correct printer driver has been selected in Chooser If the printer resides on a network with multiple zones make sure that the correct zone is selected in the AppleTalk Zones box in Choos...

Страница 149: ...ting Install the PostScript driver See page B 2 This job contains binary data message appears The pure binary data option is not supported by the PostScript driver Open the Properties of the PostScript driver click on PostScript and click on Advanced The pure binary data option is not supported Choose another A PS error page prints Print job may not be PS Make sure that the print job is a PS job C...

Страница 150: ...e card option for TallyGenicom 9025 When you print a file from a Macintosh computer you can use PostScript driver by installing the PPD file This chapter includes Installing Software for Macintosh Setting Up the Printer Printing a Document Using Advanced Printing Features USING YOUR PRINTER WITH A MACINTOSH ...

Страница 151: ...language to select the correct one 5 Click Continue 6 The TallyGenicom Laser Printer Installer window opens Select the installation type The window provides two options for software installation Easy Install recommended method This option loads the PPD file and the Adobe Acrobat Reader programme Custom Install This option allows you to choose which components will be installed the PS Level 3 PPDs ...

Страница 152: ...e menu select Chooser 3 Click LaserWriter 8 the PostScript driver provided with your Macintosh The name of your printer appears in the list 4 Select TAL000xxxxxxxxx from the printer box where the xxxxxxxxx varies depending on each of the products and Click Select If Auto Setup does not work properly click Select PPD choose TallyGenicom 9025 and click OK 5 When the setup is completed you see your p...

Страница 153: ...6 If Auto Select does not work properly select TallyGenicom in Printer Model and TallyGenicom 9025 in Model Name Your printer appears on the Printer List and is set as a default printer For USB connected Macintosh In Mac OS 9 x NOTE The location of the Desktop Printer Utility may be different depending on your Macintosh OS 1 Follow the instructions on page A 2 to install the PPD file on your compu...

Страница 154: ... and choose TallyGenicom 9025 9 When the setup is completed click Create 10Click Save In Mac OS 10 2 x 1 Follow the instructions on page A 2 to install the PPD file on your computer 2 Open Print Center from the Utilities folder 3 Click Add on the Printer List 4 Select the USB tab 5 Select TallyGenicom 9025 and click Add 6 If Auto Select does not work properly select TallyGenicom in Printer Model a...

Страница 155: ...ntosh application and select a file you want to print 2 Open the File menu and click Page Setup Document Setup in some applications 3 Choose your paper size orientation paper type and other options and click OK 4 Open the File menu and click Print 5 Choose the number of copies and indicate which pages you want to print 6 Click Print when you finish setting the options Canceling a Print Job To canc...

Страница 156: ...d Paper Size Printing Multiple Pages on One Sheet of Paper You can print more than one page on a single sheet of paper This feature provides a cost effective way to print draft pages 1 From your Macintosh application select Print from the File menu 2 Select the Layout 3 Click Print and the printer prints the selected number of pages on one side of each page Mac OS 10 2 x ...

Страница 157: ...The binding options are Which is the conventional layout used in book binding Which is the type often used with calendars 1 From your Macintosh application select Print from the File menu 2 Select the Duplex Select the Layout if you are an Mac OS 9 x user 3 Click Print on Both Sides and select a binding orientation 4 Click Print and the printer prints on both sides of the paper Mac OS 10 2 x ...

Страница 158: ...inter Features Select the Advanced Options if you are an Mac OS 9 x user 3 Select an option from the Fit to Page drop down list and click Print Nearest Size and Scale The printer automatically selects paper nearest the document size and reduces or enlarges the page to fit it onto the paper Nearest Size and Crop The printer automatically selects paper nearest the document size and prints the page i...

Страница 159: ...USING YOUR PRINTER WITH A MACINTOSH A 10 MEMO ...

Страница 160: ... the PostScript driver provided with your system CD ROM to print a document use the information on this Appendix This chapter includes Installing PS Drivers Using PS Printer Driver Features USING WINDOWS POSTSCRIPT DRIVER ...

Страница 161: ...ee page 2 20 connecting with a network interface see page 2 12 For a TallyGenicom 9025 you need to install an optional network interface card see Installing a Network or Serial Interface Card on page E 6 Installing PS Drivers 1 Place the CD ROM in the CD ROM drive Installation will start automatically If the CD ROM drive does not automatically run Select Run from the Start menu type x cdsetup exe ...

Страница 162: ...xt 4 When reinstallation is done click Finish Removing PS Drivers 1 From the Start menu select Programs 2 Select TallyGenicom 9025 and then TallyGenicom 9025 PS Driver Maintenance 3 The TallyGenicom 9025 PS Driver Maintenance window appears Check Remove and then click Next 4 When you are asked to confirm your selection click OK The TallyGenicom 9025 PS printer driver and all of its components are ...

Страница 163: ...PostScript printer driver can be opened from the Printers folder or an application To open the properties window from the Printer folder 1 Click the Windows Start button 2 Select Settings then Printers to open the Printers window 3 Select TallyGenicom 9025 PS 4 Click the right mouse button and select Properties to open the properties window To open the properties window from an application 1 From ...

Страница 164: ...so print from a DOS software Programme using the Remote Control Panel utility provided in the supplied software CD ROM This chapter includes About the Remote Control Panel Installing the Remote Control Panel Selecting Print Settings PRINTING FROM DOS APPLICATIONS ...

Страница 165: ...he manufacturers of your DOS software programmes If your DOS software Programme does not include a printer driver for your printer contact the manufacturer of the software or use one of the alternate printer drivers Installing the Remote Control Panel 1 Place the CD ROM in the CD ROM drive Installation will start automatically If the CD ROM drive does not automatically run Select Run from the Star...

Страница 166: ...e Remote Control Panel 1 From the Start menu select Programs 2 Select TallyGenicom 9025 and then Uninstall Remote Control Panel 3 Click OK The TallyGenicom 9025 Remote Control Panel and all of its components are removed from your computer 4 Click Finish ...

Страница 167: ... programme override the ones that are selected in the Remote Control Panel Starting the Remote Control Panel 1 From the Start menu select Programs 2 Select TallyGenicom 9025 and then Remote Control Panel 3 The Remote Control Panel window allows you to access all the information you need when using your printer If necessary click the other tabs on the top of the window to access other features 4 Wh...

Страница 168: ...onfigure general settings for printing Paper Size sets the paper size Orientation determines how the output is printed on the page Paper Tray sets the default paper source Auto CR sets how the printer performs a carriage return Copies sets the number of copies printed for each page Quality specifies the print quality Margins sets the top and left margin of the print material ...

Страница 169: ... job is sent to the printer If it is checked the printer will pick up the paper from the tray after fifteen seconds Otherwise the printer will wait for you to load paper in the Multi Purpose Tray Jam Recovery determines what action the printer should take when a paper jam occurs If it is unchecked the printer does not reprint a page that has jammed If it is checked the printer keeps the image in m...

Страница 170: ... job For the best result set this to the paper type you loaded in the tray of the printer When using the plain paper set this to Printer Default Image Quality improves the print quality of your text and image and make the characters and images appear smoother Time out determins the amount of time in seconds the printer will wait before printing the last page of a print job that does not end with a...

Страница 171: ...print a resident page to test your printer s performance Self Test prints a configuration sheet A list of the user default settings and the amount of printer memory available prints Demo Page prints a demonstration page It shows the printer features and specifications ...

Страница 172: ...selected a scalable monospaced font Pitch refers to the number of fixed space characters in one horizontal inch of type Point Size sets the font point size only if you have selected a scalable typographic font Point size refers to the height of the characters in the font One point equals approximately 1 72 of an inch You can select point sizes from 4 0 to 999 75 in increments of 0 25 points Lines ...

Страница 173: ...list Macros adds or deletes macros You can also activate Enable macro or deactivate Disable macro them Delete all macros and fonts deletes all macros and fonts in the flash memory Refresh updates information about fonts and macros in the flash memory NOTE For using the font and macro download feature please add an optional empty flash module to the printer For purchase please contact your local de...

Страница 174: ...tings for PostScript 3 emulation Font List allows you to print the PS font sample list Print error information determines whether or not the printer prints the error information page when an error occurs during processing the job Select ON to print the page otherwise select OFF ...

Страница 175: ...r Table selects the character sets Pitch sets the font pitch Pitch refers to the number of fixed space characters in a horizontal inch of type LPI sets the number of lines printed a vertical inch You can select 6 or 8 lines Auto Wrap determines whether or not the printer automatically performs line feed when the data overflows the printable area of the print material Font List prints a font list s...

Страница 176: ...a direct attachment to an external print server This chapter includes About Sharing the Printer on a Network Setting Up a Locally Shared Printer Setting Up a Network Connected Printer NOTE If you are a TallyGenicom 9025 user You need to install an optional network interface card For more information see Appendix E Programme Installing Printer Options USING YOUR PRINTER ON A NETWORK ...

Страница 177: ...lyGenicom 9025N printer have the built in network interface For more information about connecting your printer to the network see page 2 12 To use a TallyGenicom 9025 printer as a network printer you need to install an optional network interface card in your printer For a TallyGenicom 9025N printer you can replace the network interface card to one supporting the wireless LAN interface See page E 6...

Страница 178: ...perties in the Printer menu 6 Click the Sharing tab and check the Shared As box Fill in the Shared Name field and click OK Setting Up the Client Computer 1 Right click the Windows Start button and select Explorer 2 Open your network folder in the left column 3 Right click the shared name and select Capture Printer Port 4 Select the port you want check the Reconnect at log on box and click OK 5 Fro...

Страница 179: ...ed As box For Windows XP check the Share this printer box 6 For Windows NT 4 0 fill in the Share Name field and click OK For Windows 2000 XP fill in the Shared Name field and click OK Setting Up the Client Computer 1 Right click the Windows Start button and select Explorer 2 Open your network folder in the left column 3 Click the shared name 4 For Windows NT 4 0 2000 select Settings and Printers f...

Страница 180: ...er To use as your network printer you have to set up the desired network protocols on the printer Setting protocols can be accomplished by using the supplied network program Please refer to SyncThru User s Guide You can configure the basic network parameters through the printer s control panel Use the printer control panel to do the following Print a Network Configuration Page Enable or disable ne...

Страница 181: ... for most applications 1 In ready mode press the Menu button until you see Network on the bottom line of the display 2 Press the Enter button to access the menu 3 Press the scroll button or until Print Net CFG displays on the bottom line 4 Press the Enter button The Network Configuration page prints out Item Requirements Network Interface 10 100 Base TX Standard for TallyGenicom 9025N or 802 11b W...

Страница 182: ...n until you see Network on the bottom line of the display 2 Press the Enter button to access the menu 3 Press the scroll button or until Config Network displays on the bottom line Press the Enter button 4 Press the scroll button or to display Yes and press the Enter button Then press the Upper Level button 5 Press the scroll button or until you see the desired protocol on the bottom line You can c...

Страница 183: ...1 In ready mode press the Menu button until you see Network on the bottom line of the display Press the Enter button to access the menu 2 Press the Enter button when Config Network displays on the bottom line 3 Press the scroll button or to display Yes and press the Enter button 4 Press the Upper Level button then use the scroll button 5 Press the Enter button when Config TCP displays 6 Press the ...

Страница 184: ...nd 13 to configure the other TCP IP parameters 16Press the ON Line Continue button to return to ready mode Dynamic Addressing BOOTP DHCP To assign the TCP IP address automatically by the server take the following steps 1 In ready mode press the Menu button until you see Network on the bottom line of the display Press the Enter button to access the menu 2 Press the Enter button when Config Network ...

Страница 185: ...on the printer In most cases you can keep the default setting AUTO However you can manually set the frame type format if required AUTO default Automatically senses and limits the frame type to the first one detected EN_8023 Limits the frame type to IPX over IEEE 802 3 frames All others will be counted and discarded EN_II Limits the frame type to IPX over Ethernet Frames All others will be counted ...

Страница 186: ...er Level button 5 Press the scroll button or until Netware displays on bottom line Press the Enter button 6 Press the Enter button when On displays 7 press the Upper Level button then use the scroll button 8 Press the Enter button when Config Netware displays 9 Press the scroll button or to display Yes on the bottom line Press the Enter button 10Press the Upper Level button then use the scroll but...

Страница 187: ... 11b After selecting Yes in Config 802 11b configure the following items SSID When you select Search List the wireless network card on your printer searches for wireless networks in the area and shows the results on the list Select one on the list You cannot change Operation Mode and Channel If you select Custom on the list you can configure the wireless settings according to your needs and enter ...

Страница 188: ...ill scan all available channels for the specified network and will adapt its channel to the one detected Default setting is 10 Authentication Open System or Shared Key The TallyGenicom print server is not configured for network authentication Open System If required by your network the proper authentication method must be configured on the print server Encryption No data Encryption 64 bits or 128 ...

Страница 189: ...USING YOUR PRINTER ON A NETWORK D 14 MEMO ...

Страница 190: ...ser may have different requirements however TallyGenicom makes several options available to enhance the printer s capabilities This chapter includes Precautions When Installing Printer Options Installing Memory DIMM Installing a Network or Serial Interface Card Installing an Optional Paper Tray PROGRAMME INSTALLING PRINTER OPTIONS ...

Страница 191: ... ANY internal or external printer option DISCHARGE STATIC ELECTRICITY The control board and internal printer options Memory DIMM Network and Serial interface cards are sensitive to static electricity Before installing or removing an internal option discharge static electricity from your body by touching something metal such as the metal back plate on any device plugged into a grounded power source...

Страница 192: ...nal printer memory option are provided on DIMM Dual In line Memory Modules This procedure is applicable to either option 1 Turn the printer power off and unplug all cables from the printer 2 Remove the two screws on the rear of the printer then remove the control board cover ...

Страница 193: ...tch and the connection point are aligned with the slot as shown and insert it all the way into the lower slot labelled RAM DIMM at a 90 degrees angle 4 Replace the control board cover and tighten the two screws 5 Reconnect the power cord and printer cable and turn the printer on ...

Страница 194: ...Macintosh For PS printing on a Windows system refer to Appendix B Using Windows PostScript Driver Removing the Memory DIMM 1 Follow steps 1 and 2 on page E 3 to access the control board 2 Push the clips at each end of the connector slot away from the DIMM 3 Place the DIMM in its original packaging or wrap it with paper and store it in a box 4 Follow from Step 4 on page E 4 ...

Страница 195: ...ow this procedure to install the network or serial interface card option in your printer 1 Unpack the network or serial printer card Make sure that there is no missing or damaged part 2 Turn the printer power off and unplug all cables from the printer 3 Remove the two screws on the back of the printer then remove the control board cover Network Interface Card SyncThru CD ROM and Setup Guide Serial...

Страница 196: ... old bracket If you are replacing the network interface card with new one or the serial interface card remove the two screws and the old card 5 Align the connector on the network or serial interface card with the connector on the control board Push the card firmly into the connector until it is completely inserted into place ...

Страница 197: ... 6 Tighten the two screws which you removed in Step 4 7 Replace the control board cover and tighten the two screws 8 If you purchase the network interface card supporting the wireless LAN interface insert the antenna counterclockwise as shown ...

Страница 198: ...on about configuring and using the printer on a network environment refer to the User s Guide provided with the network interface card You can also configure the network parameters on the control panel see page D 6 Because the network and the serial interface cards are inserted into the same connector on the control board you cannot install both of them ...

Страница 199: ...r by installing an optional Tray2 The optional paper tray consists of two components the support unit and paper tray 1 Turn off the printer and unplug all cables from the printer 2 Remove the tape fastening the interface cable from the bottom of the support unit 3 Observe the location of the support unit s tabs Support unit Paper tray ...

Страница 200: ...information about loading paper in the tray see page 2 6 7 Reconnect the power cord and cables and then turn the printer on NOTE When you print a document configure the printer driver from your application To access the printer driver see page 5 2 CAUTIONS Do not remove Tray 1 from the printer while you are printing using the optional Tray 2 If you do this a paper jam may occur Use the optional Tr...

Страница 201: ...PROGRAMME INSTALLING PRINTER OPTIONS E 12 MEMO ...

Страница 202: ...F This chapter includes Printer Specifications Paper Specifications SPECIFICATIONS ...

Страница 203: ...um Weight Gross 17 1 Kg 37 7 lb Net 13 7 Kg 30 2 lb Package Weight Paper 2 5 Kg Plastic 0 6 Kg External Dimensions W x D x H 386 W x 446 D x 326 H mm 15 2 x 17 6 x 12 8 in without options Operating Environment Temperature 10 32 C 50 90 F Humidity 20 80 RH Emulation PCL 5e PCL 6 PostScript 3 IBM ProPrinter EPSON Random Access Memory RAM Standard 32 MB Expandable to 160 MB 100 pin SDRAM 3 3 V 16 MB ...

Страница 204: ... cause the following problems Poor print quality Increased paper jams Premature wear on the printer NOTES Some paper may meet all of the guidelines in this guide and still not produce satisfactory results This may be the result of improper handling unacceptable temperature and humidity levels or other variables over which TallyGenicom has no control Before purchasing large quantities of paper ensu...

Страница 205: ...e Tray Dimensionsa a The printer supports a wide range of media sizes See Printing on Card Stock or Custom sized Materials on page 4 22 Weight Capacityb b Capacity may vary depending on media weight and thickness and environmental conditions Minimum Size custom 76 X 127 mm 3 X 5 in 60 to 163 g m2 bond 16 to 43 lb 100 sheets of 80 g m2 bond paper Maximum Size custom 216 X 356mm 8 5 X 14 in Transpar...

Страница 206: ...The following problems may cause print quality deviations jamming or even damage to the printer Symptom Problem with Paper Solution Poor print quality or toner adhesion problems with feeding Too moist too rough too smooth or embossed faulty paper lot Try another kind of paper between 100 250 Sheffield 4 5 moisture content Dropout jamming curl Stored improperly Store paper flat in its moisture proo...

Страница 207: ...1 second Paper Specifications Paper Output Capacity Category Specifications Acid Content 5 5 8 0 pH Caliper 0 094 0 18 mm 3 0 7 0 mils Curl in Ream Flat within 5 mm 0 02 in Cut Edge Conditions Cut with sharp blades with no visible fray Fusing Compatibility Must not scorch melt offset or release hazardous emissions when heated to 200 C 392 F for 0 1 second Grain Long Grain Moisture Content 4 6 by w...

Страница 208: ...ken not to purchase more paper than can be used in a short time about 3 months Paper stored for long periods may experience heat and moisture extremes which can cause damage Planning is important to prevent damage to large supplies of paper Unopened paper in sealed reams can remain stable for several months before use Opened packages of paper have more potential for environment damage especially i...

Страница 209: ... not contain air Condition Envelopes should not be wrinkled nicked or otherwise damaged Temperature You should use envelopes that are compatible with the heat and pressure of the printer Size You should only use envelopes within the following size ranges NOTES Use only the Multi Purpose Tray to print envelopes You may experience some paper jams when using any media with a length less than 127 mm 5...

Страница 210: ...s might cause wrinkling creasing or even jams and may even damage the fuser Envelope Margins The following gives typical address margins for a commercial 10 or DL envelope NOTES For best print quality position margins no closer than 15 mm 0 6 in from the edges of the envelope Avoid printing over the area where the envelope s seams meet Envelope Storage Proper storage of envelopes helps contribute ...

Страница 211: ...rinter s fusing temperature Arrangement Only use labels with no exposed backing between them Labels can peel off sheets with spaces between the labels causing serious jams Curl Prior to printing labels must lie flat with no more than 13 mm 5 in of curl in any direction Condition Do not use labels with wrinkles bubbles or other indications of separation See Printing on Labels on page 4 17 Transpare...

Страница 212: ...printing 5 11 E envelopes print 4 14 error messages 7 20 Ethernet cable print 2 12 F face down output tray 4 5 face up output tray 4 6 Favorite setting use 5 6 features printer 1 2 printer driver 2 16 G graphic properties set 5 25 H help use 5 6 I image mode 5 26 install PCL driver for Windows 2 17 printer driver for Macintosh A 2 printer options E 1 PS Drivers B 2 Remote Control Panel C 2 toner c...

Страница 213: ... 7 tips for avoiding 7 14 paper level bar 4 7 paper properties set 5 7 paper size set 5 7 paper source set 5 8 paper type set 5 8 parallel cable connect 2 10 poster printing 5 16 PostScript driver access in Windows B 4 errors 7 24 install in Macintosh A 2 install in Windows B 2 preprinted paper print 4 21 print order set 5 28 print quality problems 7 15 print quality problems solve 7 15 print reso...

Страница 214: ...or Macintosh A 2 for Windows 2 17 T toner cartridge install 2 4 maintain 6 3 redistribute 6 4 replace 6 6 Toner Save mode use 5 9 top output tray use 4 5 transparencies print 4 19 Tray 1 use 2 6 turn on printer 2 13 U uninstall Remote Control Panel C 3 Windows 2 19 unpack 2 2 USB cable connect 2 11 USB driver install in Windows 98 Me 2 20 W watermarks use 5 18 ...

Отзывы: