background image

Quick start guide

Control panel

9

EN

GLIS

H

Control panel

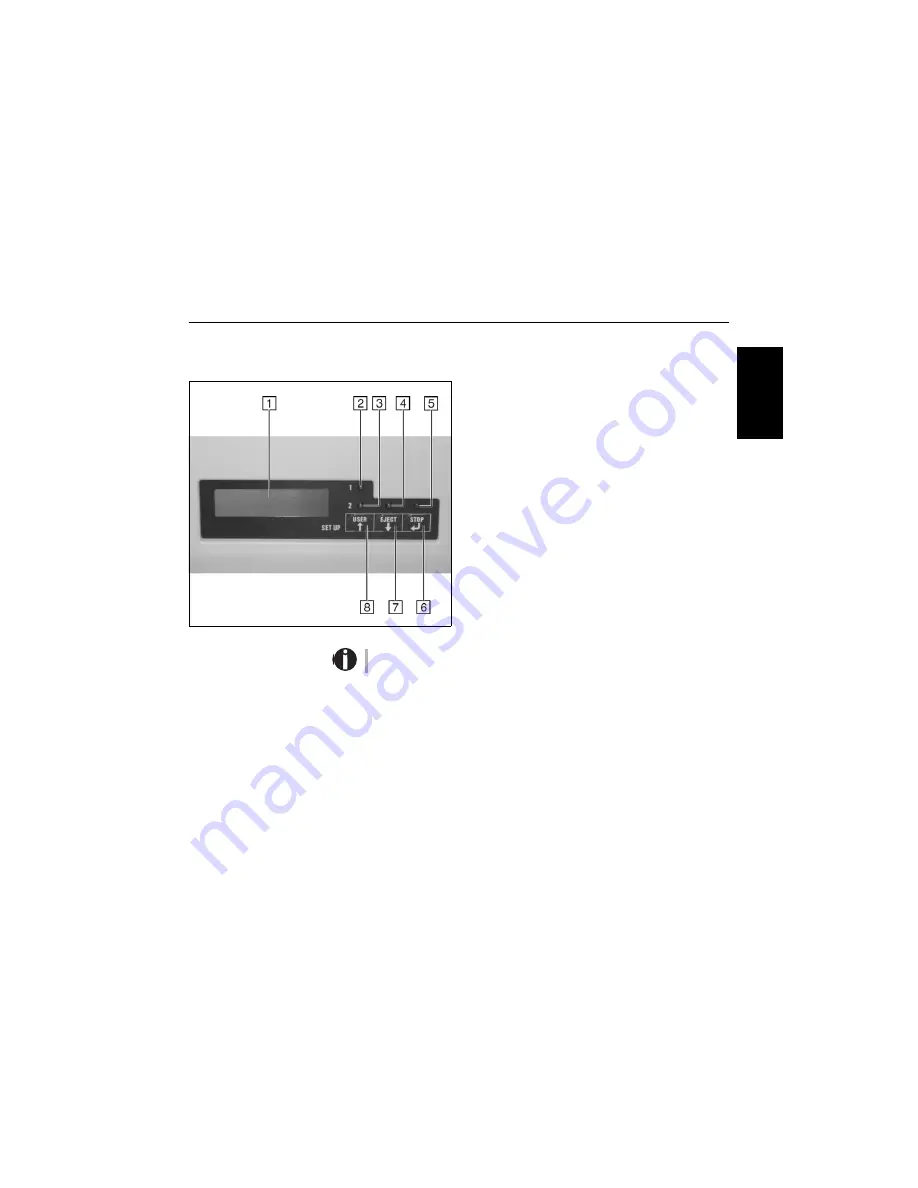
The control panel consists of three keys for controlling the printer functions, four 
LEDs displaying the status of the printer and a LCD display with 2 x 16 digits.

1

LCD display: Displays the internal printer status, operat-
ing instructions and error messages.

2

User 1 LED: Lights up if the printer is receiving data via 
the first interface or is set by the USER key (see below).

3

User 2 LED: Lights  up if the printer is receiving data via 
the second interface or is set by the USER key (see 
below).

4

Paper LED: Displays if paper is inserted or not; 
on = paper is inserted, off = no paper inserted.

5

Ready LED: Displays if printer is offline or online; 
on = online, off = offline.

6

STOP key: Sets the printer to Online/Offline mode (see 
also Ready LED)

7

EJECT key: Ejects inserted paper (see also Paper LED).

8

USER key: Toggles between User 1 and User 2 (see also 
User 1 LED and User 2 LED).

For a detailed overview of the individual functions of the control panel refer to the 
User Guide on the Online CD-ROM.

Содержание 5040

Страница 1: ...USER SETUP 1 2 EJECT STOP 5040 Quick Start Guide Flatbed Printer...

Страница 2: ...ollowing measures Reorient the receiving antenna Relocate the peripheral away from the receiver Move the peripheral away from the receiver Plug the peripheral into a different outlet so that the peri...

Страница 3: ...t a glance 3 Installation 5 Unpacking the printer 5 Placing the printer 6 Checking the printer voltage 7 Connecting the printer 7 Switching on the printer 8 Control panel 9 Operating the printer 10 In...

Страница 4: ......

Страница 5: ...r in order to prevent injuries and avoid damage to the device Keep this Quick start guide in a place which is easily accessible at all times Place the printer on a solid and even base so that it canno...

Страница 6: ...nter and its impressive features Drivers Windows 95 98 Windows 2000 Windows XP Additional documentation Programmer s application manuals lists of the sup ported printer control codes and sequences If...

Страница 7: ...uick start guide Printer at a glance 3 ENGLISH Printer at a glance Cover Power switch On Off Paper tray Control panel Ribbon cassette Print head Release lever View from the front View with cover opene...

Страница 8: ...Printer at a glance Quick start guide 4 Power inlet Parallel interface 1st Serial interface 2nd Serial interface USB interface View from the rear...

Страница 9: ...aging lift the printer out of the cardboard box and remove the re maining packaging material Check the printer for any visible transport damage and missing items The follow ing items should be include...

Страница 10: ...nter near a window protect it from the sunlight with a curtain When connecting a computer to the printer make sure not to exceed the maxi mum cable length see User guide on the Online CD ROM Technical...

Страница 11: ...if the setting is incorrect Never switch on the printer if the voltage setting is incorrect since this may result in severe damage Connecting the printer Connect the power cable to the power inlet of...

Страница 12: ...ht of the printer switch for switching on the printer The printer initializes When the initialization is completed the Ready indicator lights up The message ONLINE NO PAPER appears on the LCD The prin...

Страница 13: ...y see below 3 User 2 LED Lights up if the printer is receiving data via the second interface or is set by the USER key see below 4 Paper LED Displays if paper is inserted or not on paper is inserted o...

Страница 14: ...of the symbol and the right edge of the document support so that the docu ment alignment can grasp it securely This is especially im portant for documents that are narrower than a DIN A4 sheet Then pu...

Страница 15: ...the fold by proceeding as follows Open the passbook on the page that you want to print Bend the fold backwards extremely hard Stroke along the fold of the passbook with both thumbs and index fingers a...

Отзывы: