background image

module type

Cell type

Cell 

Q’ty

Dimensions (mm)

A*B

J

K

M

N

O*

P*

TP672 Series

6inch crystalline (M/P) 6*12

1960*990

50

600

12

20

0.5~2 2.5~3

TP660 Series

6inch crystalline (M/P) 6*10

1640*990

50

425

12

20

0.5~2 2.5~3

TP654 Series

6inch crystalline (M/P)

6*9

1482*990

50

380

12

20

0.5~2 2.5~3

TP636 Series

6inch crystalline (P)

4*9

1482*672

50

380

12

20

0.5~2 2.5~3

TP596 Series

5inch crystalline (M)

8*12

1580*1064

50

416

12

20

0.5~2 2.5~3

TP572 Series

5inch crystalline (M)

6*12

1580*808

50

416

12

20

0.5~2 2.5~3

TP536 Series

5inch crystalline (M)

4*9

1199*551

50

320

12

20

0.5~2 2.5~3

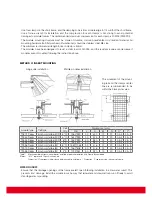
Table 1:  Mechanical dimensions when modules installed at portrait orientation with Clamp fitting method
*Notes:  “672”  represents 72pcs 6inch cell, etc.
 

Dimension “O” represents the distance between clamp and frame.  /  Dimension “P” represents the thickness of clamp.

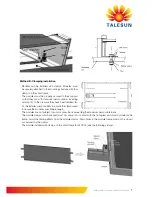
·  Use four clamps on the short frame, and the clamping zone is from module edge to 1/4 width of the short frame. 
·  Use a torque wrench for installation, and the compression for each clamps is not strong to avoid potential 

damages to module frames. The recommended maximum compression for each clamp is 20MPa (2900PSI). 

·  The module mounting structure must be made of durable, corrosion-resistantand UV-resistant material. All 

mounting hardware (bolt/flat washer/split washer/nut) should be stainless steel M8 size. 

·  The minimum recommended length for each clamp is 50mm. 
·  The modules have been designed to resist a static load of 2400Pa, and the resistance value can decrease if 

modules are not mounted following the instruction above. 

METHOD C: INSERT MOUNTING

Fringe side installation

Middle modules installation

The movement of the mount-
ing rail and the clamps center 
line are recommended to be 
within the black arrow area.

WATER RUNOFF

·  Ensure that the drainage openings of the frame are left open following installation to allow water runoff. This 

prevents frost damage. Install the module in such a way that rainwater and snowmelt can run off freely to avoid 
standing water or pudding.

Содержание TP672M-315

Страница 1: ...electing the proper supporting frame 5 3 3 Frame holes mounting 5 4 Electrical mounting 4 1 Module selection 9 4 2 Safety factor 9 4 3 General installation 9 4 4 Grounding 10 5 Commission and maintena...

Страница 2: ...allation Information for operators Keep these instructions safe for the entire useful life of the solar installation Please contact your plant supplier for information concerning the formal requiremen...

Страница 3: ...can cause arching resulting in grave or mortal injury The severity increases when several modules are connected in series Cover the solar modules with opaque material for the entire duration of assem...

Страница 4: ...eners on the modules Use only insulated tools that are approved for work on electrical installations Do not use light concentrators e g mirrors or lenses to attempt to increase the capacity of the mod...

Страница 5: ...the assembly substructure That ensures that no mechanical stress e g caused by vibrations twisting or expansion is generated on the module That ensures sufficient back ventilation of the module That...

Страница 6: ...le support structures used to support PV modules at correct tilt angles should be wind and snow load rated by appropriate local and civil codes prior to installation Pole mount When installing a modul...

Страница 7: ...ponsibility to ensure the clampsused to secure the module sare strong enough The modules are not subject to wind or snow loads exceeding the maximum permissible loads The module clamps which are used...

Страница 8: ...edge to 1 4 width of the short frame Use a torque wrench for installation and the compression for each clamps is not strong to avoid potential damages to module frames The recommended maximum compres...

Страница 9: ...of the modules and all other system components If modules are connected in series the total voltage is equal to the sum of individual voltages The recom mended max number of module N Vmax system Voc...

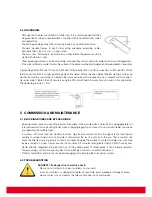
Страница 10: ...tion The tightening torque is 1 Nm 5 COMMISSION AND MAINTENANCE 5 1 Blocking diodes and bypass diode Blocking diodes prevent current flowing from the battery to the module when no electricity is being...

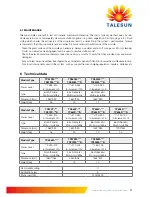
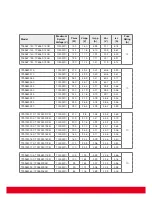
Страница 11: ...Technical data Module Type TP672M TP672M B TP660M TP660M B TP654M TP654M B Power Level 265 315 in increment of 5 215 265 in increment of 5 195 235 in increment of 5 Type 6inch 72cells Multi crystalli...

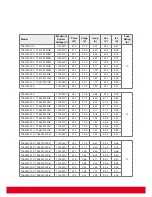
Страница 12: ...255B 1000 IEC 255 30 2 8 44 37 5 8 81 TP660M 250 TP660M 250B 1000 IEC 250 30 1 8 31 37 3 8 78 TP660M 245 TP660M 245B 1000 IEC 245 30 0 8 17 37 2 8 69 TP660M 240 TP660M 240B 1000 IEC 240 29 8 8 06 37...

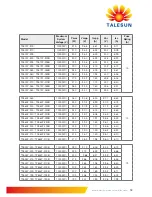
Страница 13: ...IEC 250 30 3 8 25 37 3 8 69 TP660P 245 TP660P 245B 1000 IEC 245 30 1 8 14 37 1 8 65 TP660P 240 TP660P 240B 1000 IEC 240 29 7 8 08 36 9 8 62 TP660P 235 TP660P 235B 1000 IEC 235 29 5 7 97 36 8 8 59 TP66...

Страница 14: ...240 47 2 5 09 58 8 5 48 TP596M 235 1000 IEC 235 46 8 5 02 58 6 5 46 TP596M 230 1000 IEC 230 46 5 4 95 58 2 5 39 TP572M 210 TP572M 210B 1000 IEC 210 38 5 53 45 8 5 83 10 TP572M 205 TP572M 205B 1000 IE...

Страница 15: ...sales eu talesun com Web www talesun eu com USA Talesun Solar USA 111W Saint John Street Suite 900 San Jose CA 95113 USA Tel 1 800 276 0823 Fax 1 408 645 7111 E Mail sales USA talesun com Web www tal...

Страница 16: ...www talesun eu com...

Отзывы: