background image

14

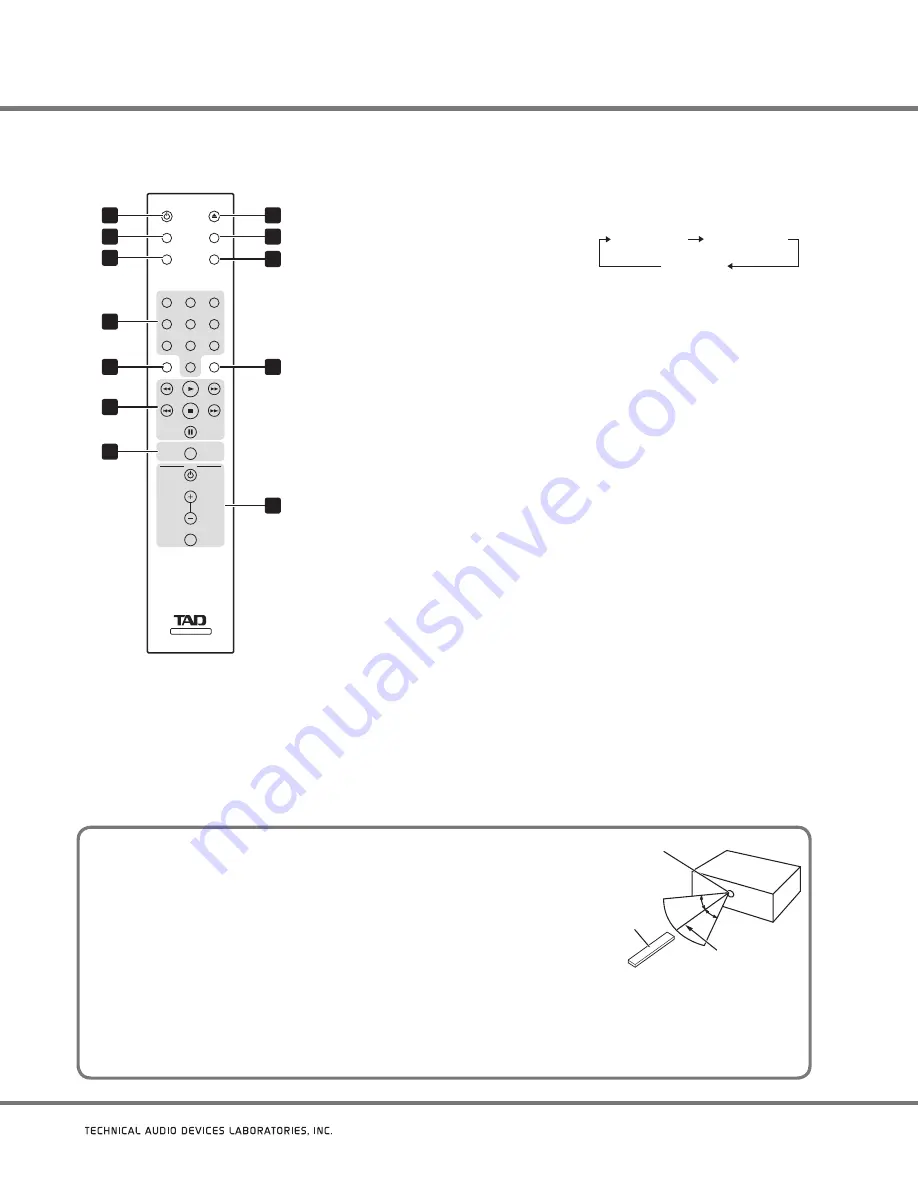
remote control unit

REPEAT

VOLUME

AMP

DISC PLAYER

OPEN/CLOSE

TIME

DISPLAY OFF

DAC MODE

SACD/CD

CLEAR

ENTER

1

2

3

4

5

6

7

8

0

9

MUTE

CXE3196

DISC PLAYER

1

8
9

10

11

12

2
3

4

6

7

5

DISC PLAYER 

 

button

Use to set power to ON/standby 
mode.

30°

30°

7 m (23 ft.)

Remote sensor

Remote

control unit 

remote control operating range

When using the remote control unit to operate the TAD-D600, point the remote control at 
the main unit’s remote sensor within the ranges shown in the accompanying illustration.

The remote control may not operate properly if obstructions exist between the 


'

remote control unit and the remote sensor, or if the angle between the remote 
control and the remote sensor is poor.
Malfunctions may occur if the TAD-D600 is used nearby other appliances that emit 


'

infrared light, or if remote control units for other devices utilizing infrared light are 
used nearby. Alternately, using this remote control unit near other appliances that also utilize infrared light may cause 
those appliances to malfunction.
Replace the batteries when you notice a reduction in the operating range of the remote control unit.


'

The remote control may not operate correctly if strong sunlight or light from fluorescent lamps is allowed to strike the 


'

remote sensor directly. In such cases, change the installation location, or remove the fluorescent lamps to a more 
distant location.

tImE button

Press to display the disc’s elapsed 
and remaining playing time. Each 
time the button is pressed, the 
display alternates as follows: 

“track 

remaining time”

 / 

“disc remaining 

time”

 / 

“elapsed time”

.

SACD/CD button 

Press to switch between play areas 

of hybrid discs. Each time the 

button is pressed, the playing area 

alternates between 

“CD area”

 and 

“SACD area”

.

Number buttons

Use to designate specific tracks 

for playback. Press the desired 

number button to select, followed 

by the 

ENtER

 button to confirm the 

selection.

CLEAR button 

Press to cancel a currently input 

item. For example, this is useful 

when an improper track number 

has been input.

Play operation buttons

 – Play disc.

g

 – Stop disc play. 

e

 – When pressed during playback, 

pauses the disc play at its current 

position. Press the button again to 

resume playback. 

m

 – Press during playback to 

perform quick reverse. 

 – Press during playback to 

return to the beginning of the 

currently playing track.

n

 – Press during playback to 

perform fast forward.

 – Press to advance to 

beginning of next track.

REPEAt button 

Each time the button is pressed the 

repeat play mode alternates in the 

following order:

All track repeat

Repeat OFF

1 track repeat

OPEN/CLOSE button 

Press to open and close the disc 

tray.

DISPLAY OFF button 

Press to turn off display.

DAC mODE button 

10 

Press to switch DAC mode. Each 

time the button is pressed the mode 

alternates as follows: 

“D1 input (XLR)”

 / 

“D2 input 

(coaxial)”

 / 

“Disc play mode”

ENtER button 

11 

Press to confirm settings and 

selections

Amplifier operation buttons

12 

These buttons can be used to 

operate a Pioneer TAD amplifier.

AmP


– Amplifier power ON/

standby

VOLumE

 – Use to adjust sound 

volume.

mutE

 – Press to temporarily mute 

the sound.

Содержание D600

Страница 1: ......

Страница 2: ...unit D58 5 2 2b _A1_En CLASS 1 LASER PRODUCT This product is for general household purposes Any failure due to use for other than household purposes such as long term use for business purposes in a r...

Страница 3: ...nnections D8 10 3a_A1_En U S model only Read these instructions Keep these instructions Heed all warnings Follow all instructions Do not use this apparatus near water Clean only with dry cloth Do not...

Страница 4: ...e dial and leave it there Taking a minute to do this now will help to prevent hearing damage or loss in the future After all we want you listening for a lifetime We Want You Listening For A Lifetime U...

Страница 5: ...V or 120 V written on the rear panel of the power unit D3 4 2 1 4 _A1_En POWER CORD CAUTION Handle the power cord by the plug Do not pull out the plug by tugging the cord and never touch the power cor...

Страница 6: ...health and the environment which could otherwise arise from inappropriate waste handling For more information about collection and recycling of old products and batteries please contact your local mun...

Страница 7: ...Press the DISC PLAYER button so that the OFF indicator in the display goes out then unplug the power cord Never move the unit with a disc loaded since damage may result Caution for when the unit is i...

Страница 8: ...ntrol Unit 14 INSTALLATION AND CONNECTIONS 15 Installation 15 Connecting up 16 Playing and caring for discs 17 To play a disc 17 Taking care of your player and discs 17 Special settings 18 Power savin...

Страница 9: ...ial D A Converters Twin Burr Brown digital audio converters 192 kHz 24 bit are connected in parallel for improved audio performance in all metrics including S N ratio linearity dynamic range and disto...

Страница 10: ...a heater This can cause batteries to leak overheat explode or catch fire It can also reduce the life or performance of batteries CAUTION Incorrect use of batteries may result in such hazards as leakag...

Страница 11: ...isc retailer Playing CD R CD RW discs The TAD D600 can play CD R CD RW discs formatted in music CD format and containing musical data Depending on the disc however some may not be playable or may exhi...

Страница 12: ...urn to beginning of currently playing track Skip to beginning of next track Set power to ON standby The indicator lights red when in the standby condition and orange when ON DAC Switch to digital anal...

Страница 13: ...in power OFF AC IN connector 22 Connect the supplied power cord here DC OUTPUT connectors DC1 DC2 33 Connect one end of the accessory DC cord here and the other end of the cord to the main unit s DC 1...

Страница 14: ...time Each time the button is pressed the display alternates as follows track remaining time disc remaining time elapsed time SACD CD button 33 Press to switch between play areas of hybrid discs Each t...

Страница 15: ...ld cause the unit to fall resulting in an accident Installation notes Both the power unit and main unit of the TAD D600 are mounted on three spike type supports which may scratch the surface of the in...

Страница 16: ...A AC 120 V Europe AC 230 V 444 XLR D1 DC2 DC1 R UNBALANCED BALANCED L R L XLR DIGITAL INPUT DC INPUT COAXIAL D2 DIGITAL OUTPUT ANALOG OUTPUT 1 2 3 DC2 POWER ON OFF AC IN DC1 DC OUTPUT BALANCED 1 GROUN...

Страница 17: ...Don t glue paper or put stickers on to discs Do not use a pencil ball point pen or other sharp tipped writing instrument to write on the disc Don t use self adhesive disc labels on discs as these can...

Страница 18: ...the time of purchase the factory default setting is DSD modulation 50 high output level While holding the main unit s front panel button depressed press the main unit s front panel button Each time t...

Страница 19: ...cut Or is there soiling on the connectors Is the disc dirty Is the play operation set to pause Is the sound volume of the connected amplifier set too low Connect audio cables securely Check the plugs...

Страница 20: ...20 dB Output connectors Balanced output XLR stereo x 1 Unbalanced output RCA stereo x 1 Frequency response Load impedance 100 k CD 4 Hz to 20 kHz SACD 4 Hz to 40 kHz S N ratio CD 115 dB SACD 110 dB Di...

Страница 21: ...21...

Страница 22: ...t principale du lecteur APPAREIL LASER DE CLASSE 1 D58 5 2 2b _A1_Fr Ce produit est destin une utilisation domestique g n rale Toute panne due une utilisation autre qu des fins priv es comme une utili...

Страница 23: ...unit d alimentation D3 4 2 1 4 _A1_Fr NOTE IMPORTANTE SUR LE CABLE D ALIMENTATION Tenir le c ble d alimentation par la fiche Ne pas d brancher la prise en tirant sur le c ble et ne pas toucher le c b...

Страница 24: ...areil de chauffage Les piles risqueraient de fuir de surchauffer d exploser ou de s enflammer Leur dur e de vie ou leurs performances pourraient galement tre r duites ATTENTION Lorsque vous vous d bar...

Страница 25: ...en Lage des Aufklebers im Inneren des Player Hauptger tes LASER KLASSE 1 D58 5 2 2b _A1_De Dieses Ger t ist f r den Heimgebrauch vorgesehen Falls bei Einsatz zu einem anderem Zweck z B Langzeitgebrauc...

Страница 26: ...iche Netzspannung mit der auf dem Typenschild an der R ckseite des Netzger tes angegebenen Nennspannung z B 230 V oder 120 V bereinstimmt D3 4 2 1 4 _A1_De VORSICHT MIT DEM NETZKABEL Fassen Sie das Ne...

Страница 27: ...es Fahrzeugs oder in der N he eines Heizk rpers Dies kann zu Leckage berhitzung Explosion oder Brand der Batterien f hren Dar ber hinaus kann sich dadurch die Lebensdauer oder Leistung der Batterien v...

Страница 28: ...A1_It Questo prodotto destinato esclusivamente all uso domestico Eventuali disfunzioni dovute ad usi diversi quali uso prolungato a scopi commerciali in ristoranti o uso in auto o su navi e che richie...

Страница 29: ...elettricit differisce da Paese a Paese e da regione a regione Verificare che il voltaggio di rete nell area dove questa unit viene usata sia quello corretto ad esempio 230 V o 120 V indicato nel panne...

Страница 30: ...potrebbero verificarsi perdite di liquido surriscaldamenti incendi o esplosioni delle batterie In tali condizioni anche la durata e le prestazioni delle batterie potrebbero risultare ridotte ATTENZION...

Страница 31: ...a debida a otra utilizaci n que tareas dom sticas tales como el uso a largo plazo para motivos de negocios en un restaurante o el uso en un coche o un barco y que necesita una reparaci n har que cobra...

Страница 32: ...ia es decir 230 V 120 V indicada en el panel posterior de la unidad de alimentaci n D3 4 2 1 4 _A1_Es PRECAUCIONES CONCERNIENTES A LA MANIPULACI N DEL CABLE DE ALIMENTACI N Tome el cable de alimentaci...

Страница 33: ...o cerca de un aparato de calefacci n Las pilas podr an perder l quido sobrecalentarse estallar o incendiarse Tambi n podr an verse afectados el rendimiento y la vida til de la pilas PRECAUCI N Aseg re...

Страница 34: ...in Japan TECHNICAL AUDIO DEVICES LABORATORIES INC 4 15 3 Nishi Shinjuku Shinjuku ku Tokyo 160 0023 Japan http tad labs com Published by Pioneer Corporation Copyright 2009 TECHNICAL AUDIO DEVICES LABO...

Отзывы: