


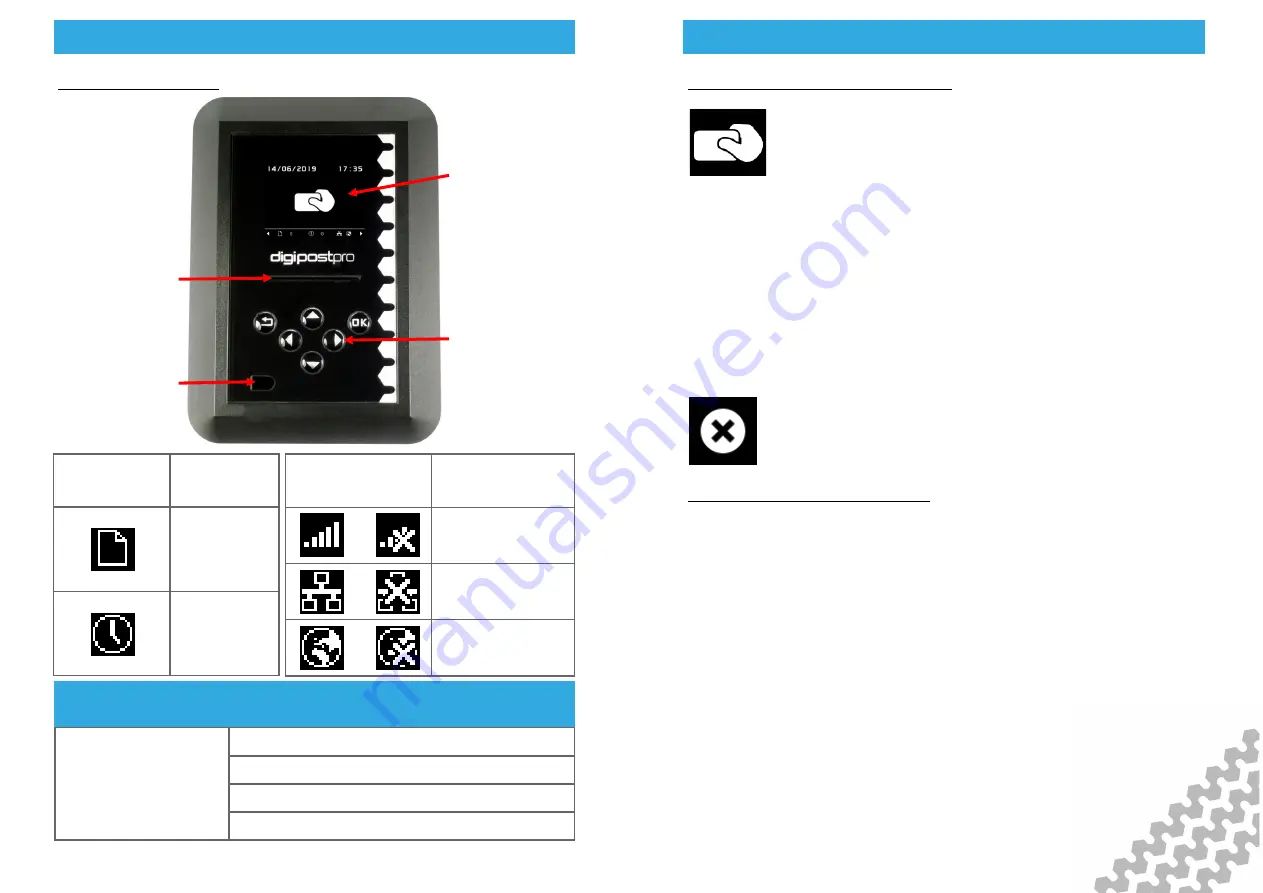
digipostpro Controls
digipostpro Controls
digipostpro Controls
digipostpro Controls
Page - 6
digipostpro Controls
Six button
control (Up,
Down, Left,
Right, OK and
Return
)
Digivu or
digifobpro
connection
Card slot
Display
Screen
LAN / Modem
MAC Address / Network Name & ID
IP Address / SIM Number
Hostname
Serial Number & Firmware
Pressing right/left from the main screen will change the information displayed at
the bottom of the screen. Listed as right from main screen .
Screen icons
Description
Card files
pending
Clocking logs
pending
Screen icons
Description
/
Modem Status
/
LAN Status
/
Server Connection
Status
Configuration Menu
Configuration Menu
Configuration Menu
Configuration Menu
Page - 7
Accessing Administration Options
To access the Main Menu ensure the digipostpro is
powered and that the screen displays the insert card
icon . Insert a valid configuration card and when
prompted to do so remove it.
The digipostpro will now display the Main Menu. Use the arrow
buttons to navigate the options.
From within any sub-menu, simply press the return button
to
return to the previous menu, and ultimately, the main menu.
As a security feature the unit will exit the Administration Options
if it does not detect any activity for 10 minutes.
If you wish to exit the administration options then
navigate to the ‘Exit’ icon
in the main menu
and press
the OK button.
Access via a configuration code
Configuration can be done via a configuration code, negating the
need for a configuration card (perfect for end users). Resellers
should visit the Tachosys Dealer Zone at
dealerzone.tachosys.com. After signing in, select the digipostpro
Menu Unlock Code option and enter the serial number of the
digipostpro that requires configuration. This will generate a code
which can be sent to an end user.
In order to enter the code on a digipostpro, from the main screen
press
OK. This will bring up a menu prompting you to enter
the activation code, scroll through the numbers by using the up
and down arrows.
Any code generated only lasts for one calendar day.


