


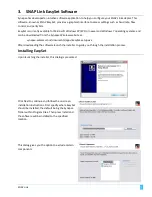


During installation you’re asked to disconnect any
Synapse USB devices. This is so the installer
can load new
drivers.
Disconnect any Synapse USB devices and press Ok
to complet
e the installation.
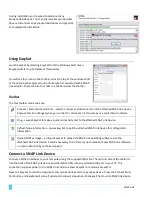
Using EasySet
Launch EasySet by selecting EasySet from the Windows Start menu.
EasySet will start up and
present this window.
You will see four icons in the tool bar across the top of the window. Most
of these are inactive (grayed out) until EasySet is connected with a SNAP
Link adapter.
There are also four tabs in a tab
bar below the tool bar.
Toolbar
The four toolbar commands
are:
Connect / Disconnect Serial Port
–
used to connect and disconnect from the attached SNAP Link device.
Because this icon changes when you connect or disconnect, it also serves as a quick status indicator.
Ping –
causes EasySet to make a quick connectivity test to the attached SNAP Link device.
Refresh Node Information
–
causes EasySet to poll the attached SNAP Link device for configuration
information.
Upload SNAPpy Image –
prompts EasySet to upload the SNAP Link operating software into the
attached SNAP Link device. It will be necessary to do this only upon release of new SNAP Link
software,
or upon instruction by technical support.
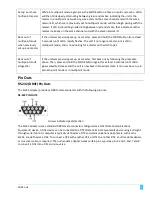
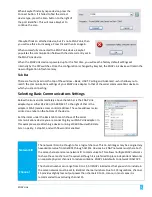
Connect a SNAP Link Device
Connect a SNAP Link device to your computer using the supplied USB cable. T
he micro-
B side of the cable fits
into the back of the SNAP Link device and the USB end fits into any standard USB port on your PC. This
connection supplies power to the SNAP Link and also allows EasySet to communicate with it.
Next, tell EasySet to scan t
he computer’s communications ports for a Synapse device. Press the Connect Serial
Port button and EasySet will scan all serial ports and will stop when it believes it has found a SNAP Link device.
8
SNAP Link
Содержание SNAP Link
Страница 4: ......