background image

628

9

The Equalizer ...

Since no one remains content to use a standard “factory preset”, you need to know how to modify

presets and create your own programs from scratch.  We’ll start with the parametric equalizer

section, since EQ is the first thing

which you will want to tweak for

each individual voice.
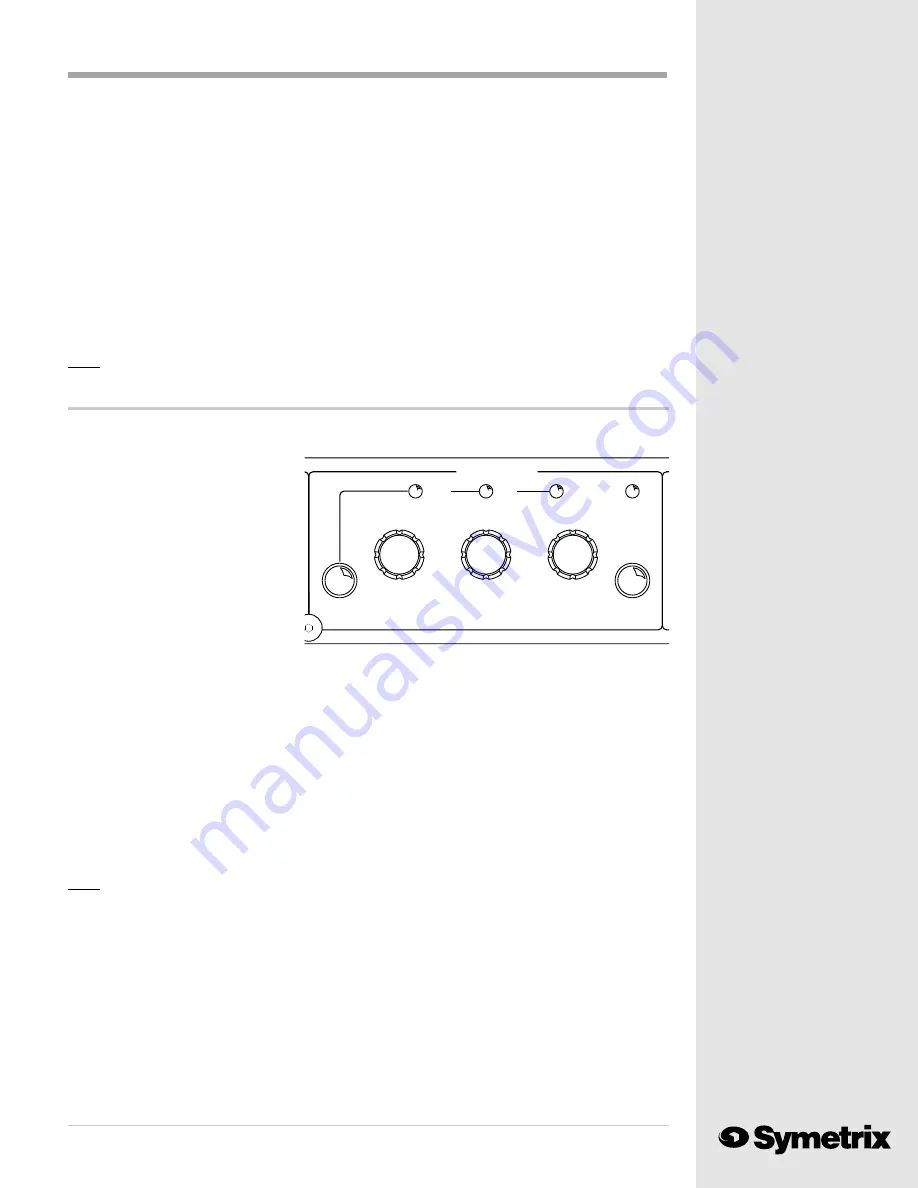
The 628 provides three overlapping

bands of parametric equalization with

adjustable frequency and bandwidth.

Operating a parametric equalizer is

like opening a safe; you must dial in

the correct three numbers to properly

accomplish the job.
First, make sure that the equalizer is active.  Momentarily push the Operate/Bypass button, and the

ACTIVE LED in the PARAMETRIC EQ section will come on.  Next, use the Band Select push-

button (left of the FREQUENCY knob) to toggle between LOW, MID and HIGH until the band

which you want to adjust is selected.
The first parameter to adjust is the frequency.  This selects the center frequency of equalization cut

or boost.  Turn the FREQUENCY knob slowly until you feel one click.  Notice that the MASTER

numeric display changes to show the frequency (in kHz) currently selected.  You will change the

frequency as you continue to turn the FREQUENCY knob, and the display will flash, indicating that

you are changing an existing program.
Notice that you will not be able to dial in a frequency outside the equalizer band which you have

selected.  The bands do overlap, so you can accomplish rather complex equalization tasks.
Note:

If you select the 32 kHz sample rate, the high frequency band tops out at 16 kHz (680 Hz

- 16.0 kHz).  The high frequency band ranges between 680 Hz and 20.0 kHz, as indicated

on the front panel, when you use either the 44.1 kHz or the 48 kHz sample rates.

When the center frequency which you want to cut or boost displays in the window, stop turning

the FREQUENCY knob.  The display will flash, indicating that you have made a change in fre-

quency.  Listen for the equalization change which you have made to the program.  If you wish to

accept this change to the preset, push the SAVE button.  The MASTER display will show the

flashing letters "Sto" (Store).  Push the SAVE button again and the 628 will record the change to

the preset program.  This edits the program and permanently records the change.  The display will

stop flashing and display the new frequency after you save the change.
Adjustments to the equalization bandwidth (Q) are just as easy.  Start by giving the BANDWIDTH

This operation SELECTS and LOADS the preset.  When you copy a preset to another

location, you want to SELECT the target location then SAVE the preset which you wish to

copy at the new location.

You will find the 628's "bypass" preset at program "0".  The MASTER display will show the letters

"byP" when you dial it in.  You may also load the bypass program from the RC-1 Remote Control.

The bypass button is in the lower right corner (Program 0).
The bypass preset comes in handy when you need to erase a program preset from the 628.  Let's

say that you want to delete preset #5.  First select and load the bypass preset.  Next, rotate the

PROGRAM SELECT knob until the MASTER display reads "5".  Push the SAVE button.  The

MASTER display will read "Sto".  Push the SAVE button again.  You have now copied the bypass

settings (no processing and flat EQ) into the processing preset #5.  You may now start fresh with a

clean slate and build a new processing preset from scratch at preset #5.
Note:

You can find a description of the factory presets and their program numbers in Appendix A.

HIGH

MID

LOW

PARAMETRIC EQ

(dB)

(Oct)

CUT/BOOST

(kHz)

FREQUENCY

BANDWIDTH

(680-20kHZ)

(20-500Hz)

(160-6300Hz)

ACTIVE

Содержание 628 Digital Voice Processor

Страница 1: ...628 Digital Voice Processor User s Guide 628...

Страница 2: ...B June 30 1998 Symetrix part number 53628 0B00 Subject to change at our whim and fancy without notice 1998 Symetrix Inc All right reserved Symetrix is a registered trademark of Symetrix Inc Mention o...

Страница 3: ...frequencysections The equalizer bands and controls remain the same as onthe528E exceptyounowreadFREQUENCY BANDWIDTHandCUTorBOOSTonthenumeric display TheOUTPUTLEVELpottweakstheoutputgain andtheLEDheadr...

Страница 4: ...on the 628 s chassis Boldface Strong emphasis Power source Electrical power requirements for US and Canadian models are 117 VAC Nominal 105 to 125 VAC 60 Hz 20 Watts maximum UL and C UL listing appli...

Страница 5: ...plugonthepowercordisnotcorrectforyourmainsreceptacle STOP Callthe Symetrixdealer oryourcountry sdistributor whosuppliedyourunitandtradethe 628foraunitbuiltforyourmainsvoltage If everything looks consi...

Страница 6: ...sleeve plug into the TRS tip ring sleeve input jack Use the GAIN control to adjust the line level input signal Caution The 628 accepts analog inputs only There is no provision for a digital input sign...

Страница 7: ...equipment there is no 0 dBm reference point A signal passing through the 628 at a level of 4 dBfs dB full scale is 4 dB below clipping NOT at 4dBu The 628 clips at 22 dBu This means that the 4 dBfs s...

Страница 8: ...l world things aren t always this neat Some consoles only allow microphone level 50 dBu inputs for the channels providing microphone functions such as speaker muting or on air light switching Please c...

Страница 9: ...should display 1 indicating that the command from he RC 1 was received and preset 1 was loaded The LEDs on the RC 1 do not provided positive confirmation of which preset is selected on the 628 They si...

Страница 10: ...tton the MASTER display will show the flashing letters Sto Store Push the SAVE button again and the 628 will copy the selected preset program to the new location Until you press the SAVE button the se...

Страница 11: ...sample rates When the center frequency which you want to cut or boost displays in the window stop turning the FREQUENCY knob The display will flash indicating that you have made a change in fre quenc...

Страница 12: ...urning the knob further will change the cut or boost and the new value will show in the LCD display Push the SAVE button once and the MASTER display will show the flashing letters Sto Store Push the S...

Страница 13: ...isplay Save the change by pressing the SAVE button The MASTER display will show the flashing letters Sto Store Push the SAVE button again and the 628 will record the change to the preset program This...

Страница 14: ...f a higher ratio 10 1 is used a 1 dBu drop in the input signal will result in a 10 dBu drop at the 628 s output This resembles the function of a gate which turns off the signal when it falls below the...

Страница 15: ...resets you can disable the 628 s front panel controls After you lock out the front panel controls the announcers can switch between presets but when they turn other knobs the 628 ignores them Front Pa...

Страница 16: ...the dynamic range of signals below a threshold Limiters can be thought of as very high ratio compressors and gates can be thought of as very high ratio expanders In addition to their roles as remedial...

Страница 17: ...or limiter we could increase the amount of change at the lower end of the dynamic range with a downward expander or gate In practice we throw away some of the low level audio down near the noise floor...

Страница 18: ...u want to stop Release timing is best expressed as decibels of compression per second A release time of 10 dB Sec allows the compressor to release compression at a rate of 10 decibels every second The...

Страница 19: ...se it operates dynamically a de esser removes only sounds that are disproportionately loud and only those falling within the selected control range De essers include knobs that allow the operator to c...

Страница 20: ...oo low using the equalizer for boost may increase noise to unacceptable levels If your source signal levels are too low increase the preamp gain if you use the microphone input You may need to raise t...

Страница 21: ...ncy Description 75 200Hz Rumble fullness 200 300Hz Bass bigness 400 600Hz Chesty warmth 600 1000Hz Volume 2 4kHz Clarity 3 5kHz Nasal yell presence 5 8kHz Enunciation intimacy 10kHzup Air mouth noises...

Страница 22: ...tch in the proper position It must reflect the sample rate of the digital recorder workstation etc 8 Do you have the digital output of the 628 connected to a digital input Hum or buzz in the audio 1 V...

Страница 23: ...trying to modify one of the factory presets Presets 120 127 are read only you must move the program to another location before you can modify it Check Chapter 3 for instruction on moving presets to ne...

Страница 24: ...The DSP is not responding to the host E22 DSP host vector error The DSP is not answering a host command vector BAT Your memory backup battery is failing Oh T Skiptothere initializationprocedurebelow...

Страница 25: ...Express We will return your repair using premium freight at no additional charge If you return you unit by parcel post or UPS surface please don t ask us to return it to you via overnight or second d...

Страница 26: ...e or merchantability Symetrix s warranty obligation and buyer s remedies hereunder are SOLELY and exclusively as stated herein This Symetrix product is designed and manufactured for use in professiona...

Страница 27: ...Bands 20 Hz to 500 Hz 160 Hz to 6300 Hz 680 Hz to 20 kHz Bandwidth Range 3 to 4 Octaves Maximum Cut Boost 15 dB Analog Output Type Balanced Transformerless Output Level at 0dBFS 22 dBu Balanced Jumper...

Страница 28: ...ntrol operating through the range of 1 1 to 15 1 A front panel threshold control shall have a range of 0 dBFS to 60 dBFS The compressor release time shall be adjustable in the range from 250 milliseco...

Страница 29: ...e settings also work well for AM talk show hosts Preset126 SusieSweetheart On The Airhereoften Features light expander operation medium processing in the compressor The EQ is set for a bass boost and...

Страница 30: ...id Band Mid Band High Band High Band Frequency Frequency Threshold Threshold Threshold Threshold Frequency Frequency Frequency Frequency Frequency Frequency Threshold Threshold Ratio Ratio Ratio Ratio...

Страница 31: ...d the chassis XLR connectors find black pin jumpers J6 and J7 or J10 and J11 depending on which XLR output you want to convert to microphone level 5 Move both jumpers next to the output connector whic...

Страница 32: ...U11 C31 C25 D1 C32 R41 BP14 C35 BP18 R43 J10 J9 J7 J5 J4 J12 G 1 3 2 G 1 3 2 J11 J13 U24 D3 C66 C61 L14 R82 R81 C65 R83 C64 R79 BP28 R85 C63 R78 R70 J8 R77 R71 U19 R68 C58 L10 C39 L9 J6 C50 R59 R60 R...

Страница 33: ...ture provided on the RC 1 If you accidentally hit one of the buttons you will accidentally change the processing preset on the 628 The RC 1 connects to the Symetrix 628 with a 25 foot 7 pin DIN cable...

Страница 34: ...628 in its permanent position you may connect the RC 1 Position the RC 1 Remote Control in a convenient but secure location Route the 25 foot cable between the two devices Secure the cable so that it...

Страница 35: ...to pin 2 etc Symetrix does not offer extension cables or cables of different lengths Troubleshooting The LEDs on the RC 1 do not light after a button is pushed 1 The RC 1 is not receiving power Are th...

Страница 36: ...PLUG TIP HIGH RING LOW SLEEVE GROUND MALE TRS PLUG TIP HIGH RING NOT USED SLEEVE GROUND LOW MALE TS PLUG TIP HIGH SLEEVE GROUND LOW MALE RCA PLUG TIP HIGH SLEEVE GROUND LOW MALE TS PLUG TIP HIGH SLEE...

Страница 37: ...ssion standard Part 1 Residential commercial and light industry EN 50082 1 Electromagnetic compatibility Generic immunity standard Part 1 Residential commercial and light industry EN 55022 Limits and...

Страница 38: ...628 36 Symetrix Inc 14926 35th Ave West Lynnwood WA 98037 2303 USA Tel 425 787 3222 Fax 425 787 3211 Website http www symetrixaudio com Email symetrix symetrixaudio com...

Отзывы: