background image

10

P P T   4 3 0 0   S e r i e s

w i t h   I n t e g r a t e d   S c a n n e r  

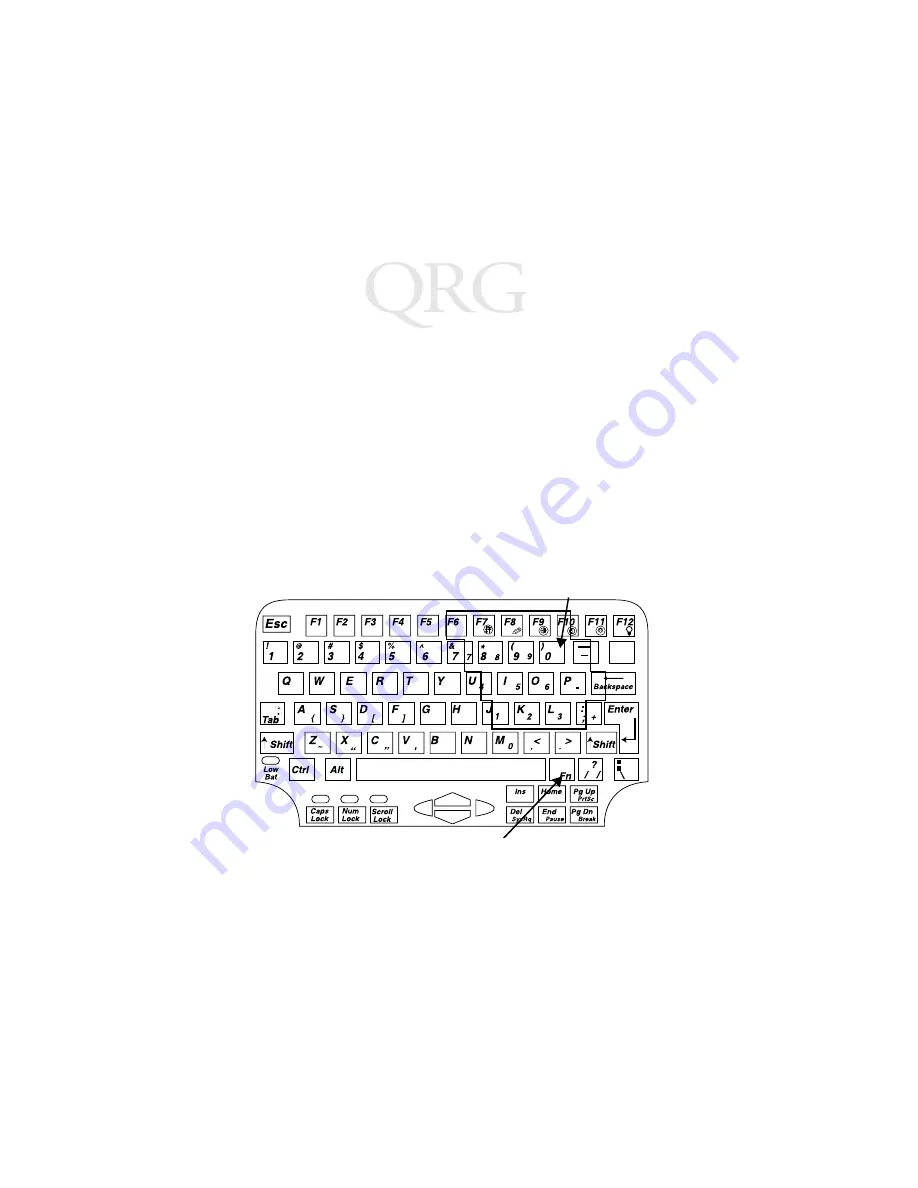
Numeric Keypad

The keyboard incorporates a numeric keypad, using the symbols 
marked in small blue letters on the 7, 8, 9, 0, U, I, O, P, J, K, L, :, M 
and > keys. To use the numeric keypad, press the NumLock key. 
When the Numlock key is on, the Numlock key lights up. Then 
press and hold the Fn key, and press the keypad keys to enter 
numbers (e.g.<Fn-J> = 1). 

Your terminal may also be set into Quick Numeric Keypad Overlay 
mode, so that when <Numlock> is on, the numeric keypad works 
as a numeric keypad without the <Fn> key (e.g.J=1). See Keyboard 
Options
 in the PPT 4300 Series Product Reference Guide for more 
information.

+
=

Numeric keypad

Fn key

Содержание PPT 4300 Series

Страница 1: ...P P T 4 3 0 0 S e r i e s w i t h I n t e g r a t e d S c a n n e r...

Страница 2: ...4 387 297 4 460 120 4 496 831 4 593 186 4 603 262 4 607 156 4 652 750 4 673 805 4 736 095 4 758 717 4 816 660 4 845 350 4 896 026 4 897 532 4 923 281 4 933 538 4 992 717 5 015 833 5 017 765 5 021 641...

Страница 3: ...This Guide This guide presents basic information on using a PPT 4300 S0E terminal It describes how to start the terminal start applications on the terminal navigate using the pen and keyboard perform...

Страница 4: ...4 P P T 4 3 0 0 S e r i e s w i t h I n t e g r a t e d S c a n n e r Parts of the PPT 4300 S0E Terminal...

Страница 5: ...DC Power Input Connector 11 External Keyboard Connector 12 RS232 Interface Connector 13 PCMCIA Slot 14 Scanner Lens 15 Scanner Foot 16 Strap Mounting Screw hole 17 Support for RS232 Interface Plug 18...

Страница 6: ...e configured to go into Sleep mode when you press the Power icon After a number of minutes in Sleep mode the terminal shuts itself off Contact your Systems Support personnel for more details If the te...

Страница 7: ...t For details see the table below You can also use the Power icon to turn the terminal off but it may not close your session on the host computer Session Type How to Exit Terminal Emulation Follow you...

Страница 8: ...use anything that will scratch or mark the screen Symbol can supply extra pens for the terminal To Do This Move the pointer Place the end of the pen onto the display surface The arrow goes to where t...

Страница 9: ...st Fn F11 Change LCD Display backlight brightness Fn F12 Turn the keyboard backlight on or off Other Fn key characters and functions are shown in blue text on the keypad For example press Fn PgDn to u...

Страница 10: ...d press the NumLock key When the Numlock key is on the Numlock key lights up Then press and hold the Fn key and press the keypad keys to enter numbers e g Fn J 1 Your terminal may also be set into Qui...

Страница 11: ...d laser beam stays lit until the bar code is successfully decoded If decoding is not successful the scanner turns off after approximately 5 seconds To use the integrated scanner 1 Make sure that the t...

Страница 12: ...ficulty scanning Scanning Tips Usually scanning is a simple matter of aiming scanning and decoding It is generally mastered simply and intuitively after a few quick test scans Two important considerat...

Страница 13: ...angle Do not scan at a sharp angle or the decode will not be success ful Practice several test scans to find the proper angle Scanning and Power Save Modes If the terminal is in Doze or Sleep mode pre...

Страница 14: ...e terminal is preparing to enter Doze mode while a scan is in progress the scan will continue and Doze mode will not be activated Miscellaneous The scanner cannot be activated if a pop up message is d...

Страница 15: ...is on press this icon to turn the terminal off Some terminals may configure the Power icon differently See page 6 for more information Displays terminal settings such as IP Address Terminal Name Date...

Страница 16: ...erform a right click press and hold the button on the side of the Electromagnetic pen as you tap the screen Bar code scanning icon To activate the scanner press the icon with the pen while you are in...

Страница 17: ...ry icon to display a Battery Status window shown below 2 When remaining battery life gets low change the battery 3 The Battery Status window closes automatically after a few seconds but you may also c...

Страница 18: ...t or losing your session To do this 1 Make sure you have a fully charged battery available and close at hand 2 Turn the terminal display side down but do not rest it on a table The table may cause key...

Страница 19: ...ith your finger tips and allow the battery to slip out of the battery compartment 5 Place the bottom of a fully charged battery pack into the battery well as shown The tabs at the bottom of the batter...

Страница 20: ...Battery Pack As an option Symbol supplies two types of Battery Chargers a single slot unit and a four slot unit For specific instructions on the use of the Battery Charger see the user guide which ca...

Страница 21: ...standard electrical outlet Note that the Power Management features are disabled when the terminal is running from the DC adapter To connect power 1 Connect the DC Adapter plug into the DC Power Input...

Страница 22: ...instructions Preventive maintenance is the responsibility of customer and is not covered under this warranty Wear items and accessories having a Symbol serial number will carry a 90 day limited warran...

Страница 23: ...chase of this Symbol Technologies product It is manufactured to the highest standards to ensure trouble free operation and durability In order to comply with various U S and International regulatory r...

Страница 24: ...Generic Immunity Stan dard Part 1 Residential commercial Light Industry IEC 1000 4 2 1995 01 Electromagnetic compatibility EMC Part 4 Testing and measurement techniques Section 2 Electrostatic dischar...

Страница 25: ...power visible light diode As with any very bright light source such as the sun the user should avoid staring directly into the light beam Momentary exposure to a Class 2 laser is not known to be harm...

Страница 26: ...BEAM CLASS 2 LASER PRODUCT DANISH KLASSE 1 KLASSE 1 LASERPRODUKT KLASSE 2 LASERLYF SE IKKE IND I STR LEN KLASSE 2 LASERPRODUKT DUTCH KLASSE 1 KLASSE 1 LASERPRODUKT KLASSE 2 LASERLICHT NIET IN STRAAL S...

Страница 27: ...E 1 KLASSE 2 LASERLYS IKKE STIRR INN I LYSSTR LEN LASERPRODUKT KLASSE 2 PORTUGUESE CLASSE 1 PRODUTO LASER DA CLASSE 1 CLASSE 2 LUZ DE LASER N O FIXAR O RAIO LUMINOSO PRODUTO LASER DA CLASSE 2 SPANISH...

Страница 28: ...s RF devices are type approved and do not require the user to obtain license or authorization before using the equipment Any changes or modifications to Symbol Technologies equipment not expressly ap...

Отзывы: