background image

Chapter 3: Sessions 


option takes effect only when this session was the last one used – each session has its own 
settings.


Start On Field  

Select the first field the User is focused on when 

New

 is selected from the data view screen.  This 

setting is commonly selected to control what data must be entered when the program is initially 
opened.   


Example:   A session is created to capture package delivery information. Date and Time 
stamps are captured in fields 1 and 2.  The bar-coded Package ID will be entered into is Field 
3.  In this scenario the Start On is set to Field 3 since Field 1 and 2 are auto entered via 
automatic date and time stamps


Edit on scan/Find in grid 

Select

 Edit on scan/Find in grid 

to automatically open records in the data entry screen when a 

record is located using ‘Find’ or scanning on the main grid screen.  Note that the Find Field 
affects which field’s data is used for searching. 
 

Example:

 A session is created to perform an inventory audit.  The goal of the audit is to quickly 

find items in the AccuScan Palm database and compare the database values to the actual 
inventory levels.  To speed this process, the 

Edit on scan/Find in grid 

setting is enabled.   When 

an item is scanned in the find field and located in the database, the matching record is 
automatically brought up in the data entry screen for editing. 


Edit on Click in Grid 

A similar option for automatically editing a record is the behavior of editing a record immediately 
upon clicking it in the grid. Selecting this option is very useful for the user who is performing a lot 
of edits to existing data. 


Note: 

When this option is selected, it is not possible to delete a single selected record from the 

grid.  The user must turn this option off before being able to delete single records.  The Delete All 
menu choice behavior is not affected.


3.2.2 

HotSync Settings  

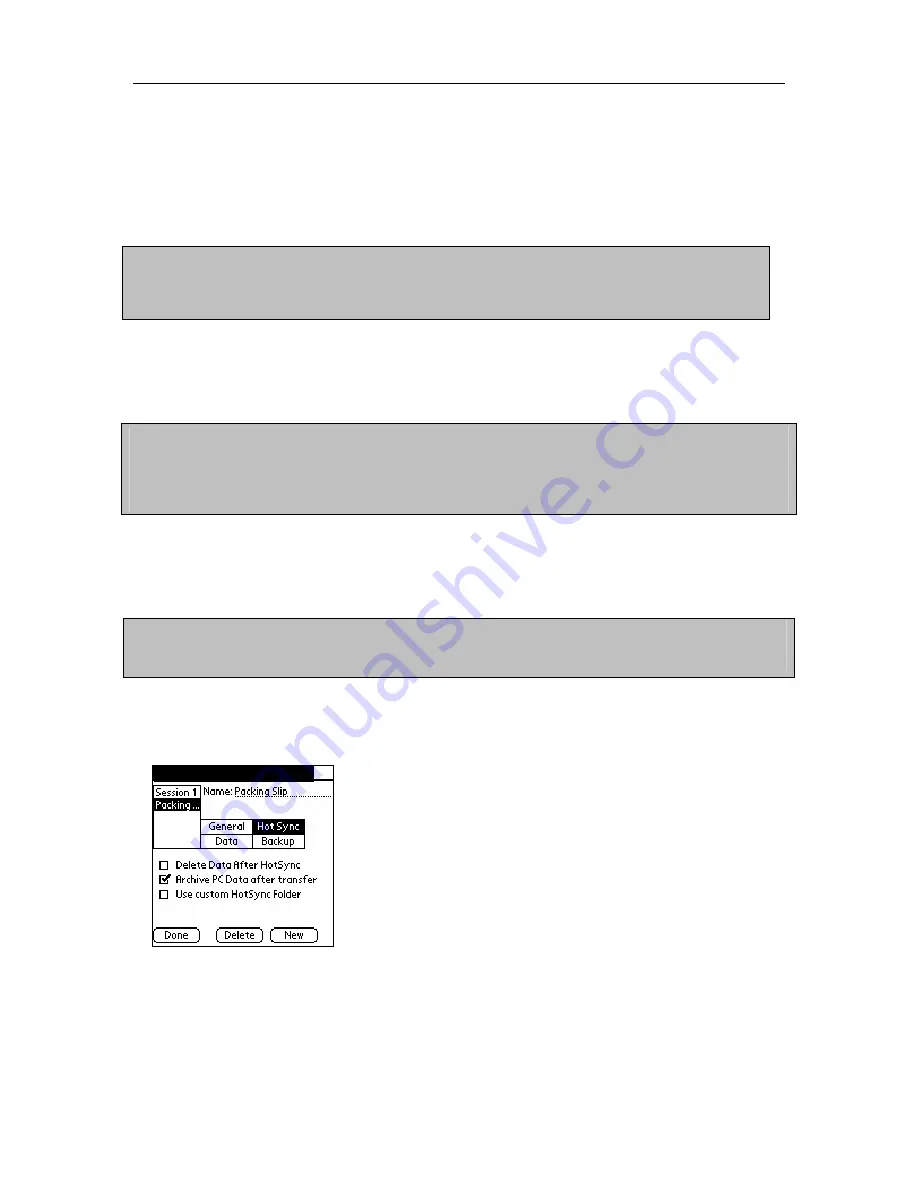
HotSync settings are used to control how data is routed during HotSync to the PC.   


AccuScan Sessions [Hot Sync] 


Delete Data After HotSync 

Select 

Delete Data After HotSync

 if the data should be removed form the PDA after a 

successful HotSync.  Note that if data is not successfully transferred to the PC, as a safety 
precaution, it will not be deleted from the PDA even when this option is enabled. 


AccuScan PalmM-0002.010 


12 

Содержание AccuScan Palm

Страница 1: ...rademarks are the property of their respective owners MGM SOLUTIONS INC WILL NOT BE LIABLE FOR A ANY BUG ERROR OMISSION DEFECT DEFICIENCY OR NONCONFORMITY IN ACCUSCAN PALM OR THIS DOCUMENTATION B IMPL...

Страница 2: ...ed 11 3 2 1 General Session Settings 11 3 2 2 HotSync Settings 12 3 2 3 Data Storage and Transfer Settings 13 3 2 4 Backup Settings 14 3 3 Deploying Configured Sessions to Multiple Users 15 Chapter 4...

Страница 3: ...own Lists to the PDA 32 5 5 4 Sending Field Hints to the PDA Pro version only 32 Chapter 6 Administration Settings 34 6 1 Setting Passwords 34 6 1 2 Enable Protection for 34 6 2 Deploying Configured S...

Страница 4: ...Computer Inventory Job Material Management Time Tracking Trade Show Visitor Tracking Electronic Signature Capture 1 2 New Features in AccuScan Palm 2 0 Great feedback from AccuScan Palm users leads to...

Страница 5: ...m administrator needs to deploy AccuScan Palm sessions to a mobile workforce Chapter 6 should be read thoroughly In order to ease the learning process of AccuScan Palm a registered user receives free...

Страница 6: ...also allows for Custom HotSync paths allowing users to specify a specific file download location Below is a list of the more popular programs and databases AccuScan Palm is integrated with Excel Micro...

Страница 7: ...ap the AccuScan Palm icon 6 Select the mode you want Standard or Pro then click the Try It Button 7 Click the New button to create a new record 8 Test your scanner by scanning a barcode Refer to your...

Страница 8: ...ur Registration Code at the Code prompt 4 If the Registration Code is valid you will receive a Thank you for Purchasing AccuScan Palm message 2 4 Upgrading AccuScan Palm To upgrade from an existing ve...

Страница 9: ...nc Path feature is available only in AccuScan Palm 2 0 Pro edition 2 5 Removing AccuScan Palm Installation In the unlikely event that you would like to remove AccuScan Palm from your PDA follow these...

Страница 10: ...session attributes to meet your data capture needs Chapter 4 details how to configure individual fields within a Session 3 1 Configuring Session Attributes The first step in creating a AccuScan Palm S...

Страница 11: ...used and you can proceed directly to Field Settings Chapter 4 if you wish to use default session settings 3 2 Session Settings Explained 3 2 1 General Session Settings General Session Settings are use...

Страница 12: ...database and compare the database values to the actual inventory levels To speed this process the Edit on scan Find in grid setting is enabled When an item is scanned in the find field and located in...

Страница 13: ...e changed to include the username that sent the data An example of a filename using this option is S01_data_johnsmith txt When the Custom HotSync Folder feature is used the ToPDA folder is expected as...

Страница 14: ...ption is enabled the user configured field names are provided in the generated data file Depending on the file format this is represented in different ways For all of the text data transfers the Field...

Страница 15: ...The Palm database containing session configuration information Backup Drop down Lists When this option is selected any drop down list databases used on the PDA are saved to the Palm Desktop backup lo...

Страница 16: ...wer of AccuScan Palm some of these settings may need modification for your specific needs Proper field configuration may speed up data acquisition and may prevent data input errors again depending on...

Страница 17: ...ypes in more detail AccuScan Settings General AccuScan Settings General 7 Enter General field settings Section 4 2 2 discusses these settings in more detail AccuScan Settings General 8 Enter additiona...

Страница 18: ...eneral Text Text fields should be chosen when data is to be entered via a bar code keyboard or graffiti The Text type does not restrict input in any way and can store up to 30 characters AccuScan Sett...

Страница 19: ...option for that field Refer to Section 4 2 4 for more information regarding Update Variables AccuScan Settings General DATE When DATE is selected the current date is automatically entered in the field...

Страница 20: ...and Field settings section of this manual for more information in those areas The INCR variable type can also be used to count backwards by setting the second number to a negative value When the fiel...

Страница 21: ...Hint is selected a field Hint can be entered as reference for the chosen field in the provided memo space This feature is used to provide reference details about the information being captured in a p...

Страница 22: ...visible in the Main Screen grid A maximum of 4 fields is available for display in the grid Only the first 4 fields with this option set on are displayed Subsequent fields with this option set on are...

Страница 23: ...tire session for this field This does not prevent the same data from being entered into another field within this session however If a field is submitted and it violates the Unique Within Table settin...

Страница 24: ...Auto Find on Scan When Auto Find on Scan is selected the database will search the session table for a record with a matching value in that field If a matching value is found the data entry screen is...

Страница 25: ...the PC Update option This gives the user the ability to avoid accidentally overwriting any existing list information created on the PDA If you wish to allow list contents to be uploaded from the PC fo...

Страница 26: ...imply choose the value to be edited and select the appropriate button NOTE List Items may also be deployed to multiple users In most multi user cases the PC update option would be used but it is also...

Страница 27: ...hese are discussed below Done Button Click the Done button when you have finished entering data and would like to return to the Main Screen You will be prompted as to whether you would like to save th...

Страница 28: ...he user to move up one field on the Entry Screen Please note that this does not follow the Go To field settings It simply moves up one field on the Entry screen The Down Arrow key allows the user to m...

Страница 29: ...ndard HotSync process The POS X installation provides a shortcut for accessing your data folder This shortcut is available from the Start Menu Programs AccuScan Palm Browse Data link This link provide...

Страница 30: ...ile Open 2 Browse to the AccuScan Palm generated text file 3 Select the file and Click Open 4 Answer any questions regarding the type of data file as is appropriate 5 You should now see your AccuScan...

Страница 31: ...2_data txt and must be located in the ToPDA as described above The required file definition for sending session data from the PC to the PDA is as follows CR indicates a carriage return line break and...

Страница 32: ...t field as a drop down list This must still be set in the Field Settings screen of the PDA application Please refer to Chapter 4 for instructions on setting field properties The format for the list fi...

Страница 33: ...Chapter 5 Managing Data Place this file in the ToPDA folder in your HotSync folder and it will be uploaded during the next HotSync operation AccuScan PalmM 0002 010 33...

Страница 34: ...n Settings Field Settings Delete One Record Delete All Records and Edit Records Refer to Sections 6 1 2 AccuScan Passwords 6 1 2 Enable Protection for Session Settings When protection is enabled for S...

Страница 35: ...section 5 4 2 for complete instructions 7 If the session consists of field hints the field hints backup file must be placed in the User Data Folders 8 Perform HotSync of those user s 9 The Session se...

Отзывы: