background image

74

EN

74

EN

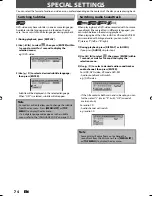
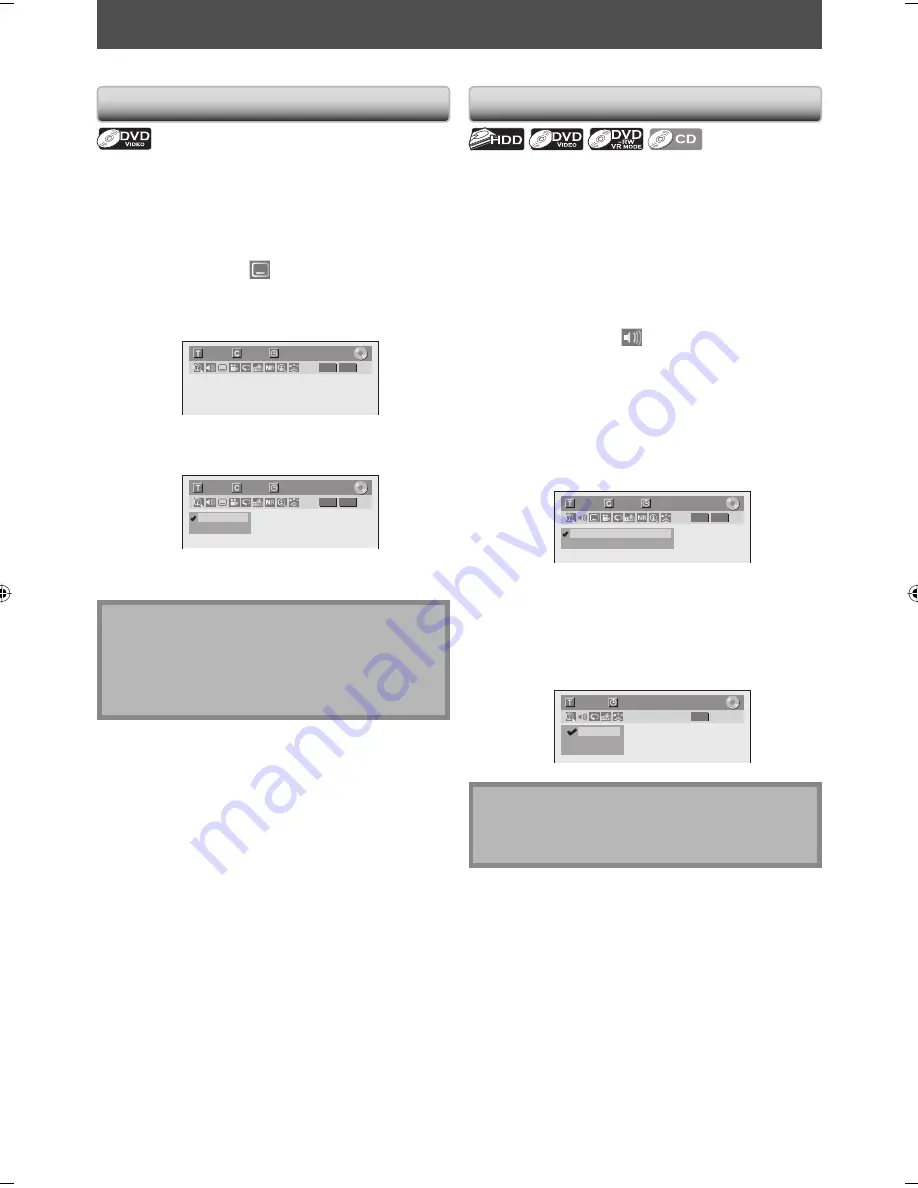
DVD-video may have subtitles in one or more languages. 
Available subtitle languages can be found on the disc 
case. You can switch subtitle languages during playback.

1) During playback, press [DISPLAY].

2) Use  [

{

 / 

B

] to select 

 , then press [ENTER] within  

1 second, or wait for 1 second to display the 
selection menu.

e.g.)  DVD-video

1/   5

1/   5

DVD

0:01:00 / 1:23:45

Video

3) Use  [

K

 / 

L

] to select a desired subtitle language, 

then press [ENTER].

1/   5

1/   5

DVD

0:01:00 / 1:23:45

   OFF
1.English

Video

Subtitle will be displayed in the selected language.
When “OFF” is selected, subtitle will disappear.

SPECIAL SETTINGS

Switching Subtitles

Note

•  Some discs will only allow you to change the subtitle 

from the disc menu. Press 

[MENU/LIST]

 or 

[TOP 

MENU]

 to display the disc menu.

•  If a 4-digit language code appears in the subtitle 

menu, refer to the “LANGUAGE CODE” on page 110.

You can select the format of audio and video as you prefer depending on the contents of the disc you are playing back.

When playing back a DVD-video recorded with 2 or more 
soundtracks (these are often in different languages), you 
can switch between them during playback.
When playing back the titles in HDD or VR mode DVD-RW 
discs recorded with bilingual audio, you can switch “L/
R”(stereo), “L”(left) or “R”(right).

1) During playback, press [DISPLAY] or [AUDIO].

If you press 

[AUDIO]

, skip to step 3.

2) Use  [

{

 / 

B

] to select 

 , then press [ENTER] within  

1 second, or wait for 1 second to display the 
selection menu.

3) Use  [

K

 / 

L

] to select a desired audio soundtrack or 

audio channel, then press [ENTER].

For HDD, DVD-video, VR mode DVD-RW
• Audio soundtrack will switch.
e.g.)  DVD-video

1/   5

1/   5

DVD

0:01:00 / 1:23:45

1.Dolby Digital  2ch English
2.Dolby Digital  5.1ch English

Video

•  If the title contains both main and sub audio, you can 

further select “L“ (main), “R“ (sub), “L/R“ (mixed of 
main and sub).

For audio CD
• Audio channel will switch.
e.g.)  audio CD

1/   5

CD

0:00:15 / 0:05:00

2. L
3. R

1. L/R

Switching Audio Soundtrack


Note

•  Some discs will only allow you to change the 

soundtrack from the disc menu. Press 

[MENU/LIST]


or 

[TOP MENU]

 to display the disc menu.

E2M20UD_H2160SL9_EN.indd   74

E2M20UD_H2160SL9_EN.indd   74

2008/02/20   15:33:31

2008/02/20   15:33:31

Содержание H2160SL9

Страница 1: ...UR WEB SITE AT http www sylvania ce com TO RECEIVE DIGITAL ANALOG SIGNAL YOU MUST CONNECT ANTENNA INSTRUCCIONES EN ESPA OL INCLUIDAS HDD DVDPlayer Recorder withDigitalTuner Owner s Manual H2160SL9 200...

Страница 2: ...lized disc DVD contains MP3 or JPEG files DVD RW R recorded in non compatible recording format Blu ray Disc HD DVD Super Video CD On the following disc the sound may not be heard Super audio CD Only t...

Страница 3: ...ing in progress press STOP C on the front panel HDD DVD 3000 MB 500 MB Dubbing Titles Please select REC MODE LP EP SLP Auto High XP SP Preparing for dubbing HDD to DVD Insert a recordable DVD Preparin...

Страница 4: ...information with respect to proper grounding of the mast and supporting structure grounding of the lead in wire to an antenna discharge unit size of grounding conductors location of antenna discharge...

Страница 5: ...ular installation If this apparatus does cause harmful interference to radio or television reception which can be determined by turning the apparatus off and on the user is encouraged to try to correc...

Страница 6: ...the unit Depending on the environment the temperature of this unit may increase slightly This is not a malfunction Dew Condensation Warning Dew condensation may form inside the unit in the following...

Страница 7: ...he installation environment or handling the unit may become partially damaged or in the worst case recording or replaying may not be available Especially while the HDD is in motion do not subject it t...

Страница 8: ...ode 33 Channel Selection 33 Selecting TV Audio 34 DTV Closed Caption 36 Closed Caption Style 37 Disc Management FORMATTING A DISC 39 Choosing the Recording Format of a Brand New DVD RW 39 Reformatting...

Страница 9: ...W 72 Repeat Playback 72 Random Playback 72 Program Playback 73 Slide Show 73 SPECIAL SETTINGS 74 Switching Subtitles 74 Switching Audio Soundtrack 74 Switching Virtual Surround System 75 Switching Cam...

Страница 10: ...rnate recording If there is no recordable disc in the unit if the disc does not have enough space to complete the recording or if the material is copy once program and prohibited to be recorded on a D...

Страница 11: ...rovides less flickering and images in higher resolution than that of traditional television signals HDMI High Definition Multimedia Interface You can enjoy clearer audio video output when connecting t...

Страница 12: ...rs Finalization necessary title menu will be created Playable only on VR mode compatible unit Finalization recommended Playable on most DVD players Finalization necessary title menu will be created _...

Страница 13: ...ese region symbols do not appear on your DVD you cannot play back the DVD in this unit The number inside the globe refers to region of the world A DVD labeled for a specific region can only play back...

Страница 14: ...ess repeatedly to start one touch timer recording 8 y POWER button Press to turn the unit on and off 9 DV IN jack L3 Use to connect the DV output of external device with a DV cable 10 AUDIO input jack...

Страница 15: ...coder or other device with a digital audio coaxial input jack with a digital audio coaxial cable 7 S VIDEO OUT jack Use to connect the S video input of a TV monitor AV receiver or other device with an...

Страница 16: ...within 30 Above approx 16 feet 5m within 15 Below approx 10 feet 3m within 30 Install the batteries AAx2 matching the polarity indicated inside battery compartment of the remote control Caution Never...

Страница 17: ...k When playback is in pause press to slow reverse playback 13 PLAY B button Press to start playback or resume playback 14 Bx1 3 0 8 button During playback press to play back in a slightly faster slowe...

Страница 18: ...s when the channel is in DTV mode 3 Title track and chapter mark Appears when indicating a title track number Appears when indicating a chapter number 4 Current status of the unit Appears when playbac...

Страница 19: ...yback through the RF is not possible ANT IN VHF UHF antenna RF coaxial cable cable TV company or rear of your TV disconnect disconnect 1 1 1 2 IN OUT ANTENNA IN VIDEO IN AUDIO IN L1 S VIDEO AUDIOOUT L...

Страница 20: ...the power cords of the devices from the AC outlet 2 Make the connection as illustrated below 3 Set your RF modulator s channel 3 4 switch to either 3 or 4 whichever the TV channel is least used in yo...

Страница 21: ...IN L R VIDEO IN IN IN OUT VIDEO IN AUDIO IN L1 S VIDEO S VIDEO AUDIOOUT OUT R VIDEO OUT Y ANTENNA R L COAXIAL IN VIDEO IN AUDIO IN L1 S VIDEO S VIDEO AUDIOOUT OUT L R VIDEO OUT Y R L IN VIDEO IN AUDI...

Страница 22: ...ou have completed the connections Switch the input selector on your TV to an appropriate external input channel Press a button on the TV s original remote control that selects an external input channe...

Страница 23: ...rts HDCP Please read the operating instructions of your display device or AV amplifier for more information Note Because HDMI is an evolving technology it is possible that some devices with an HDMI in...

Страница 24: ...audio source on a disc in a Dolby Digital multi channel surround format cannot be recorded as digital sound by an MD or DAT deck By connecting this unit to a Dolby Digital decoder you can enjoy high...

Страница 25: ...Program rating Note When the program guide is displayed in more than 6 lines use K L to scroll No description provided is displayed when the program guide is not provided The on screen display change...

Страница 26: ...n this manual only one disc type is indicated as an example Disc Information Menu 1 Indicates artist track information First track name will be displayed Track Name If you press DISPLAY one more time...

Страница 27: ...select a menu and press ENTER to display the menu These menus provide entries to all main functions of the unit 1 General Setting To go to general setting menu 2 Timer Programming To program a timer...

Страница 28: ...UV SETUP REPEAT DISPLAY AUDIO MENU LIST RETURN TOP MENU WXYZ CLEAR JKL MNO DEF ENTER PLAY DVD HDD DUBBING SKIP REPLAY VARIABLE SKIP BX1 3 0 8 STOP PAUSE SKIP REC OTR REC MODE TIMER PROG DTV TV POWER C...

Страница 29: ...Cable When using basic cable The channels broadcasted in CATV are automatically scanned and memorized Auto Presetting Now CH 1 4 Press ENTER to activate Clock Setting Initial Setting Clock Setting 5 P...

Страница 30: ...n using basic cable The channels broadcasted in analog CATV are automatically scanned and memorized Cable Extended Scan When using basic cable The channels broadcasted in analog CATV and digital CATV...

Страница 31: ...e If you are deleting digital TV channels go to DIGITAL on page 30 to continue Adding Deleting Channels CHANNEL SETTING You may want to add or delete TV channels if your channel lineup changes or if y...

Страница 32: ...ETUP to exit DIGITAL 5 Select the channel number to delete Only the major channel is displayed in Manual Preset menu The channel number displayed in the parenthesis is a virtual channel number Use CH...

Страница 33: ...6 Press POWER to turn off the unit This unit will search for the time only when the power is off Leave it off for several minutes to give this unit time to set the clock Auto Clock Setting This unit...

Страница 34: ...Press SETUP and use K L to select General Setting then press ENTER 2 Use K L to select Clock then press ENTER Clock menu will appear 3 Use K L to select Clock Setting then press ENTER 4 Use K L to se...

Страница 35: ...digit number e g 25ch 2 5 Digital TV channels Enter the major and minor channel number with the Number buttons to select a channel you want to watch For 1 digit number e g 2 2 ch major channel 0 2 or...

Страница 36: ...ill be recorded Note The timer recording for digital TV cannot record any audio language other than English AUDIO does not control external device audio When there is only one audio channel on the bro...

Страница 37: ...ss SETUP to exit Note on recording analog TV channel audio When you record an analog TV program available in second audio or stereo you have to select either Stereo or SAP in Channel menu beforehand R...

Страница 38: ...k Channel HDMI Reset All OSD Language Screen Saver FL Dimmer DTV CC CC Style V Chip DTV CC Caption Service Recording Caption Service OFF Service1 Service2 Service3 Service4 Service5 Service6 OFF Selec...

Страница 39: ...nt Size Font Style Font Opacity Font Color Edge Type Edge Color Back Opacity Back Color 5 Use K L to select ON then press ENTER General Setting Playback Display Video Recording Clock Channel HDMI Rese...

Страница 40: ...ting Font Size Font Style Font Opacity Font Color Edge Type Edge Color Back Opacity Back Color Font Color White Black Red Green Blue Yellow Magenta Cyan Edge Type Edge type of the displayed caption ca...

Страница 41: ...K L to select Format then press ENTER DVD Menu Format Finalize 4 Use K L to select Format Mode then press ENTER DVD Menu Format Finalize Start Format Mode 5 Use K L to select Video mode or VR mode th...

Страница 42: ...rmat Mode Selection menu will appear and prompt you to confirm 5 Use K L to select Yes then press ENTER Formatting will start If you want to cancel formatting select No DVD Menu Format Finalize Disc P...

Страница 43: ...n may take awhile to be completed To prevent accidental recording editing or erasing the titles you can protect them from DVD Menu menu Note To cancel the disc protect When you insert a disc protected...

Страница 44: ...I Reset All Auto Chapter Auto Finalize Auto Finalize Disc Full End of Timer Rec Disc Full ON OFF General Setting Playback Display Video Recording Clock Channel HDMI Reset All Auto Chapter Auto Finaliz...

Страница 45: ...Y DVD HDD DUBBING SKIP REPLAY VARIABLE SKIP BX1 3 0 8 STOP PAUSE SKIP REC OTR REC MODE TIMER PROG ENTER RETURN SETUP STOP Note Finalizing a disc in video mode automatically creates a title menu Even a...

Страница 46: ...akage Use HDD on the premise that you should dub the recorded program to a DVD disc to protect your precious videos HDD is a temporary storage location HDD is not a permanent storage location of the r...

Страница 47: ...utes different from the time option you set A blank chapter may be created depending on the remaining time of the disc Recording the DTV Closed Caption You can record the DTV Closed Caption as the par...

Страница 48: ...ess REC MODE to select a recording mode Refer to Recording Mode on page 44 DVD SP 1 53 6 Press DTV TV to select analog TV or digital TV then use CH or the Number buttons and for digital TV channels to...

Страница 49: ...s to HDD or you stop recording When the unit clock has not been set the space for a date and time of title names will be blank When you record a TV program onto HDD DVD RW R you have to select the TV...

Страница 50: ...RS TUV SETUP REPEAT DISPLAY AUDIO MENU LIST RETURN TOP MENU WXYZ CLEAR JKL MNO DEF ENTER PLAY DVD HDD DUBBING SKIP REPLAY VARIABLE SKIP BX1 3 0 8 STOP PAUSE SKIP REC OTR REC MODE TIMER PROG DTV TV POW...

Страница 51: ...not set the clock yet Manual Clock Setting menu will appear instead of the timer programming list at step 1 Continue with the step 4 in Manual Clock Setting on page 32 before setting a timer programm...

Страница 52: ...e space of the disc when you select the recording mode Date JAN 02 SP 1 00 Start End REC To Mode CH 1 00AM 12 00AM DTV125 1 HDD SP Auto recording mode select DVD only When Auto is selected as a record...

Страница 53: ...no disc space on the HDD at the starting time for the HDD timer recording E50 HDD recording is canceled due to the insufficiency of the disc space on the HDD E23 24 E27 29 E31 36 E42 46 and E48 are no...

Страница 54: ...lly if you select Yes or if you do not reply in 1 minute When the programmed starting and ending time are earlier than the current time the setting will not be accepted and be cleared for redoing If t...

Страница 55: ...ion When connecting a DVC digital video camcorder use DV IN jack of L3 Front Connection to an External Device 1 Press SETUP 2 Use K L to select General Setting then press ENTER 3 Use K L to select Vid...

Страница 56: ...lect L2 or DV by using INPUT SELECT or CH You can also select L1 or L2 by using the Number buttons For L1 press 0 0 1 For L2 press 0 0 2 5 Press REC MODE to select a recording mode Refer to Recording...

Страница 57: ...to dub the stereo1 and stereo2 4 Indicator of dubbing function When the unit is ready for dubbing Start Rec will appear When the unit is in dubbing Pause Rec will appear 5 Channel position When you s...

Страница 58: ...DV Audio Stereo1 Start Rec 5 Press PLAY B to find where you wish to start dubbing Then press STOP C where you wish to start dubbing 6 Use K L to select Start Rec then press ENTER The dubbing will sta...

Страница 59: ...ite box or D VHS VCR cannot be recognized If no video signal is detected from the DVC during DVC to HDD or DVD dubbing the recording will be paused and I will flash on the TV screen The recording will...

Страница 60: ...e when you dub HDD to DVD RW disc with Content Protection for Recordable Media CPRM formatted in VR mode and in this case the programs does not remain on the HDD If you stop the dubbing halfway the co...

Страница 61: ...D DVD HDD DVD DVD HDD Dubbing 4 Use K L to select Add then press ENTER HDD DVD 1 1 3000 MB Dubbing List Add Delete All Dubbing Start If you have registered any dubbing before they will be listed in th...

Страница 62: ...ll appear When dubbing from HDD to DVD or from VR mode DVD RW to HDD you can select High to perform the high speed dubbing refer to Recording Mode for Dubbing on page 58 for more details 9 Use K L to...

Страница 63: ...y From Start Edit Title Delete Delete Plural Titles Dubbing 4 Use K L to select Yes then press ENTER Start Dubbing Yes No Dubbing of the selected title will start To stop the dubbing in progress Press...

Страница 64: ...ck 1 Track 2 Track 3 Track 4 Track 5 MP3 JPEG folder 1 folder 2 file 1 file 2 file 1 file 2 file 3 Title Divided contents of a DVD video Roughly corresponds to a story title in short stories Chapter D...

Страница 65: ...ck a DVD video a menu may appear Refer to Using the Title Disc Menu on page 66 4 Press STOP C once to stop playback temporarily Refer to Resume Playback on page 67 Note Some discs may start playback a...

Страница 66: ...p playback temporarily Refer to Resume Playback on page 67 To eject the disc press OPEN CLOSE A to open the disc tray then remove the disc before turning off the unit Note Some discs may start playbac...

Страница 67: ...files are shown by The system can recognize up to 255 folders and up to 99 tracks 999 files Letters of a file folder name overflowing the given space will be displayed as If there are no files in the...

Страница 68: ...op playback Notes on JPEG and Kodak Picture CD After track is displayed for 5 seconds or 10 seconds set in the Slide Show on page 73 the display moves to the next track During JPEG or Kodak Picture CD...

Страница 69: ...8x with sound 2 Press PLAY B to return to normal playback Fast Forward Fast Reverse Playback Rapid playback function is available only during playback This function is available only on discs recorde...

Страница 70: ...rent one the zoom area will not be displayed To exit the zoom menu press DISPLAY repeatedly To cancel the zoom function select x1 0 using K L then press ENTER at step 3 You cannot slide the zoomed pic...

Страница 71: ...the title HDD only Changing the mode between Original and Playlist VR mode DVD RW disc only Chasing Playback during Recording Note You can also use the special playback functions such as REV E FWD D e...

Страница 72: ...AY then press ENTER 2 Use K L B or the Number buttons to enter a desired time then press ENTER While playing back the autostart recording press STOP C to cancel the playback When watching TV program o...

Страница 73: ...mber of chapters total time of the title Using SKIP j SKIP i 1 During playback press SKIP i to skip the current track file and move to the next The track file will move forward one at a time To go bac...

Страница 74: ...A 3 Press ENTER at the desired ending point B Track The current track or file will be played back repeatedly Group The current folder will be played back repeatedly You can play back a disc randomly i...

Страница 75: ...our desired order 1 Press SETUP in stop mode 2 Use K L to select CD Playback Mode then press ENTER CD Playback Mode menu will appear 3 Use K L to select Program Play then press ENTER 4 Use K L to sele...

Страница 76: ...ontents of the disc you are playing back When playing back a DVD video recorded with 2 or more soundtracks these are often in different languages you can switch between them during playback When playi...

Страница 77: ...gles Angle information should be on the disc case if the disc contains multi angle scenes 1 During playback press DISPLAY 2 Use B to select then press ENTER 1 5 1 5 DVD 0 01 00 1 23 45 Video Angle ico...

Страница 78: ...ting the title is protected Indicating the title is a copy protected title 1 Indicating the title is a copy once program I If you call up the title list while recording I will be displayed on the inde...

Страница 79: ...e The Full Recorded disc The Full Recorded disc Delete The Full Recorded disc After the disc is fully recorded DVD RW DVD R When a title is deleted from DVD RW in VR mode the recordable disc space wil...

Страница 80: ...ect Title Delete then press ENTER Title List 1 2 4 5 6 1 2 3 ORG JAN 1 08 12 00AM CH10 LP 12 00AM 2 00 00 JAN 1 08 CH10 LP Play From Start Edit Title Delete Add To Playlist Dubbing 4 Use K L to select...

Страница 81: ...ct the title with the trash mark then press ENTER 6 Press CLEAR Confirmation message will appear 7 Use K L to select Yes then press ENTER Title List 1 1 Title 1 12 00AM 1 00 00 JAN 1 08 CH10 SP 1 4 2...

Страница 82: ...JAN 1 08 CH10 LP 4 5 6 1 3 2 ORG Create a Playlist Yes No The title is added to playlist 5 Press RETURN or STOP C to exit Data will be written onto the disc momentarily This operation may take awhile...

Страница 83: ...ormat Finalize Disc Protect OFF ON Delete All Playlist Delete entire playlist Yes No Are you sure will appear Use K L to select Yes and then press ENTER DVD Menu Format Finalize Disc Protect OFF ON De...

Страница 84: ...e to be completed You can put a name on the disc and change it from this menu If you edit the HDD press HDD first If you edit a disc press DVD first 1 In stop mode press TOP MENU Title list original o...

Страница 85: ...character set will be changed to the previous input mode automatically To delete letters press CLEAR repeatedly Press and hold CLEAR to delete all letters Use s B to move the cursor to the left and ri...

Страница 86: ...hapter Mark Add Yes No JAN 1 08 12 00AM CH10 LP 1 Chapter 2 3 ORG 1 25 47 A new chapter mark will be added 6 Press RETURN 7 Press RETURN again and then RETURN or STOP C to exit For DVD data will be wr...

Страница 87: ...OSE INPUT SELECT HDMI ABC GHI PQRS TUV SETUP REPEAT DISPLAY AUDIO MENU LIST RETURN TOP MENU WXYZ CLEAR JKL MNO DEF ENTER PLAY DVD HDD DUBBING SKIP REPLAY VARIABLE SKIP BX1 3 0 8 STOP PAUSE SKIP REC OT...

Страница 88: ...area selected for deletion is indicated in red You can check the preview by pressing ENTER Before and after 5 seconds of the deleted point will be playback for preview Before editing Edited start poin...

Страница 89: ...JAN 1 08 12 00AM CH10 LP 12 00AM 2 00 00 JAN 1 08 CH10 LP 4 5 6 1 2 3 PL Play From Start Edit Title Delete Dubbing 4 Use SKIP H SKIP G REV E FWD D PAUSE F VARIABLE SKIP VARIABLE REPLAY and PLAY B to...

Страница 90: ...3 LP Combine selected titles Yes No The two titles will combine into a single title Title List 1 6 PL 1 4 5 6 2 3 JAN 1 08 12 00AM CH10 LP 12 00AM 2 30 00 JAN 1 08 CH10 LP 5 Press RETURN or STOP C to...

Страница 91: ...n Edit Protect OFF ON JAN 1 08 12 00AM CH10 LP 1 ORG 1 25 47 will appear on the title in the original list 4 Press RETURN and then RETURN or STOP C to exit For DVD data will be written onto the disc m...

Страница 92: ...mode DVD you can set or edit chapter at every time interval You can clear the chapter mark too You can specify the interval of chapter marks for titles last more than 5 minutes Note You cannot select...

Страница 93: ...All Unprotected Titles if you want to delete only the unprotected titles Select Delete All Playlists if you want to delete all Playlists Delete All Titles Delete All Unprotected Titles Delete All Pla...

Страница 94: ...ge page 98 OFF English French Spanish Other Set the language for subtitles Angle Icon page 98 ON OFF Set whether to display the angle icon or not Still Mode page 98 Auto Field Frame Set the type of st...

Страница 95: ...he font color of the displayed caption Edge Type page 38 None Raised Depressed Uniform L Shadow R Shadow Set edge type of the displayed caption Edge Color page 38 White Black Red Green Blue Yellow Mag...

Страница 96: ...tes 30 minutes 60 minutes Insert chapter marks at even time interval Auto Finalize page 42 Disc Full ON OFF Set the unit to finalize the disc automatically End of Timer Rec ON OFF Clock Clock Setting...

Страница 97: ...s ENTER 1 2 3 4 5 6 7 8 Parental Lock Audio Out Disc Menu Language Audio Language Subtitle Language Angle Icon Still Mode Variable Skip Replay Submenu will appear 4 Refer 1 to 8 on pages 96 to 98 and...

Страница 98: ...k Audio Out Disc Menu Language Audio Language Subtitle Language Angle Icon Still Mode Variable Skip Replay Parental Lock OFF 8 Adult 7 NC 17 6 R 5 PG R 4 PG 13 3 PG 2 G 1 Kid Safe Change Password Yes...

Страница 99: ...z 96kHz sound will be output in 48kHz 96kHz If your amplifier decoder is compatible with 96kHz PCM select 96kHz 96kHz sound will be output Note When playing back disc with copyright protection Even if...

Страница 100: ...le Language Angle Icon Still Mode Variable Skip Replay Angle Icon ON OFF Your setting will be activated 7 Still Mode Default Auto Select Auto usually Use K L to select a setting then press ENTER Gener...

Страница 101: ...L to select a setting then press ENTER General Setting Playback Display Video Recording Clock Channel HDMI Reset All OSD Language Screen Saver FL Dimmer DTV CC CC Style V Chip FL Dimmer Auto Bright Da...

Страница 102: ...US movie ratings TV Rating US TV program ratings Canadian French Rating Canadian French language Ratings Canadian English Rating Canadian English language Ratings 1 Use K L to select the desired rati...

Страница 103: ...system via digital broadcasting or clear the downloaded ratings This feature is available only after the digital TV ratings have been downloaded The ratings can be downloaded by the unit automatically...

Страница 104: ...sive setting will be OFF When selecting No or not pressing any buttons on the unit or remote control within 15 seconds at step 3 progressive scan remains to be OFF interlace scan 2 TV Aspect Default 4...

Страница 105: ...he connected device is not compatible with the Y Cb Cr HDMI signal is output as RGB regardless of the setting General Setting Playback Display Video Recording Clock Channel HDMI Reset All Format HDMI...

Страница 106: ...t Yes No Are you sure will appear Select Yes using K L and then press ENTER Your setting will be initialized Reset All Note The settings listed below will remain unchanged even after resetting to the...

Страница 107: ...h this unit s tuner analog TV closed caption cannot be output Try using other connection DV signal cannot be input Before connection turn on the power supplies for both this unit and the DVC and make...

Страница 108: ...a power failure that lasted for more than 30 seconds Reset the clock Refer to pages 31 to 32 HDD The picture of the autostart recording disappears The contents of the autostart recording will be clear...

Страница 109: ...oment when the 1st layer switches to the 2nd layer This is not a malfunction Playback cannot be performed Check if the playable disc is inserted Check if the disc is loaded correctly with the labeled...

Страница 110: ...he unit Refer to page 14 If above solutions do not solve the problem please call an Authorized Service Center Frequently Asked Questions Can I record to CD RW R No this unit records only HDD DVD Can I...

Страница 111: ...No area for new recording You are trying to record onto the disc which has no space for recording Insert the recordable disc with enough recording space Recording Error You cannot record more than 99...

Страница 112: ...kh 5757 Kinyarwanda 6469 Kirghiz 5771 Kirundi 6460 Korean 5761 Kurdish 5767 Laothian 5861 Latin 5847 Latvian Lettish 5868 Lingala 5860 Lithuanian 5866 Macedonian 5957 Malagasy 5953 Malay 5965 Malayala...

Страница 113: ...code modulation The most common system of encoding digital audio found on CD and DAT Excellent quality but requires a lot of data compared to formats such as Dolby Digital and MPEG audio For compatib...

Страница 114: ...et 75 Video input Input level Jacks Input 1 rear 2 front 1 Vp p 75 RCA jack Video output Output level Jack Output 1 rear 1 Vp p 75 RCA jack S video input Y luminance Input level C color Input level Ja...

Страница 115: ...no puede reproducir discos DVD grabados en otros sistemas de color Sistemas de Color Este equipo ha sido dise ado para reproducir discos DVD rotulados para la regi n 1 Para poder ser reproducidos en...

Страница 116: ...e RCA de v deo cable S video Conectar esta unidad a un dispositivo con un toma HDMI Interface de Multimedios de Alta Definici n que utilice un solo cable hace posible la transferencia digital tanto de...

Страница 117: ...p gina 31 2 Para seleccionar un modo de grabaci n presione REC MODE 18 min 36 min 72 min 108 min 144 min 60 min 120 min 240 min 360 min 480 min HDD interno XP SP LP EP SLP Calidaddelvideo yelsonido Mo...

Страница 118: ...ontrol remoto durante 2 segundos Copiado a un toque Con el copiado a un toque usted puede comenzar a copiar de inmediato con s lo un toque Para copiar el contenido de un DVD que est finalizado en otro...

Страница 119: ...ndeja de discos Aseg rese de que el disco sea compatible con este aparato Para obtener la lista de discos compatibles consulte las p ginas 10 11 2 Para iniciar una reproducci n presione PLAY B 3 Para...

Страница 120: ...O OR FLOOR MODELS FUNAI CORP AND ITS REPRESENTATIVES OR AGENTS SHALL IN NO EVENT BE LIABLE FOR ANY GENERAL INDIRECT OR CONSEQUENTIAL DAMAGES ARISING OUT OF OR OCCASIONED BY THE USE OF OR THE INABILITY...

Отзывы: