background image


Swiss Timing LTD 

Phone +41 32 488 36 11 

P.O. Box 138, Rue de l’Envers 1 

[email protected] 

CH-2606 Corgémont - Switzerland 

www.swisstiming.com  


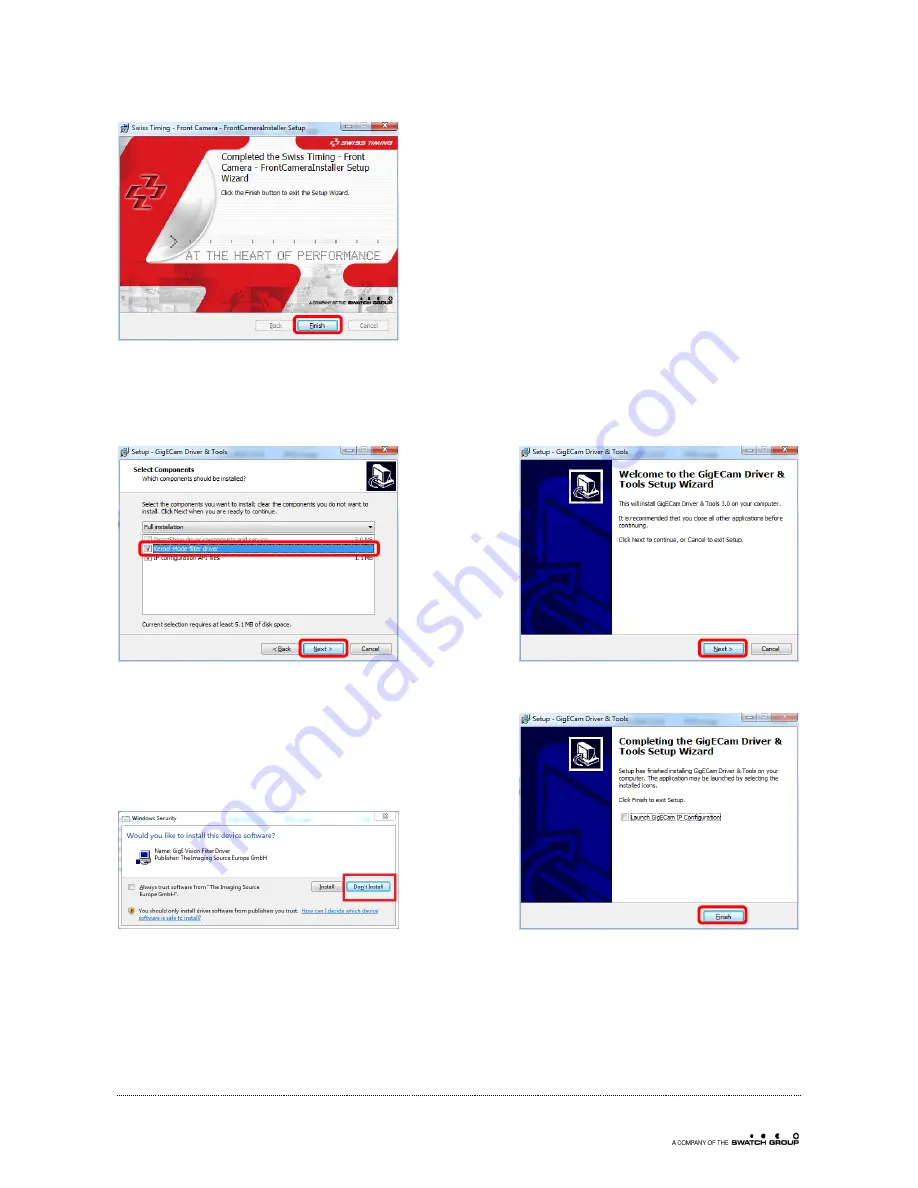
Clicking on the Finish button will redirect you automatically to the next step 3.2. 

3.2 

The GigE driver  

Follow the instructions according to the image below. 


If asked to install the Vision Filter driver, answer don’t install 


Clicking on the Finish button will redirect you automatically to the next step 3.3. 


Содержание SCAIDER

Страница 1: ...Phone 41 32 488 36 11 P O Box 138 Rue de l Envers 1 info swisstiming com CH 2606 Corgémont Switzerland www swisstiming com SCAIDER FRONT CAMERA HD FOR PHOTOFINISH USER S MANUAL 3511 500 02 l Version 1 3 l September 2017 ...

Страница 2: ...right to refuse all guarantees if this condition is not fulfilled If the installation includes a horn be sure to maintain a sufficient security distance from the public Documentation Updates Swiss Timing SA reserves the right to make improvements in the products described in this documentation at any time without prior notice Furthermore Swiss Timing SA reserves the right to revise this documentat...

Страница 3: ...SOFTWARE INSTALLATION 4 3 1 Main software 4 3 2 The GigE driver 5 3 3 The Framework 6 3 4 Set the network adapter 7 3 4 1 Activate the Jumbo Frames 7 3 4 2 Set the IP address 7 3 4 3 Optional Deactivate the GigE Vision Filter Driver for this all network adapters 8 4 CONFIGURE OSV STAR SOFTWARE 9 4 1 Update OSV Star software v1 9 1 90 or higher 9 4 2 Goal 9 4 3 Set the judgement output in the DH On...

Страница 4: ... settings 14 5 7 Check Connection Statuses 14 6 PREPARE FOR RACE 15 6 1 very important Synchro 15 6 2 Get the Auto mode remote control 15 6 3 Background recording Loading another race 15 6 4 very important Disk space 15 7 JUDGING 16 7 1 Display offset 16 7 2 Digital zoom 16 8 KEYBOARD SHORTCUTS 17 9 PROPERTIES 18 9 1 Specifications Scaider 18 10 APPENDIX 19 10 1 Version history 19 Note This manual...

Страница 5: ...nish line to have the best angle and the sharpest pictures to read the bibs The power is brought through the Ethernet cable from the Regie 1 2 Starting equipment 1x Scaider Camera 3511 700 1x Power over Ethernet injector module 30W 9051 5732 1x Ethernet adaptor 1GB USB3 0 9051 5744 1x Ethernet cable cat 6 2m 9051 1317 1x Ball heads Series BH 00 9051 6338 1x Carrying case 3511 640 1x Software USB 3...

Страница 6: ...integrated LAN port and the other end to the DATA IN port of the POE Power supply Connect the long Ethernet cable max 70m to the POE DATA POWER OUT port of the POE Power supply end the other end to the SCAIDER camera on the field LEDs behind the camera shall turn on If you need more than 70 m you must purchase optional equipment Power over Ethernet extender module 9051 5729 to place between the 2 ...

Страница 7: ...he integrated Ethernet card is used to connect to a camera and receive images 2 The USB3 Ethernet card is used to exchange the following data Time of the image to be displayed simultaneously on OSV Judgment software and the SCAIDER software Information about race progress Enter race Start race Exit race sent from OSV Acquisition software to control the SCAIDER software Automatic mode 2 3 Dongle Th...

Страница 8: ...timing com info swisstiming com SWISS TIMING LTD 3 SOFTWARE INSTALLATION 3 1 Main software Put the key USB Drivers and utilities on the computer and select the file FrontCameraInstaller Press next and follow the instructions according to the image below The installer will announce you that drivers and or framework have to be installed ...

Страница 9: ...ww swisstiming com Clicking on the Finish button will redirect you automatically to the next step 3 2 3 2 The GigE driver Follow the instructions according to the image below If asked to install the Vision Filter driver answer don t install Clicking on the Finish button will redirect you automatically to the next step 3 3 ...

Страница 10: ...2606 Corgémont Switzerland Fax 41 32 488 36 09 Pelimon Stefan www swisstiming com info swisstiming com SWISS TIMING LTD 3 3 The Framework Follow the instructions according to the image below All Software is installed Click on the Finish button to exit the installer ...

Страница 11: ...your embedded network card and double click on it Follow the instructions according to the image below 3 4 1 Activate the Jumbo Frames Click on the Configure button and open the Advanced Tab Scroll to Jumbo Packet and choose 9014 bytes 9Kbytes value Validate with OK 3 4 2 Set the IP address Assign the IP address 192 168 2 100 to the Ethernet adapter which communicates with the SCAIDER camera Valid...

Страница 12: ...1 32 488 36 09 Pelimon Stefan www swisstiming com info swisstiming com SWISS TIMING LTD 3 4 3 Optional Deactivate the GigE Vision Filter Driver for this all network adapters If you accidentally installed the GigE Filter Driver in chapter 3 2 deactivate it in the properties of each Network Adapter ...

Страница 13: ...on software has to be configured to provide to SCAIDER software the data described in chapter 2 2 Chapter 4 3 concerns the OSV Judgment computer Chapter 4 4 concerns OSV Acquisition According to your custom network scheme OSV Acquisition and OSV Judgment can be the same computer 4 3 Set the judgement output in the DH On the Judgment computer Open the Scan O Vision software Choose the Omega Protoco...

Страница 14: ...limon Stefan www swisstiming com info swisstiming com SWISS TIMING LTD 4 4 Set up SCB dedicated to the Front Camera On the Acquisition computer Open the Scan O Vision software Choose the Front Camera as type Socket as COM Port and type a port number i e 3000 Check the checkbox on the left to activate this service ...

Страница 15: ...Display Settings by right clicking an empty area on the desktop Verify that the text size is at 100 5 2 Shortcut on the desktop Double click the Front Camera icon on the desktop It is supposed that you plugged the dongle in the USB port as described in chapter 2 3 5 3 Live The camera shall start displaying images at about 25 fps 1 If this doesn t happen check the cable connections or Ethernet adap...

Страница 16: ...e Push Button Try to leave Hue and Saturation to values close to what you see in the picture below Otherwise you could have non natural colours or colour swapping green blue Software version Manual seek Existing races double click to judge New race to be recorded Exit button Time of day sync age and sync button Disk space remaining Camera control s Frames per second Network connections statuses Ch...

Страница 17: ...images due to longer exposure time You can reduce exposure time to 1 500s 1 1000s or even shorter if you have too much sun Auto Reference Use low values 70 Above 70 white colours on the image will get saturated and therefore unreadable 5 5 3 Image You can add digital Sharpness in a reasonable way up to the value of 10 Leave the gamma at around 100 5 5 4 Lens Adjust the zoom according to your finis...

Страница 18: ...st if it is on the same machine otherwise enter the correct address and choose the Port as given for the DH Omega chapter 4 3 For OSVRecord enter the correct IP address of your OSV acquisition computer and choose the Port as given for the SCB FrontCamera chapter 4 4 Click on Close to leave this view If you have changed IP addresses or ports you may need to restart the software 5 7 Check Connection...

Страница 19: ...older with the same ID as OSV When the race starts the SCAIDER software will start recording automatically When the race exits the SCAIDER software will stop recording automatically When the Judgment computer will start placing a new cursor the SCAIDER software will display the Front image accordingly If the given image frame is not suitable the user can scroll back of forth with the mouse wheel o...

Страница 20: ...decreases the offset by 1 frame The offset shall not be bigger than 5 6 frames The Default button will restore the offset to a central value 7 2 Digital zoom By pressing the Zoom button or the Z key the zoom window will appear above the main image to move the Zoom Window drag it with the left mouse button to centre the point to zoom right click on the main image the region you want to zoom to incr...

Страница 21: ...ox 138 Rue de l Envers 1 info swisstiming com CH 2606 Corgémont Switzerland www swisstiming com 8 KEYBOARD SHORTCUTS F5 Toggle recording start stop Left arrow Scroll one image left Right arrow Scroll one image right Z Toggle the digital Zoom view ...

Страница 22: ...swisstiming com SWISS TIMING LTD 9 PROPERTIES 9 1 Specifications Scaider Dimensions LxWxH 76 x 79 x 187 mm Lens Integrated 12x zoom motor lens Weight 0 485kg Resolution 1920x1080px Full Hd Frame rate 25 fps Connection Gigabit LAN up to 100m Power Power Over Ethernet POE Temperature 5 C to 45 C Protection class IP43 Certifications CE and RoHS compliant ...

Страница 23: ...16 Initial version 1 1 15 02 17 New chapter 3 4 1 1 2 22 06 2017 Updated interface screenshots for new software version v3 9 Chapter 5 New recommendation for Windows text size and Image Settings Chapter 6 re written the sync procedure and added information about Disk Space handling New Chapter 7 Judging with new function Digital Zoom explained 1 3 21 11 2017 Computer requirements Microsoft Windows...

Страница 24: ...P O Box 138 rue de l Envers 1 Phone 41 32 488 36 11 3511 500 02 2606 Corgémont Switzerland Fax 41 32 488 36 09 Pelimon Stefan www swisstiming com info swisstiming com SWISS TIMING LTD NOTES ...

Отзывы: