6
6
6
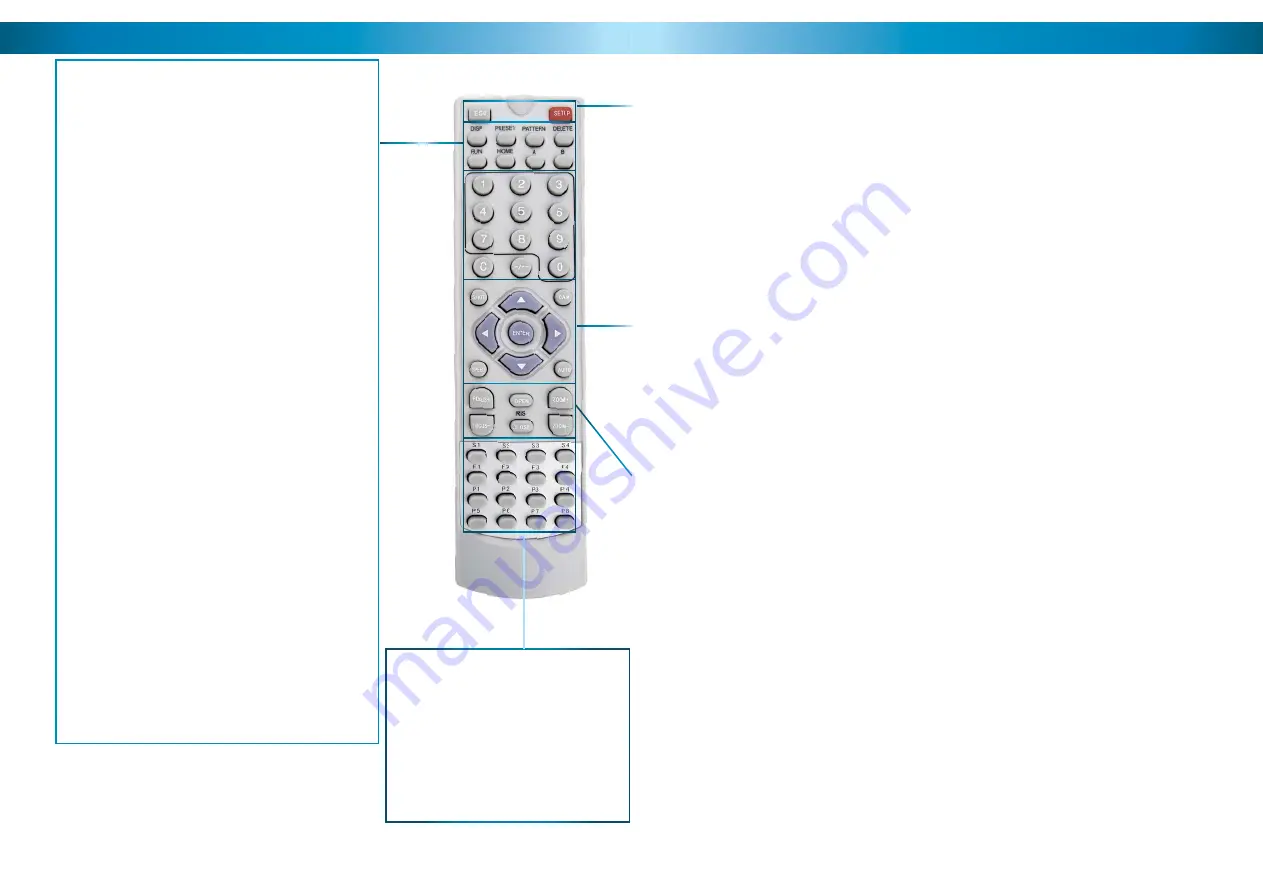
DISP (Display)
Toggles the display on the front of the PTZ Controller,
showing the Command Address, Protocol and Baud Rate.
PRESET (HOLD to defi ne)
Changes or accesses preset points.
PATTERN (press and HOLD)
Allows for the programming of lists of preset points for
the camera to view in sequence.
DELETE (press and HOLD)
Will remove a Preset Point or Pattern.
RUN
Commands the system to begin executing the
programmed pattern.
HOME
Master Preset Point. Whilst not in Cruise Mode
(see page 15) the camera will automatically
return to this position whilst idle.
A & B
Master Preset Points. They are defi ned in the same way
as other Preset Points (see page 14). They operate as
shortcut buttons thereafter.
0 – 9
The number buttons. Used to enter a numerical value
into the PTZ controller.
C
Clear. Removes the last digit entered into the controller,
somewhat like the ‘backspace’ key on your computer.
-/--
Allows for the entry of more than one digit at a time. “-”
represents a single digit, whilst “--” indicates space to
enter two digits.
S1 ~ S4
Shortcut to the SPEED setting for the
camera. 1 is the slowest shortcut speed,
4 is the highest.
P1 ~ P8
Shortcuts to PRESET POSITIONS. Pressing
the button will send the camera directly to
the corresponding PRESET POSITION.
5
Layout of Remote Control
15
Removing a Preset Point
Removing Preset Points is performed in much the same manner as defi ning them.
Once a Preset Point has been removed, selecting it as detailed opposite will no
longer have any effect, until a new point is set.
• Press the DELETE button on the remote, and hold for two seconds.
• The display will now read “Clr-”
• Press a number key to select a Preset Point number. To choose a Preset Point
with a value higher than 10, press the -/-- button fi rst.
• Press ENTER to confi rm.
• The selected Preset Point will now no longer be set.
Cruise Mode
Whilst the PRO-690 is in Cruise Mode, the camera will move continuously and
automatically, only pausing when it arrives at Preset Points for a short interval.
There are two ways to enter Cruise mode.
Auto-scan (Cruise) Mode
When in Auto-scan Mode, the PRO-690 will continuously move automatically,
attempting to observe as much of the fi eld of view as practicable in the shortest
time it can.
• To enter Auto-scan Mode, press AUTO.
• For an alternate Auto-scan mode, go to Preset Point 99.
Manual Cruise Mode
You can program lists of Preset Points for the PRO-690 to view in order.
• First, create all the Preset Points you wish to see, as detailed on page 8.
• Press and hold PATTERN for two seconds.
• The display will now read “PStA”.
•
Press the NUMBER button for the fi rst Preset Point you want in the programmed
loop, using the -/-- button to access points higher than 10 if necessary.
• Press ENTER once the camera has moved to that Preset Point to confi rm.
• Repeat for the other Preset Points you want on the loop, in the order that you
want them to be accessed. Remember to press ENTER each time to confi rm
your selection.
• Press and hold PATTERN for two seconds. The display will now show “PSt0”
confi rming that the pattern programming has ended and the pattern has been
saved.
• Press RUN to initiate the programmed pattern, and press RUN again to stop
the pattern.


