background image

4

4

4

Congratulations on your purchase of this 360º PTZ Camera Dome! This system is 
an ideal solution for monitoring a large area – a combination of a high quality CCD 
image sensor mounted in a contained dome with the option to pan fully 360º. 
Nothing will be out of sight for long!

Whether you wish to do this using the full complement of manual controls, or 
program a detailed surveillance program for the camera to run, the PRO-690 gives 
you all the options you need to simply and effectively monitor a large range of 
locations without the hassle of multiple cameras.

The PRO-690 features an included fully functional PTZ controller, great low-light 
performance and a 3x optical zoom – great for getting up close to what you want 
to see. All this comes mounted in a simple but elegant 4” dome.

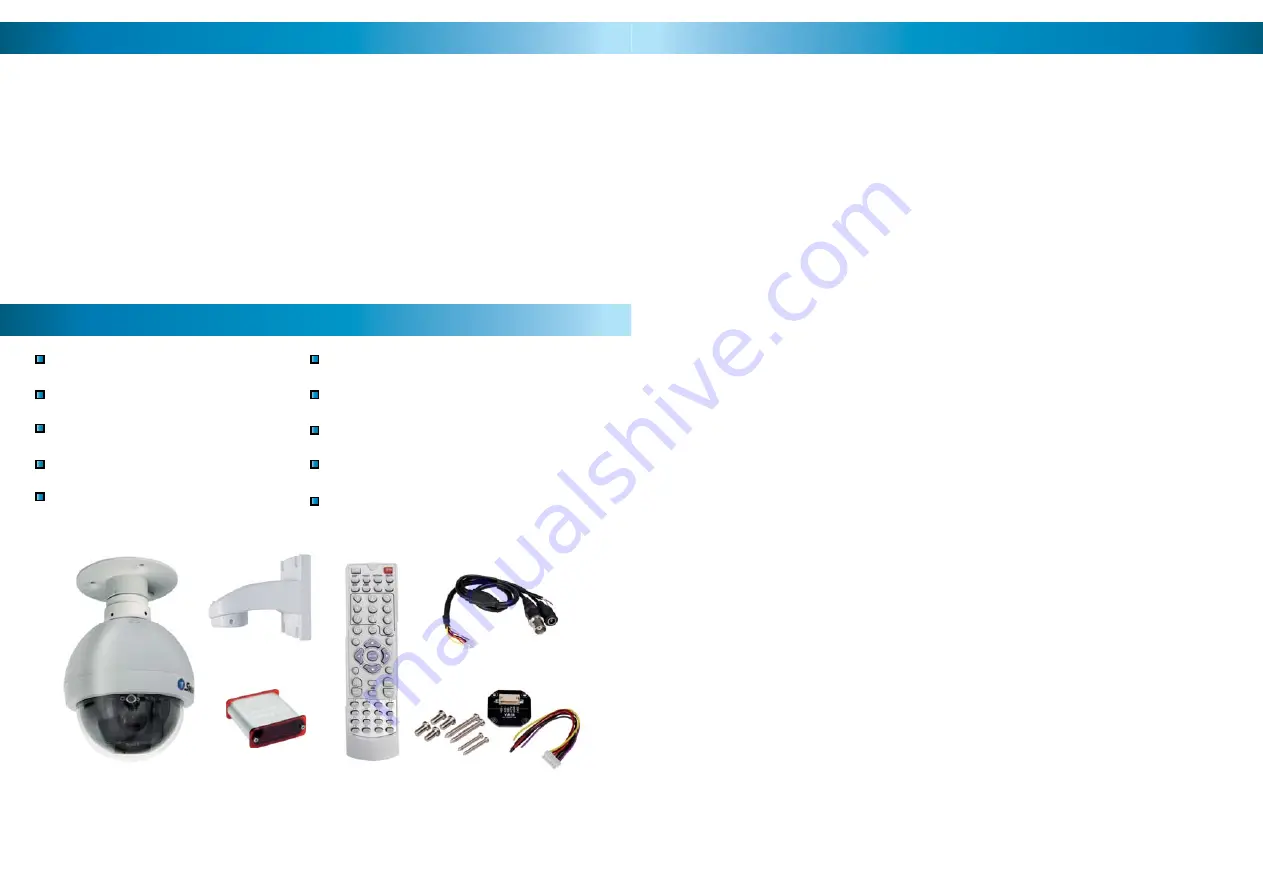
PRO-690 PTZ 4” Dome Camera

Ceiling Mounting Arm/Bracket

Wall Mount Arm

PTZ Controller/Receiver

Remote Control

Mounting Screws

Operating Instructions

2 x Power Adapters (DC 12V)

18m (59ft) Hybrid Video/RS485 Cable

Spare Camera Cable & Plug Board

If any of these components are missing, contact 

Swann

 Technical Support. 

Contact details are on the back cover of this booklet.

Overview

Package Contents

17

Auto-Home Function

The PRO-690 can be confi gured to automatically return to it’s master Preset Point, 
the “Home Point”. This is particularly useful for monitoring a door, hallway, car 
space or similar, where the default position of the camera should be viewing this 
location.

To turn Auto-Home ON and OFF use the numerical command shown opposite. 
The numerical commands are “81” to enable the Auto-Home function, and “82” 
to disable it. You can also change the wait time (the amount of time the camera 
will spend stationary before defaulting to the home point) by using numerical 
shortcuts 77 - 80.

The Home Point is stored as PRESET 76. Defi ning this Preset Point will redefi ne 
the Home Point. To remove the Home Point, follow the instructions for deleting a 
Preset Point, and DELETE Preset Point 76.

F1 - F4 Shortcut Buttons

These are user-defi ned buttons, which can be used as master shortcut buttons. 
Defi ning the behaviour of shortcut buttons is complex, and not recommended 
for novice or intermediate users. Proper usage of the shortcut interface requires 
detailed knowledge of PELCO-P/D protocols. In this example, we’ll set F1 to be a 
shortcut key to access Preset Point 8. The PELCO command for this operation is: 

0x00 0x07 0x00 0x08

.

•  Press the SHOT button, followed by -/--. Key in “240” and press ENTER.
•  The LED display will now show “0---”
•  Input X, where X is the F button you wish to assign the shortcut to. In this 

example, as we want to defi ne F1, enter “1” and press ENTER.

•  The display will now show “1---”. In this example, we wish to enter “0” 

(abbreviation of 0x00 in hexadecimal), and then press ENTER.

•  The display will now show “2---”. Continuing the above example, enter “7” and 

press ENTER.

•  The display will now show “3---”. Enter “0”, press ENTER.
•  The display will now show “4---”. Enter “8”, press ENTER.

Once this has been defi ned, pressing F1 will instantly take the camera to Preset Point 8. 
To create other customised shortcut programs you’ll need a list of commands for PTZ 
protocols. These are easily obtained via the Internet - just enter the protocol you’d like 
into a good search engine and you’ll fi nd several lists compiled by different authorities. 
The specifi c protocol you’ll use depends on your needs and limitations of your specifi c 
setup. If in doubt, we suggest hiring an experience installer/technician.

Additional Functions

Содержание PRO-690

Страница 1: ... user This warranty applies to the original purchaser of the product only and is not transferable to any third party Unauthorized end user or third party modifications to any component or evidence of misuse or abuse of the device will render all warranties void By law some countries do not allow limitations on certain exclusions in this warranty Where applicable by local laws regulations and legal...

Страница 2: ... s authority to operate the equipment IMPORTANT SAFETY INSTRUCTIONS Make sure product is fixed correctly and stable if fastened in place Do not operate if wires and terminals are exposed 2 FOR BEST RESULTS This is a semi professional 360º PTZ dome camera conforming to PELCO P D stand ards To obtain the best image quality please use a high quality cable particularly if the cables required length ex...

Страница 3: ...nvironment it will not be able to see anything Consider illuminating your subject perhaps simply leaving a light on will make all the difference If you really need to see in absolute darkness consider upgrading to a camera with infrared night vision built in Problem After running the dome for an extended period it seems to lose precision Solution The PTZ system needs to be re initialized this is t...

Страница 4: ... the wait time the amount of time the camera will spend stationary before defaulting to the home point by using numerical shortcuts 77 80 The Home Point is stored as PRESET 76 Defining this Preset Point will redefine the Home Point To remove the Home Point follow the instructions for deleting a Preset Point and DELETE Preset Point 76 F1 F4 Shortcut Buttons These are user defined buttons which can ...

Страница 5: ...0 Init EEPROM to Default 241 Init System 242 Begin PATTERN setup 243 End PATTERN setup 244 Set PATTERN speed 245 Set PATTERN stay time 246 Set PATTERN point number 247 Start run PATTERN Enable Auto Start PATTERN cruise 248 Stop run PATTERN Disable Auto Come Back Home Point 249 Set Pan Limited to 0x38 255 Set Pan Tilt speed to fast mode CLEAR Function 1 32 Clear Preset Point 62 Clear Left Limited P...

Страница 6: ...ntil a new point is set Press the DELETE button on the remote and hold for two seconds The display will now read Clr Press a number key to select a Preset Point number To choose a Preset Point with a value higher than 10 press the button first Press ENTER to confirm The selected Preset Point will now no longer be set Cruise Mode Whilst the PRO 690 is in Cruise Mode the camera will move continuousl...

Страница 7: ...he preset points use the shortcut buttons marked P1 through P8 Of course this only works for the first eight Presets To access Preset 9 and above Press the SHOT button If you re accessing a point above 10 press the button Enter the number of the Preset you d like to access Press ENTER to confirm As a shortcut if you are already in Preset mode the controller will display Pxxx you can just enter the...

Страница 8: ...le systems can be connected to the RS485 cable in a bus or line configuration The exact details of the wiring solution will vary by environment the following is presented only as a guide Please Note If you already have or are planning on getting a PTZ capable Swann DVR then using the supplied PTZ controller is optional The PTZ system can be controlled by the RS485 connection built into the DVR In ...

Страница 9: ...tocol and Baud Rate Press and hold the SETUP button The display on the Controller will change to a letter either d or p and a number 12 24 48 or 96 The letter represents the current protocol either Pelco P or Pelco D The number is the abbreviated Baud Rate i e 12 represents 1200bps 24 represents 2400bps and so on Use the UP and DOWN arrows to change the Protocol Use LEFT and RIGHT to change the Ba...

Страница 10: ...e camera A freestanding pole of sufficient height and integrity to reliably hold the camera securely is an ideal choice as is the centre of the ceiling in a larger room or a warehouse Height For best results the PRO 690 PTZ Dome should be mounted as high up as practicable This is because the camera has complete freedom of tilt movement in the 90º below the horizontal plane Stated more simply it ca...

Отзывы: