background image

PC Webcamera

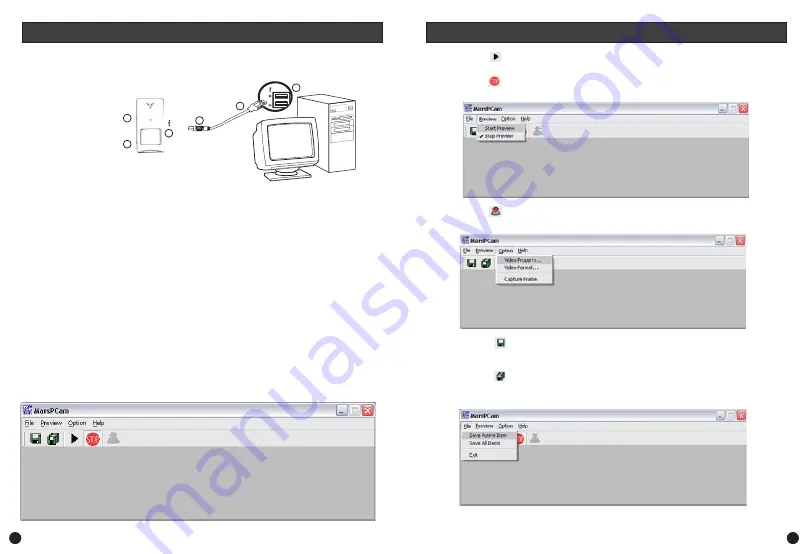
To connect the camera to your PC and use the camera as a PC webcam or save the
images to your computer, please refer to the image below.

Using the SD PIR cam as a PC camera.

Step 1:

Step 2:

Step 3:

Step 4:

Step 5:

Step 6:

Important: Make sure the PIR ON/OFF switch (3) on the left of the camera is in the OFF position.

Firstly install the software on you pc by running the setup.exe file found on the CD.

Then connect the USB A plug (1) into a spare USB port (2) on your computer.

Make sure the PIR ON/OFF switch (3) on the left of the camera is in the ON position.

Hold down on the shutter button (4) before you connect the USB B plug (5) into the USB port

(6) on the right side of the PIR camera.

Your system should detect your camera and a “Found new hardware wizard” will start. Select

“Install the software automatically”, and click next. Now you will receive a message that the
software for the device you are installing has not passed “Windows Logo testing to verify its
compatibility with Windows XP”. You must click “Continue Anyway” to complete the
installation. When your system has completed the installation, you will see a message telling
you that the wizard has completed installing the software. Click “finish” to close the wizard.

Note: If you do not get the found new hardware wizard, you should disconnect the USB cable from the
side of the camera and check if the PIR ON/OFF switch is in the ON position. Also check if the camera
is listed as a “MR97316 VGA Dual-Mode Camera” in the Imaging Devices category of your Device
Manager.

Run the MR97316 MarsPCam file found on your desktop. The screen below should appear.

r

USB CABLE

Plug in to a spare USB

port on your PC.

CAMERA

1

2

5

6

3

4

4

5

PC Webcamera continued

Step 7:

Step 8:

Step 9:

Step 10:

Step 11:

Step 12:

Press the

button to start previewing from the camera. Otherwise click on “Start Preview”

from the Preview tab menu.

Press the

button to stop previewing from the camera. Otherwise click on “Stop Preview”

from the Preview tab menu.

Press the

button to capture the image from the camera. Otherwise click on “Capture

Frame” from the Option tab menu.

Press the

button to save the last captured image. Otherwise click on “Save Active Item”

from the File tab menu. In the next screen, select the location of where you want to save the
captured “jpeg” image.

Press the

button to save all captured images. Otherwise click on “Save All Items” from the

File tab menu. In the next screen, select the location of where you want to save the captured
“jpeg” images.

Click on the “About MarsPCam” from the Help tab menu to find the version number of the

MarsPCam software.

Содержание Memory Camera Series

Страница 1: ... s original purchase date You must present your receipt as proof of date of purchase for warranty validation Any unit which proves defective during the stated period will be repaired without charge for parts or labour or replaced at the sole discretion of Swann The repair or replacement will be warranted for either ninety days or the remainder of the original one year warranty period whichever is ...

Страница 2: ...s which have a mini CD tray Please Note 2 2 3 3 4 5 6 7 Back Cover Back Cover 2 2 3 3 4 5 6 7 Back Cover Back Cover Parts Identification A B C D E F G H DC power input LED indicator lights up when capturing a picture Shutter button Pinhole Lens PIR ON OFF switch SD Memory Card slot Mini USB port PIR Sensor and filter A B C D E F H G 2 Step 5 Step 6 Step 7 Step 8 Highlight the images you want to sa...

Страница 3: ...move the card when the LED is blinking This can result in damage to the picture or the SD card PIR Camera POWER CONNECTOR 6 CAMERA POWER ADAPTOR 7 5 9 2 3 8 POWER CONNECTOR 6 BATTERY SNAP 10 BATTERY NOT INCLUDED 1 4 SD MEMORY CARD CAMERA BRACKET Important Make sure the PIR ON OFF switch 8 on the left of the camera is in the OFF position Firstly insert your SD memory card 1 into the SD card slot 2 ...

Страница 4: ... Click finish to close the wizard Note If you do not get the found new hardware wizard you should disconnect the USB cable from the side of the camera and check if the PIR ON OFF switch is in the ON position Also check if the camera is listed as a MR97316 VGA Dual Mode Camera in the Imaging Devices category of your Device Manager Run the MR97316 MarsPCam file found on your desktop The screen below...

Страница 5: ... Click finish to close the wizard Note If you do not get the found new hardware wizard you should disconnect the USB cable from the side of the camera and check if the PIR ON OFF switch is in the ON position Also check if the camera is listed as a MR97316 VGA Dual Mode Camera in the Imaging Devices category of your Device Manager Run the MR97316 MarsPCam file found on your desktop The screen below...

Страница 6: ...move the card when the LED is blinking This can result in damage to the picture or the SD card PIR Camera POWER CONNECTOR 6 CAMERA POWER ADAPTOR 7 5 9 2 3 8 POWER CONNECTOR 6 BATTERY SNAP 10 BATTERY NOT INCLUDED 1 4 SD MEMORY CARD CAMERA BRACKET Important Make sure the PIR ON OFF switch 8 on the left of the camera is in the OFF position Firstly insert your SD memory card 1 into the SD card slot 2 ...

Страница 7: ...s which have a mini CD tray Please Note 2 2 3 3 4 5 6 7 Back Cover Back Cover 2 2 3 3 4 5 6 7 Back Cover Back Cover Parts Identification A B C D E F G H DC power input LED indicator lights up when capturing a picture Shutter button Pinhole Lens PIR ON OFF switch SD Memory Card slot Mini USB port PIR Sensor and filter A B C D E F H G 2 Step 5 Step 6 Step 7 Step 8 Highlight the images you want to sa...

Страница 8: ... s original purchase date You must present your receipt as proof of date of purchase for warranty validation Any unit which proves defective during the stated period will be repaired without charge for parts or labour or replaced at the sole discretion of Swann The repair or replacement will be warranted for either ninety days or the remainder of the original one year warranty period whichever is ...

Отзывы: