background image

Saving Images to your PC

6

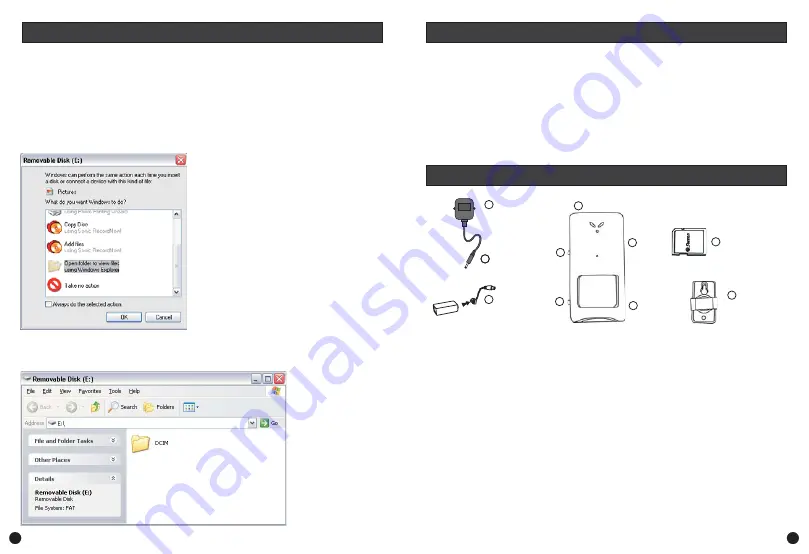
Saving images from the SD memory card to your PC. Please refer to illustrations
on page 4.

Step 1:

Step 2:

Step 3:

Step 4:

Important: Make sure the PIR ON/OFF switch (3) on the left of the camera is in the OFF position.

Connect the USB A plug (1) into a spare USB port (2) on your computer.

Connect the USB B plug (5) into the USB port (6) on the right side of the PIR camera.

Windows will prompt you with a “What do you want Windows to do?” Dialog box for

your removable disk. Please select the “Open folder to view files” option.

The screen below should appear. Now double click on the “DCIM” folder to view the

images taken by the camera.

Getting Started

You can connect your Swann Memory camera to your PC and use the camera as a PC webcam or
extract the images already saved on the SD memory card in the camera. To help guide you through the
process of setting up the camera, we have outlined the steps and numbered each of the components
required in the diagram below each of the configurations.

Important!

The SD card can only be inserted one way (gold pins facing towards the back of the camera), forcing it
may damage the camera or SD card. Make sure you turn OFF the power to the camera before inserting
or removing the SD card. Do not insert or remove the card when the LED is blinking. This can result in
damage to the picture or the SD card.

PIR Camera

POWER

CONNECTOR

6

CAMERA

POWER

ADAPTOR

7

5

9

2

3

8

POWER

CONNECTOR

6

BATTERY

SNAP

10

BATTERY NOT INCLUDED

1

4

SD MEMORY CARD

CAMERA

BRACKET

Important: Make sure the PIR ON/OFF switch (8) on the left of the camera is in the OFF position.

Firstly insert your SD memory card (1) into the SD card slot (2) on the camera.

Choose where you want to situate the camera. Keep in mind the camera can only be 3f / 1m

away from a mains power socket, unless you use extension cables. Then mount the camera
bracket to your wall using the screws provided in the packaging.

Connect the camera (3) to the camera bracket (4) mounted on your wall.

Connect the DC plug (6) into the DC power socket (5) on the top of the camera.

Plug the power adaptor (7) into the mains power on your wall. For short term usage, connect a

9V battery to the Battery Snap (10) and plug it into the DC power socket (5).

Make sure you wait 30 seconds while the camera goes through diagnostics before you push the

PIR ON/OFF switch (8) on the left of the camera into the ON position.

The camera will now take images of any motion events within 15 feet (5 metres) of the camera

every 3 seconds. All images will be saved to the default location on the SD memory card.

Press the shutter button (9) on the left of the camera to manually save images to your SD

memory card.

Step 1:

Step 2:

Step 3:

Step 4:

Step 5:

Step 6:

Step 7:

Step 8:

3

Содержание Memory Camera Series

Страница 1: ... s original purchase date You must present your receipt as proof of date of purchase for warranty validation Any unit which proves defective during the stated period will be repaired without charge for parts or labour or replaced at the sole discretion of Swann The repair or replacement will be warranted for either ninety days or the remainder of the original one year warranty period whichever is ...

Страница 2: ...s which have a mini CD tray Please Note 2 2 3 3 4 5 6 7 Back Cover Back Cover 2 2 3 3 4 5 6 7 Back Cover Back Cover Parts Identification A B C D E F G H DC power input LED indicator lights up when capturing a picture Shutter button Pinhole Lens PIR ON OFF switch SD Memory Card slot Mini USB port PIR Sensor and filter A B C D E F H G 2 Step 5 Step 6 Step 7 Step 8 Highlight the images you want to sa...

Страница 3: ...move the card when the LED is blinking This can result in damage to the picture or the SD card PIR Camera POWER CONNECTOR 6 CAMERA POWER ADAPTOR 7 5 9 2 3 8 POWER CONNECTOR 6 BATTERY SNAP 10 BATTERY NOT INCLUDED 1 4 SD MEMORY CARD CAMERA BRACKET Important Make sure the PIR ON OFF switch 8 on the left of the camera is in the OFF position Firstly insert your SD memory card 1 into the SD card slot 2 ...

Страница 4: ... Click finish to close the wizard Note If you do not get the found new hardware wizard you should disconnect the USB cable from the side of the camera and check if the PIR ON OFF switch is in the ON position Also check if the camera is listed as a MR97316 VGA Dual Mode Camera in the Imaging Devices category of your Device Manager Run the MR97316 MarsPCam file found on your desktop The screen below...

Страница 5: ... Click finish to close the wizard Note If you do not get the found new hardware wizard you should disconnect the USB cable from the side of the camera and check if the PIR ON OFF switch is in the ON position Also check if the camera is listed as a MR97316 VGA Dual Mode Camera in the Imaging Devices category of your Device Manager Run the MR97316 MarsPCam file found on your desktop The screen below...

Страница 6: ...move the card when the LED is blinking This can result in damage to the picture or the SD card PIR Camera POWER CONNECTOR 6 CAMERA POWER ADAPTOR 7 5 9 2 3 8 POWER CONNECTOR 6 BATTERY SNAP 10 BATTERY NOT INCLUDED 1 4 SD MEMORY CARD CAMERA BRACKET Important Make sure the PIR ON OFF switch 8 on the left of the camera is in the OFF position Firstly insert your SD memory card 1 into the SD card slot 2 ...

Страница 7: ...s which have a mini CD tray Please Note 2 2 3 3 4 5 6 7 Back Cover Back Cover 2 2 3 3 4 5 6 7 Back Cover Back Cover Parts Identification A B C D E F G H DC power input LED indicator lights up when capturing a picture Shutter button Pinhole Lens PIR ON OFF switch SD Memory Card slot Mini USB port PIR Sensor and filter A B C D E F H G 2 Step 5 Step 6 Step 7 Step 8 Highlight the images you want to sa...

Страница 8: ... s original purchase date You must present your receipt as proof of date of purchase for warranty validation Any unit which proves defective during the stated period will be repaired without charge for parts or labour or replaced at the sole discretion of Swann The repair or replacement will be warranted for either ninety days or the remainder of the original one year warranty period whichever is ...

Отзывы: