background image

14

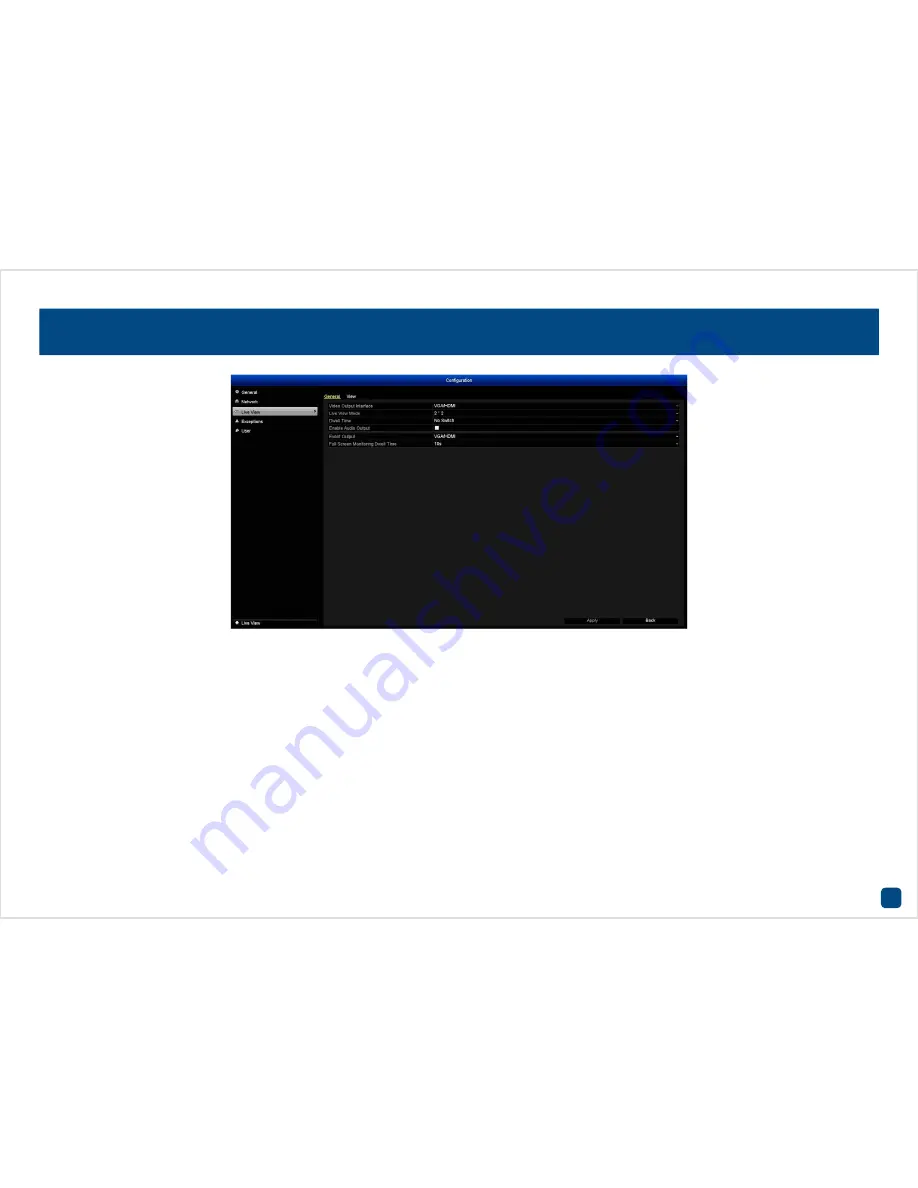
Configuration: Live View: General

Video Output Interface: 

As the DVR has a VGA and HDMI output, this cannot be changed.

Live View Mode:

 2 x 2 is the default mode for the 4 channel model and 3 x 3 for the 8 

channel model. This will display up to 4 video channels on-screen for the 4 channel 
model and up to 8 video channels on-screen at a single time for the 8 channel model. 
Selecting 1 x 1 will display the first video channel full-screen. Other views available on 
the 8 channel model are 1 + 5 and 1 + 7.

Dwell Time:

 The time in seconds to dwell on a video channel when enabling “Start 

Auto-switch” on the “Live View Menu Bar”. This only works when the “Live View Mode” 
is set to 1 x 1.

Enable Audio Output:

 This enables the audio output connection on the DVR.

Event Output:

 As the DVR has a VGA and HDMI output, this cannot be changed.

Full Screen Monitoring Dwell Time:

 The time in seconds to display an alarm event 

screen.
Don’t forget to click “Apply” to save settings. 


Содержание hdr8-8050

Страница 1: ...1 DIGITAL VIDEO RECORDER EN INSTRUCTION MANUAL...

Страница 2: ...it or limit the use of camer as and to comply with the applicable laws and regulations FCC Regulation for USA Prohibition against eavesdropping Except for the operations of law enforcement officers co...

Страница 3: ...iew 15 Configuration Exceptions Exception 16 Configuration User User Management 17 Playback 18 Playback Options Controls 19 Export Normal 20 Export Event 21 Manual Record 22 HDD General 23 HDD Advance...

Страница 4: ...ord ing schedule Camera Adjust and configure how the DVR looks for cameras via the video inputs Access to Motion Detection and Privacy Mask configuration is located here Configuration Access and confi...

Страница 5: ...enwich Mean Time it s the baseline that keeps all the different time zones in sync Date Format The format the date will be displayed System Date You can manually set the date if it is incorrect System...

Страница 6: ...savings applies to your location There are many different standards for DST which can vary dramatically even in the same time zone so you ll need to tell the DVR when it applies to you DST Bias This...

Страница 7: ...h your router You can change this to something more rele vant Device No The internal device number of the DVR We recommend that you leave the default setting Operation Timeout Here you can change the...

Страница 8: ...is hardwired into the hardware and can t be changed MTU Bytes The MTU Maximum Transmission Unit is the size of the largest data gram that can be sent over a network It is recommended to leave the defa...

Страница 9: ...allows the DVR to be more directly connected via a DSL modem This is an option for advanced users only Username Enter the username for your DSL account provider Password Enter the password for your D...

Страница 10: ...unt with SwannDNS go to www swanndvr com and click the Reg istration button Follow the prompts to create your account Enable DDNS check box Click this to enable DDNS Type SwannDNS is automatically sel...

Страница 11: ...ork Management Protocol is an Internet protocol for managing devices over an IP network It is mainly used in network management systems to mon itor network attached devices For the day to day function...

Страница 12: ...rwise the UPnP function will not work HTTP Port This port is used to log into your DVR via your network or remotely The default port number 85 is seldom used by other devices however if you have anoth...

Страница 13: ...n your network where an IP based alarm system is host ed Alarm Host Port The port associated with the IP based alarm system Any changes to the Server Port HTTP Port and RTSP Port on the previous tab w...

Страница 14: ...ecting 1 x 1 will display the first video channel full screen Other views available on the 8 channel model are 1 5 and 1 7 Dwell Time The time in seconds to dwell on a video channel when enabling Star...

Страница 15: ...nge 4 Press the Play button to start the live view of all cameras connected to the DVR Press the Stop button to stop the live view of all cameras connected to the DVR Please note pressing the Stop but...

Страница 16: ...e DVR has difficulties connected to the Internet This may indicate a problem with the DVR s configuration a fault with the network or an issue with the Internet connection on your router IP Conflicted...

Страница 17: ...s operation 1 Click Edit to change the password and click OK to confirm 2 If you have multiple user accounts that you have setup click Delete to remove them 3 Click Add to setup additional users You...

Страница 18: ...u to record information such as location or people at a certain point within the video You can add tags in both normal and event playback External File Allows you to play video files from an external...

Страница 19: ...e player program to play the video file on your computer Click OK to confirm Multiple mark in and out points can be applied 3 Add default tag Tagging allows you to record information such as location...

Страница 20: ...to export unlocked or locked video files Start Time Select your start date time End Time Select your end date time Click the Search button The video files fitting your search criteria will be displaye...

Страница 21: ...t export function works in the same way but is specific for exporting motion events Follow the instructions on the previous page Please note after clicking the Search button click the Details button t...

Страница 22: ...tes that each camera has no recording schedule enabled and the yellow ON button indicates that each camera is recording manually Click the button next to each camera to change the recording status Nor...

Страница 23: ...hed storage device that the DVR can record to Add Create a folder on your NAS device to save to Input the IP address of the NAS device and the folder name you created Click OK to continue Init Enable...

Страница 24: ...ng less frequented areas Mode The default selection is Quota Select Group if you have multiple hard drives installed so you can instruct the DVR on which drive each camera can record to Camera Quota S...

Страница 25: ...25 HDD Detect The HDD detect menu displays technical specifications of the hard drive installed This information is primarily used by Swann Technical Support to detect possible hard drive faults...

Страница 26: ...and blue represents normal recording Camera Select a camera that you would like to edit Enable Schedule This is enabled by default Edit Click this to edit the schedule You can set a schedule for cert...

Страница 27: ...C and 25fps PAL Video Quality The amount of data the DVR will use to record video Lowering the qual ity will reduce the file size of each video saved to the hard drive Pre record By default the DVR wi...

Страница 28: ...he hard drive The DVR will always record over the oldest files on your hard drive first It s advisable to leave this function enabled as the DVR will always be able to record events as they happen How...

Страница 29: ...periods of time where the DVR will employ an alternative recording mode You can define up to 32 holiday periods These periods can be delineated by date by weeks or by the month Click Edit to begin Ho...

Страница 30: ...be displayed depending on your current locale Time Format Choose between 12 hour and 24 hour time Display Mode How you would like the OSD on screen display to be displayed It s worth having a look at...

Страница 31: ...ult the instructions included with your camera and match those settings here You also have the ability to move the camera s focus within the camera s view and save these as pre sets From here you can...

Страница 32: ...Z More Settings You also have the ability to move the camera s focus within the camera s view and save these as pre sets From here you can create a patrol using these pre sets Please consult the instr...

Страница 33: ...ble Motion Detection This is enabled by default Click the checkbox to disable Handling Here you can define what will happen when the camera you ve selected detects motion You can trigger additional ca...

Страница 34: ...n Position your cameras well Many issues seen with motion detection and security cameras can be traced back to poor positioning of the camera itself Make sure the area in front of your cameras is as c...

Страница 35: ...bscured by a privacy mask won t be shown when viewing a live image and will not be recorded Click and drag to select the area you want to select or de select Camera Select a camera that you would like...

Страница 36: ...en when the camera you ve selected is being tampered with You can trigger additional cameras to start recording you can adjust your arming schedule send alerts to the SwannView Plus software and to se...

Страница 37: ...a camera connected Camera Select a camera that you would like to edit Enable Video Loss Alarm Click the checkbox to enable Handling Here you can define what will happen when the camera you ve selected...

Страница 38: ...gin The warranty does not cover any incidental accidental or consequential damages arising from the use of or the inability to use this product Any costs associated with the fitting or removal of this...

Страница 39: ...port E mail tech swann com Telephone Helpdesk USA Toll Free 1 800 627 2799 USA Parts Warranty 1 800 627 2799 M F 9am 5pm US PT AUSTRALIA 1300 138 324 NEW ZEALAND Toll Free 0800 479 266 UK 0203 027 097...

Отзывы: