background image

USER MANUAL

In order to continue serving our customers and providing the best 

products, our product information including our user manuals may 

receive updates from time to time. Please check our website for the 

latest user manuals and product materials.  Rev. 0517

Содержание SG-5

Страница 1: ...ue serving our customers and providing the best products our product information including our user manuals may receive updates from time to time Please check our website for the latest user manuals a...

Страница 2: ...ctric scooter and tops it off with an extra bit of swag To ensure your safety and the safety of others please read and follow the guidelines in this user manual carefully and thoroughly before and dur...

Страница 3: ...lay Information 07 Section 3 FOLDING ASSEMBLY 3 1 Assembling the Handlebars 07 3 2 Attaching the Phone Mount 08 3 3 Standing Folding Unfolding the Scooter 09 3 4 Tire Inflation 10 Section 4 CHARGING S...

Страница 4: ...t this manual and exercise good judgment when using your Swagger 5 scooter Consult this manual before you attempt to use your Swagger 5 1 1 Important Information Within this manual the Swagger 5 your...

Страница 5: ...s needed dampen non abrasive cloth with water or mild cleaner and wipe off the scooter Never submerge the scooter or any of the scooter s components Do not disassemble or modify the battery Attempting...

Страница 6: ...2000 m above sea level Prolonged Exposure to UV Rays Rain and the Elements May Damage the Enclosure Materials Store Indoors When Not in Use WARNING RISK OF FIRE No user serviceable parts AVERTISSEMEN...

Страница 7: ...ant to Part 15 of the FCC Rules These limits are designed to provide reasonable protection against harmful interference in a residential installation This equipment generates uses and can radiate radi...

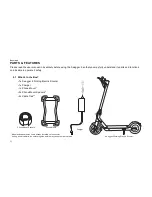
Страница 8: ...ble to operate it safely 2 1 What s in the Box 1x Swagger 5 Folding Electric Scooter 1x Charger 1x Phone Mount 2x Phone Mount Spacers 2x Cable Ties Swagger 5 Folding Electric Scooter Charger Phone Mou...

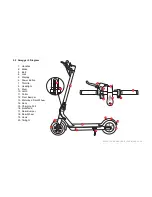
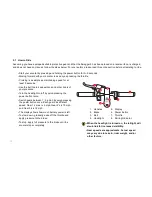
Страница 9: ...ke 3 Bell 4 Lock 5 Display 6 Power Button 7 Throttle 8 Headlight 9 Stem 10 Latch 11 Collar 12 Front Bumper 13 Motorized Front Wheel 14 Deck 15 Charging Port 16 Kickstand 17 Rear Bumper 18 Rear Wheel 1...

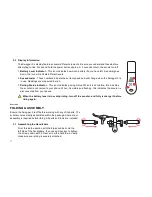
Страница 10: ...When it is not visible this indicates the scooter is connected to your phone When it is visible and flashing this indicates the scooter is disconnected from your phone When the battery level is low st...

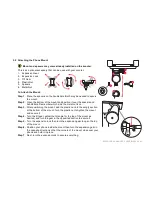
Страница 11: ...nut into the empty section at the bottom of the mount Turn the plastic nut to tighten the mount and secure it Step 4 Turn the tilt gear adjust the tilt angle for the top of the mount as desired and tu...

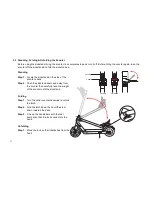
Страница 12: ...de of the scooter s deck Step 2 Push the kickstand down and away from the scooter then carefully lean the weight of the scooter onto the kickstand Folding Step 1 Turn the collar counterclockwise to un...

Страница 13: ...valve located on the inside of the wheel and remove the cap Step 4 Use a standard bicycle pump to pump air to the tire slowly Step 5 Use the pressure gauge periodically to check PSI Step 6 When the ti...

Страница 14: ...k Step 2 Insert the appropriate end into the charging port and then insert the other end into an outlet Step 3 While the scooter is charging the charger light will turn red Step 4 When the scooter is...

Страница 15: ...5 kg Before each ride especially if you may travel a long distance check the tires for proper inflation check all cables for damage and test the brakes Do not ride if any part of the scooter is damage...

Страница 16: ...resence Turn the headlight on off by quick pressing the power button twice Switch gears between 1 2 and 3 by quick pressing the power button once Each gear has different speed Gear 1 s max is 5 mph Ge...

Страница 17: ...l turn off as the scooter powers off Cruise Control Step 1 Accelerate to reach the desired speed Step 2 Hold the throttle for approx 5 seconds to turn on Cruise Control and maintain speed Step 3 Use t...

Страница 18: ...able Step 5 Once the app finds the scooter tap Pair to connect the two After successfully pairing the two the scooter s pairing indicator will stop flashing Step 6 After successfully pairing use the a...

Страница 19: ...3 4 2 Inspect the brakes to make sure that both are working properly 3 Make sure all screws and bolts are taut and properly fastened to prevent injury and unnecessary wear and tear For questions conc...

Страница 20: ...eated garage shed or other location with extreme temperature fluctuations or ranges Store only in environments where temperatures will be stable and kept between 4 F to 140 F 20 C to 60 C 6 3 Transpor...

Страница 21: ...ard Surfaces Flat roads Ramps under 20 Working Temp 32 F to 109 F 0 C to 43 C Storage Temp 4 F to 140 F 20 C to 60 C Motor Power 200W Tires Front Tire Rubber Motorized Wheel Air Filled at 28 PSI 1 9 B...

Страница 22: ...the Product with a product that is new or refurbished which is substantially equivalent to the original product This Warranty is for one replacement only of like items and does not cover items out of...

Страница 23: ...LL WE UNDER ANY CIRCUMSTANCES BE LIABLE FOR ANY CONSEQUENTIAL INCIDENTAL SPECIAL OR PUNITIVE DAMAGES OR LOSSES WHETHER DIRECT OR INDIRECT SOME STATES DO NOT ALLOW THE EXCLUSION OR LIMITATION OF INCIDE...

Страница 24: ...demarks of Google Inc Apple and the Apple logo are registered in the U S and other countries as a trademark of Apple Inc The App Store is registered in the U S and other countries as a service mark of...

Отзывы: