background image

-16-

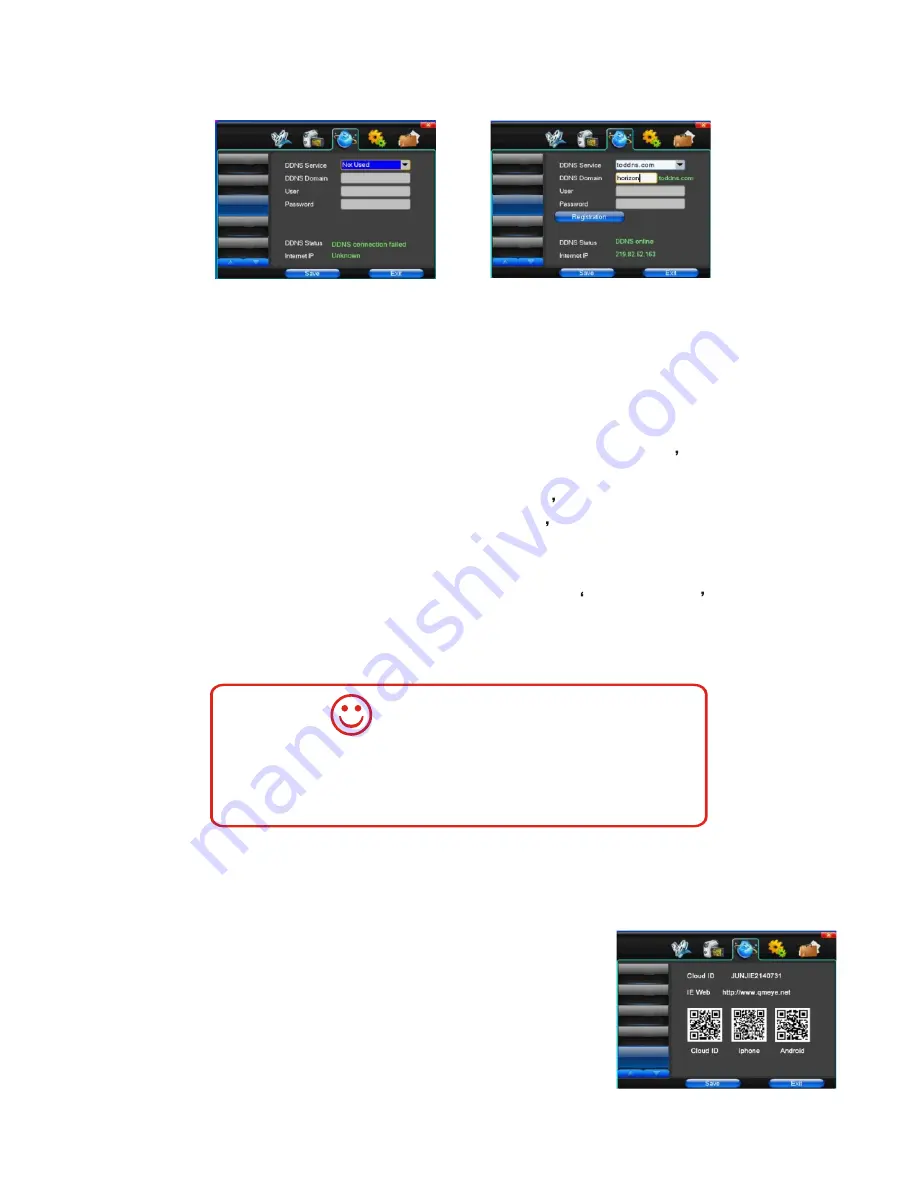
2.2 DDNS setting (picture 2-3)

Picture 2-3

Picture 2-4

Ethernet Setup

PPPoE & 3G

DDNS Setup

Email

P2P Client

Ethernet Setup

PPPoE & 3G

DDNS Setup

Email

P2P Client

DDNS service -

 Dynamic DNS service provider selection. System 

      default DDNS server: SODDNS.COM, TODDNS.COM, 
      DYNDNS.ORG. If users want to use theirs own service provider,
      choose NOT USED, then enter the Dynamic DNS and user 
      information.

DDNS domain -

 According to the DDNS domain service provider s

       main domain to fill out the second-level register domain name.

User name - 

Login the domain service provider s website

Password - 

Login the domain service provider s website

For example, choose SODDNS.COM domain server. Enter personal 
custom domain name (not be registered). Choose  Binding Domain
as picture 2-4. After the domain is set, it will be displayed in the DDNS
status and shows the network IP address, etc. 

2.3 P2P setting (picture 2-5)

Picture 2-5

Ethernet Setup

PPPoE & 3G

DDNS Setup

Email

P2P Client

If  the  product  connects  to  the  Router,  when  using  dynamic 
domain name function, do  port  mapping  in  Router  before  the 
communication. Details setting please refer to Router instruction.  

OPERATION TIPS

CLOUD ID -

 Use cell phone or PC for P2P connection according to the

    ID to authenticate .  Users  can  search  the  equipment  CLOUD  ID 
    from here. 

CLOUD ID QR CODE - 

When users add the equipment to the cell 

    phone or PC port, directly enter the ID number or scan the QR code. 

QR code for APPLE application  - 

Scan the QR code to download 

    the application for IOS system.        

QR code for Android application - 

Scan the QR code to download

   the application for Android system. 

Содержание SVT-SMART 500

Страница 1: ...User Manual SVT SMART 500 700 Please read this user manual prior to installing the system and keep it well for future use ...

Страница 2: ...or Unlocking 8 Monitoring 8 DVR Operation Instructions 9 18 SVT SMART Remote Control Functions 9 Shortcut Menu 10 Monitor Permission Login 10 Language Setting 11 Recording Control 11 Plaback Backup 12 14 Main Menu Introduction 15 Camera Setings 15 Network Settings 15 16 Systems Settings 17 18 SVT SMART Cell Phone Application Instructions 19 Downloading the App 19 App functions 19 App operation 19 ...

Страница 3: ...ket holes Brightness adjustment Reserved Voice volume Ring volume Alarm zone port Alarm port Indoor monitor port Outdoor station 2 port NO NO 1 2 3 4 5 6 7 8 9 10 11 12 15 16 17 Function Outdoor station 1 port 485 port Network port Video port Power port On off key Switch the screen Call guard station Unlock key Talk key Monitor door 1 Monitor door 2 Play pause Esc Menu Confirm Move up down left ri...

Страница 4: ... 10mm thickness with 9 10mm thickness Installation steps 1 Cut off the power According to the indication of the symbol on the top of the indoor monitor toggle the switch button to open the hard disk cover 2 Insert the hard disk into the indoor monitor correctly If the thickness of hard disk is less than 9mm the hard disk may not be read Try to place the screen of the indoor monitor facing up Then ...

Страница 5: ...acket on the installation place keep it horizontal a mark the drilling positions 2 Drill holes according to the marked drilling positions and pad with screw anchors 3 Fasten the bracket with the screws properly on the installation place 4 Connect the indoor monitor according to the wiring diagram 5 Mount the indoor monitor properly on the bracket hooks from top to bottom ...

Страница 6: ...Wiring diagram SVT 2 TD20G 4C 2C 5C 2C SVT 2TD20G 4C 2C 5C 2C 4 4 ...

Страница 7: ... 5 ...

Страница 8: ... 6 ...

Страница 9: ... 7 ...

Страница 10: ... the first press is to turn on the moniter interface and the second press is to turn off it Indoor Monitor Functions Visitor calls When the indoor monitor is called by the outdoor station the indoor monitor will ring and display the view from the camera of the outdoor station Press on the indoor monitor the indicator light will be on and indoor monitor can talk with the outdoor station Press again...

Страница 11: ... 6 7 8 9 0 10 MENU OK FN ESC SEARCH DEV PTZ ALARM CLEAR 1 2 3 4 5 6 7 8 9 10 11 NO Function On off Video record control Keypad Picture switch Backspace Show hide the screen menu Four split window switches Movement key Enter key Pop up control Esc 9 There are three methods ways to operate the SVT SMART System Connecting a mouse SVT SMART Remote Control and the Keypad of the indoor monitor DVR Opera...

Страница 12: ... control playback backup in picture 1 3 enter choose the right user name and password to login Press ESC to return exit logout NOTICE Factory default user name and password admin null 1 If forgot user password reset to factory default setting Steps In the monitor status no other operation or in setting interface press and hold the SLOW of the remote control for at least 5 seconds Then lease the pr...

Страница 13: ...ess REC of remote control or choose RECORDING CONTROL OF the shortcut menu picture 1 2 to enter picture 1 6 SETTING INTERFACE Press ESC to return or exit the setting NOTE For the first time login the user admin dialog interface will pop up Factory default user name and password admin null Automatically Rec main menu record setting to set by timing and or dynamic monitor Manual Rec The highest prio...

Страница 14: ...de Show List Playback Date Video backup or choose PLAYBACK BACKUP from In monitor status press shortcut menu in picture 1 2 to enter picture 1 7 interface Press ESC to return or exit NOTE For the first time login the user admin dialog interface will pop up Factory default user name and password admin null icon icon Function Function Picture 1 8 Playback Backup 4 1 Select playback backup channel s ...

Страница 15: ...Picture 1 9 4 3 Choose playback backup time In picture 1 11 choose TIME SELECTION icon and press confirm Picture 1 12 will pop up Choose HOUR MINUTE SECOND and press confirm The numeric keypad will pop up Select the number by moving up and down or press the number directly in the remote control Press ESC to exit the numeric keypad Last year Next year Next month Choose date Last month 18 4 2 Select...

Страница 16: ...f the indoor monitor and of the remote control 3 press hold the for 3 seconds to change the function with the displaying Then press to choose the equipment Press FN to exit the function The system will start to backup the video file automatically Press ESC to exit the video backup status Choose the equipment and press Backup Start 1 During the video playback press 1 8 keypad of the remote control ...

Страница 17: ...et mask default gateway DNS server etc by the Router automatically This function requires the Router activates DHCP Activate UPnp Optional choice IP address Equipment network logical address Subnet mask Set according to the actual communication status Default gateway Allocate according to the actual connection eg NSR connects to the Router and write the Router address DNS server DNS server address...

Страница 18: ...ame not be registered Choose Binding Domain as picture 2 4 After the domain is set it will be displayed in the DDNS status and shows the network IP address etc 2 3 P2P setting picture 2 5 Picture 2 5 Ethernet Setup PPPoE 3G DDNS Setup Email P2P Client If the product connects to the Router when using dynamic domain name function do port mapping in Router before the communication Details setting ple...

Страница 19: ... choose according to the requirement Network validation when connect to the public network time can be adjusted by the network modify time confirm system time modification 3 System settings 3 1 Time code picture 2 6 Time date adjust 1 remote control operation after choose the option press keyp to enter 2 Keypad 2 Keypad control operation after choose the option pre OK and pops up the time control ...

Страница 20: ... control press remote control key to choose hard drive information box then press to choose OPERATION TIPS Hard drive is full when hard drive is full system will cover the oldest file and keep recording if choose auto cover or stop recording if choose stop current recording Package time time period to create video file Time can be set between 5 120 minutes Recording Rate total data rate for the cu...

Страница 21: ... to login There are remember password remember me Login Free Help FAQ Android 1 Downloading the App iOS 1 Via 3G network or other methods to search QMEYE in APP STORE and download it 2 Scan the QR in the P2P setting of the main menu to download 2 App functions Via network NSRcell phone application for the following functions 1 Check real time monitor video Support 4 video in the same screen 2 Snap...

Страница 22: ...xplorer Monitoring To remotely access the live view stream of the SVT SMART cameras from anywhere in the world visit http preview qmeye net You will be prompted to input your existing username and password 2 PC Windows Software Download the PC Windows Software to access the live view stream and management features of the SVT SMART System Visit http www qmeye net and select the Windows Download Opt...

Страница 23: ......

Страница 24: ...The design and specifications of this user manual can be changed without any notification to the user All copyright and interpretation rights are reserved to SVT Innovations Inc ...

Отзывы: