


SPM200 User guide
Index
1. Welcome
2. Features
3. Content
4. Hardware
5. Remote Control
6. TV Connections
6.1 AV Connection
6.2 YPbPr Connection
6.3 HDMI Connection
7. USB device connection
8. Playback from card reader
9. First time usage
9.1 Starter Screen
10. Main Menu
10.1 Movie
10.2 Music
10.3 Photo
10.4 File Copy
10.5 Setup
11. Basic operations
12. Network functions
12.1 Wireless LAN Connection
12.2.1 Infraestructure (AP)
12.2.2 Point to Point (Ad Hoc)
13. Files sharing
13.1 Windows XP
13.2 Windows Vista
13.2.1 Mode 1
13.2.2 Mode 2
14. File access through the network
14.1 My Shortcuts
14.2 My Neighbors
15. Firmware upgrading
16. FAQs
18
English
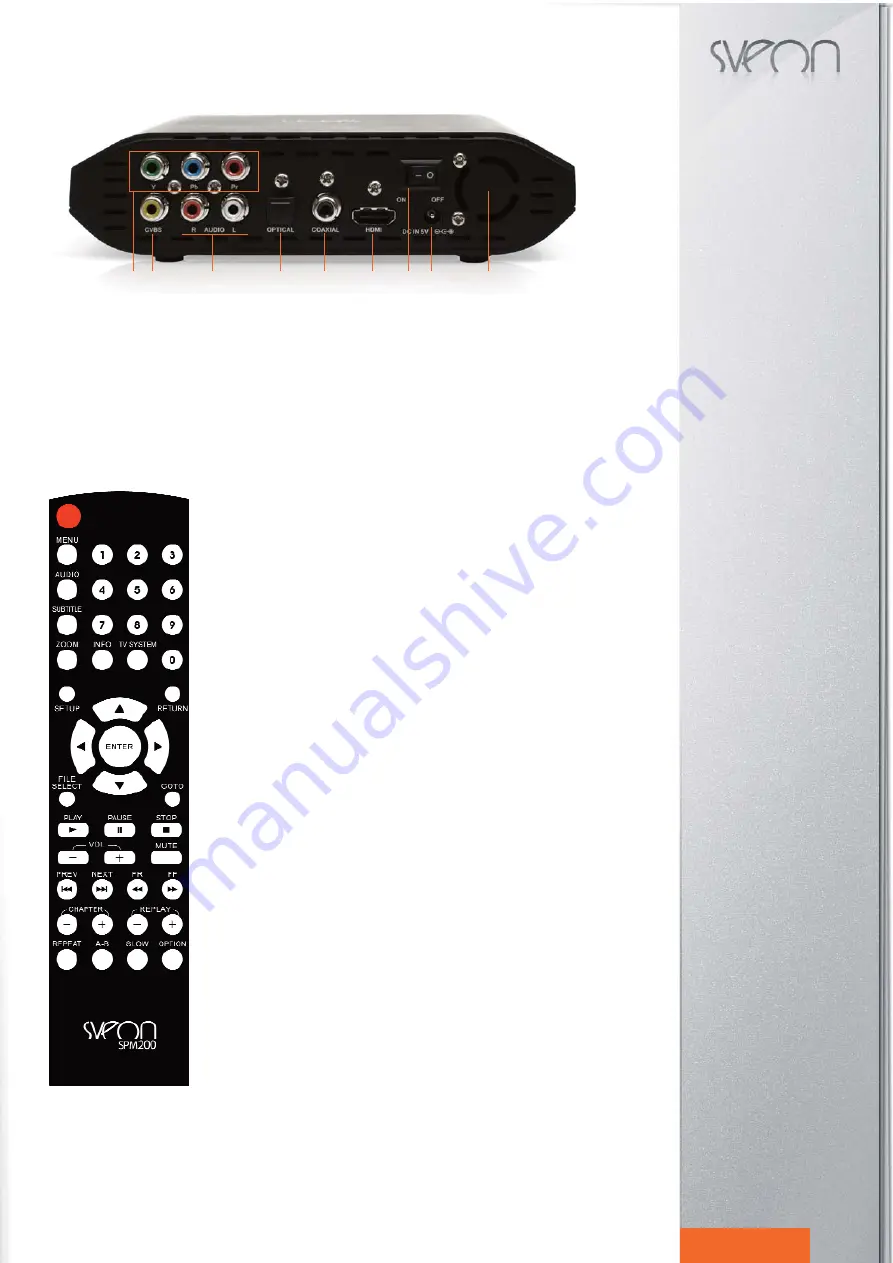
Rear panel
1. YPBPR: Analog component video output
2. CVBS: Analog video output (yellow connector)
3. R-AUDIO-L: Analog audio output (white and red connectors)
4. OPTICAL: Optical digital audio output
5. COAXIAL: Coaxial digital audio output
6. HDMI: Video and audio digital output
7. ON/OFF: Power switch
8. DC IN 5V: Power input
9. FAN
5. Remote control
-
POWER:
Press to turn the unit on/off (standby).
- MENU:
Press to go to the Main Menu.
- AUDIO:
Press to change between the different audio channels available (option avai-
lable only in files with more than one audio channel).
- SUBTITLE
: Press to change between the different subtitle options or to enable/disa-
ble subtitles (only available if the file includes subtitles).
- ZOOM:
Press while playing picture or video files to enlarge its size. In video files the
available options are: 2x, 3x, 4x and 8x; in picture files you can enlarge the image up
to 2x, 4, 8, 16x. Press arrow buttons to move the picture or video file when this option
is enabled.
- INFO:
Press to display the time/name/information about the file while playing video
or picture files.
- TV SYSTEM:
Press to change the output resolution between: NTSC, PAL, 480p,
576p, 720p 50HZ 720p 60HZ, 1080i 50HZ, 1080i 60HZ, 1080p 50 HZ, 1080p 60HZ.
- 0-9:
Number buttons
- SETUP:
Press to go to Setup menu.
- RETURN:
Press to go to the previous menu.
-
: Press to move the highlight left.
-
: Press to move the highlight right.
-
: Press to move the highlight up.
-
: Press to move the highlight down.
- ENTER:
Press to confirm.
- FILE SELECT:
In “File Copy” menu, press this button to select the file or folder you
want to copy.
- GOTO:
Press while video playback to go to a point of the playback using time sear-
ching function.
- PLAY
: Press to play a file.
- PAUSE/STEP
: Press to pause a playback. Press again to go forward step by step.
- STOP:
Press to stop a playback.
- VOL- :
Press to decrease the volume.
- VOL+:
Press to increase the volume.
- MUTE:
Press to enable or disable audio signal.
-
PREW:
Press to play the previous file.
-
NEXT:
Press to play the next file.
- FR
: Press for fast backward during a playback.
- FF
:Press for fast forward during a playback.
- CHAPTER - :
In DVD playback mode, press to go to the previous chapter..
- C :
In DVD playback mode, press to go to the next chapter.
- REPLAY - :
Each time you press this button during a playback, the timeline goes
10sg backward.
- :
Each time you press this button during a playback, the timeline goes
10sg forward.
- REPEAT:
Press to repeat the current file or all the files.
- A-B:
Press to select a video interval time you want to repeat.
- SLOW:
Press to playback in slow motion mode (1x, 3/4x, 1/2x, 1/4x, 1/8x, 1/16x).
Press “Play” to restore the playback mode.
- OPTION:
When you have selected a file or a folder, press this button to rename, de-
lete or cancel.
Remote control instructions:
1. Put the batteries in the remote control before starting to use it.
2. When you use the remote control, point the infrared signal to the infrared receiver located in the front panel of the unit
in an angle of +/-30 degrees and in less than 5 meters.
3. Don´t drop the remote control and avoid placed it in damp.
4. When the remote control doesn´t work please replace the batteries.
1
3
2
4
5
6
7
8
9
Содержание SPM200
Страница 1: ...Manual de usuario 2 User Guide 16...


