Chapter 5: Advanced Motherboard Setup
5-3
cables (with their locations noted) should be connected. (See the layout on page
5-9 for connector locations.)
•
SATA drive data cable (I-SATA0 ~ I-SATA3)
•
Control Panel cable (JF1)
Important!
Make sure the the cables do not come into contact with the fans.
Connecting Power Cables
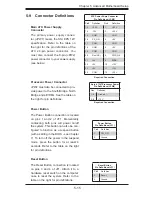
The X8SIL/X8SIL-F has a 24-pin primary power supply connector (JPW1) for con-
nection to the ATX power supply. In addition, an 8-pin processor power connector
(JPW2) must also be connected to your power supply. See Section 5-9 for power
connector pin defi nitions.
Connecting the Control Panel
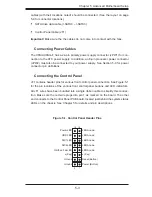
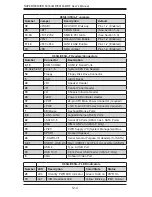
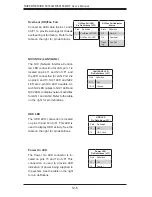
JF1 contains header pins for various front control panel connectors. See Figure 5-1
for the pin locations of the various front control panel buttons and LED indicators.
All JF1 wires have been bundled into a single ribbon cable to simplify this connec-
tion. Make sure the red wire plugs into pin 1 as marked on the board. The other
end connects to the Control Panel PCB board, located just behind the system status
LEDs on the chassis. See Chapter 5 for details and pin descriptions.
Figure 5-1. Control Panel Header Pins
LED Anode
LED Anode
LED Anode
LED Anode
LED Anode
x (Key)
Reset (Button)
Power (Button)
Power LED
HDD LED
NIC1 LED
NIC2 LED
OH/Fan Fail LED
x (Key)
Ground
Ground
2 1
16 15
Содержание SuperServer 5016I-MR
Страница 1: ...SUPER SuperServer 5016I MR SuperServer 5016I MRF USER S MANUAL Revision 1 0b...
Страница 5: ...v Preface Notes...
Страница 10: ...Notes SUPERSERVER 5016I MR 5016I MRF User s Manual x...
Страница 16: ...1 6 SUPERSERVER 5016I MR 5016I MRF User s Manual Notes...
Страница 28: ...2 12 SUPERSERVER 5016I MR 5016I MRF User s Manual Notes...
Страница 32: ...3 4 SUPERSERVER 5016I MR 5016I MRF User s Manual Notes...
Страница 52: ...4 20 SUPERSERVER 5016I MR 5016I MRF User s Manual Notes...
Страница 108: ...A 2 SUPERSERVER 5016I MR 5016I MRF User s Manual Notes...
Страница 113: ...C 3 Appendix C System Specifications Notes...

