Chapter 6: Advanced Chassis Setup
6-5
Use caution when working around the backplane. Do not touch the back-
plane with any metal objects and make sure no ribbon cables touch the
backplane or obstruct the holes, which aid in proper airfl ow.
!
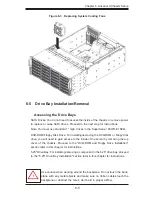
Figure 6-3. Replacing System Cooling Fans
6-5 Drive Bay Installation/Removal
Accessing the Drive Bays
SATA Drives: You do not need to access the inside of the chassis or remove power
to replace or swap SATA drives. Proceed to the next step for instructions.
Note: You must use standard 1" high, drives in the SuperServer 6047R-E1R24L.
DVD-ROM/Floppy Disk Drive: For installing/removing the DVD-ROM or fl oppy disk
drive, you will need to gain access to the inside of the server by removing the top
cover of the chassis. Proceed to the "DVD-ROM and Floppy Drive Installation"
section later in this chapter for instructions.
5.25" Drive Bay: For installing/removing a component in the 5.25" drive bay, proceed
to the "5.25" Drive Bay Installation" section later in this chapter for instructions.
Содержание 6047R-E1R24L
Страница 1: ...SUPER STORAGE SYSTEM 6047R E1R24L SUPER USER S MANUAL 1 0...
Страница 5: ...Notes Preface v...
Страница 21: ...Chapter 2 Server Installation 2 7 Figure 2 4 Installing the Outer Rails to the Server Rack 1 3 1 3 1 2...
Страница 26: ...3 4 SUPERSTORAGESYSTEM 6047R E1R24L User s Manual Notes...
Страница 62: ...5 32 SUPERSTORAGESYSTEM 6047R E1R24L User s Manual Notes...
Страница 77: ...Chapter 6 Advanced Chassis Setup 6 15 Notes...
Страница 111: ...A 2 SUPERSTORAGESYSTEM 6047R E1R24L User s Manual Notes...

