7-4
S
UPER
S
ERVER 1015B-3 User's Manual
Serial ATA
This setting allows the user to enable or disable Serial ATA connections. The options
are Disabled and
Enabled.
Native Mode Operation
Select Serial ATA for SATA or select Auto (Native Mode) for ATA. The options are:
Serial ATA and
Auto
.
SATA AHCI
Select Enable to enable the function of Serial ATA Advanced Host Interface. (Take
caution when using this function. This feature is for advanced programmers only.
The Enhanced AHCI mode is available when the Windows XP-SP1 OS and the
IAA Driver is used.) The options are Enabled and
Disabled
.
X
SATA Port0 and SATA Port1
These settings allow the user to set the parameters of the drive indicated above.
Hit <Enter> to activate the following sub-menu screen for detailed options of the
items. Set the correct confi gurations accordingly. The items included in the sub-
menu are:
Type
This feature allows the user to select the type of a drive specifi ed. Select
Auto
to
allow the BIOS to automatically set the capacity of the drive specifi ed. Select
User to allow the user to enter the parameters of the drive installed at this con-
nection. Select CDROM if a CDROM drive is installed. Select ATAPI if a remov-
able disk drive is installed.
CHS Format
The following items will be displayed by the BIOS:
Cylinders:
This item indicates the status of Cylinders.
Headers:
This item indicates the number of headers.
Sectors:
This item displays the number of sectors.
Maximum Capacity:
This item displays the maximum storage capacity of the
system.
LBA Format
The following items will be displayed by the BIOS:
Total Sectors:
This item displays the number of total sectors available in the
LBA Format.
Maximum Capacity:
This item displays the maximum capacity in the LBA
Format.
Содержание SUPERSERVER 1015B-3
Страница 1: ...SUPER USER S MANUAL Revision 1 0 SUPERSERVER 1015B 3...
Страница 5: ...v Preface Notes...
Страница 10: ...Notes SUPERSERVER 1015B 3 User s Manual x...
Страница 16: ...1 6 SUPERSERVER 1015B 3 User s Manual Notes...
Страница 23: ...Chapter 2 Server Installation 2 7 Figure 2 4 Installing the Outer Rails to the Rack 2 3 3...
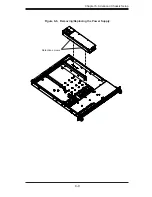
Страница 71: ...Chapter 6 Advanced Chassis Setup 6 9 Figure 6 6 Removing Replacing the Power Supply Retention screws...
Страница 72: ...6 10 SUPERSERVER 1015B 3 Manual Notes...
Страница 94: ...A 2 SUPERSERVER 1015B 3 User s Manual Notes...

