background image

47

Chapter 3: Maintenance and Component Installation

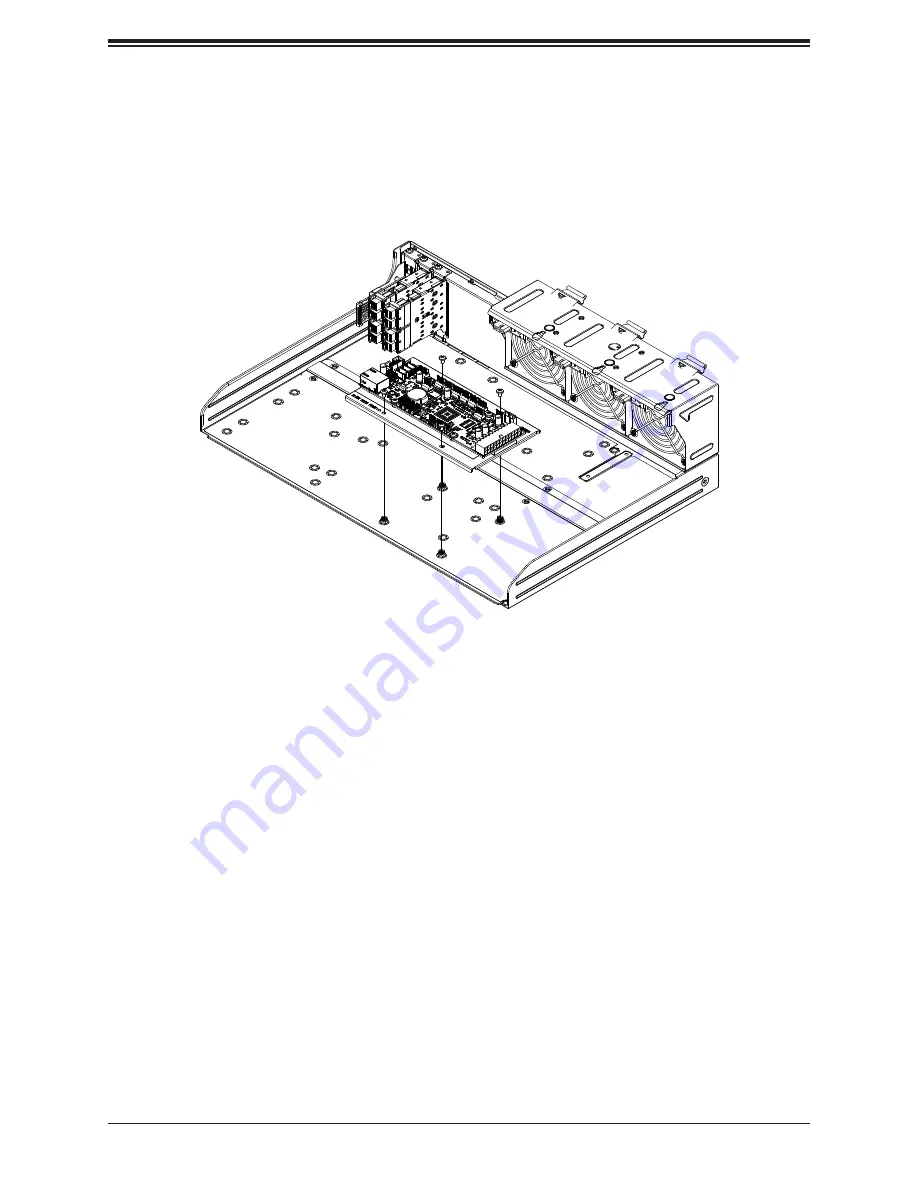
4. Now the JBOD control board is visible. Disconnect all the cables connected on the 

control board, taking take note of the location for each connector, including the ATX 
power cable, FAN power cable, IPMI cable, I

2

C cable, and control panel cable.

5. Loosen the screws on the control board and lift out the control board

Figure 3-13. Removing the JBOD Control Board

Содержание SC946LE1C-R1K66JBOD

Страница 1: ...USER S MANUAL Revision 1 0 SC946L JBOD Chassis SC946LE1C R1K66JBOD ...

Страница 2: ... designed to provide reasonable protection against harmful interference when the equipment is operated in a commercial environment This equipment generates uses and can radiate radio frequency energy and if not installed and used in accordance with the manufacturer s instruction manual may cause harmful interference with radio communications Operation of this equipment in a residential area is lik...

Страница 3: ...updates http www supermicro com Notes For your system to work properly please follow the links below to download all necessary drivers utilities and the user s manual for your server Supermicro product manuals http www supermicro com support manuals Product drivers and utilities ftp ftp supermicro com Product safety info http www supermicro com about policies safety_information cfm If you have any...

Страница 4: ...us Submenu 14 Hard Disk Drive Status 15 Power Supply Status 15 Cable Connection Status 15 Fans Status 15 Thermal Monitor 15 IPMI Submenu 15 System Info 16 IPMI Event Log 16 Settings Submenu 17 Error Message 17 UID Message 17 1 5 Where to get Replacement Components 18 1 6 Returning Merchandise for Service 18 Chapter 2 Installation in a Rack 2 1 Preparing for Setup 19 Choosing a Setup Location 19 Ra...

Страница 5: ...hassis from the Rack 28 2 4 Optional Quick Installation Method 28 2 4 Installing the Cable Management Arm 29 Chapter 3 Maintenance and Component Installation 3 1 Power Up Power Down Sequences 34 Power Up 34 First Use or Power Cord Plug In 34 After Normal Shutdown by IPMI or Power Button 34 After a Power Loss 34 Power Down 34 Removing Power from the System 35 3 2 Cable Connections 35 IPMI 35 SAS Ca...

Страница 6: ... the JBOD Control Board 46 Appendix A Power Supply Specifications Appendix B Standardized Warning Statements for AC Systems Appendix C Backplane Specifications Cascading Configuration Backplane to Internal HBA Controllers 82 Cascading Configuration Backplane to Internal SAS Controllers 83 Appendix D CSE PTJBOD CB3 Control Board ...

Страница 7: ...Address Super Micro Computer B V Het Sterrenbeeld 28 5215 ML s Hertogenbosch The Netherlands Tel 31 0 73 6400390 Fax 31 0 73 6416525 Email sales supermicro nl General Information support supermicro nl Technical Support rma supermicro nl Customer Support Website www supermicro nl Asia Pacific Address Super Micro Computer Inc 3F No 150 Jian 1st Rd Zhonghe Dist New Taipei City 235 Taiwan R O C Tel 88...

Страница 8: ...s high power efficiency optimized HDD signal trace routing and improved HDD carrier design to dampen HDD vibrations and maximize performance Equipped with two redundant high efficiency power supplies and five 80 mm high speed low vibration hot swappable cooling fans the SC946L JBOD is a reliable maintenance storage server 1 1 Models SC946L JBOD Chassis Models Model Drives SAS Expanders Power Suppl...

Страница 9: ...fication UID button turns on or off the blue light function of the Information LED and a blue LED on the rear of the chassis These are used to locate the server in large racks and server banks The same button functions as an IPMI reset button Hold the button for ten seconds to reset IPMI to factory derfaults 3 Power LED Indicates power is being supplied to the system power supply units This LED is...

Страница 10: ...tion to locate the server in a rack mount environment Blinking blue Remote UID is on Use this function to identify the server from a remote location Chassis Front The illustration below shows the features included on the front of the chassis Figure 1 2 Front View optional LCD Status screen pictured Control Panel Front Chassis Features Item Feature Description 1 Control Panel Power UID network over...

Страница 11: ...splay status lights Figure 1 3 Rear View Rear Chassis Features Item Feature Description 1 Power Supply modules Two redundant hot swap 2 Fans Five hot swap 3 Mini SAS Ports Mini SAS HD ports for internal or external cascading expander combinations One for SC946LE1C R1K66JBOD 4 IPMI Port Networking port used for remote management 4 3 2 1 2 2 ...

Страница 12: ... SC946L JBOD User s Manual Chassis Top A hinged cover on the top of the chassis opens to access the drive bays Individual hard drive carriers display status lights Figure 1 4 Top View 45 Drives Mounted Vertically ...

Страница 13: ...e user the ability to monitor drives power supplies fans and connections It shows temperature events and errors The LCD display is activated as the system powers on Figure 4 1 LCD Status LCD Screen on the Chassis Front The user can navigate the menus using the four control buttons scroll up scroll down Cancel and Enter Note The SKU shown in the screen is for reference only and may different with t...

Страница 14: ...ightly different SKU Figure 4 1 System Status Main Page Throughout the GUI component status is displayed in color where green indicates normal operation red indicates a problem and gray indicates the component is not installed The UID Alert is blue when active the Error Alert is red when active System Status Submenu Main Page System Status Figure 4 2 System Status Submenu UID Alert Error Alert ...

Страница 15: ...s Main Page System Status Power Supply This page shows the status and temperature of each power supply unit Cable Connection Status Main Page System Status Cable Connection The Cable Connection page shows the status of connections to the backplanes Fans Status Main Page System Status Fan The Fan page shows whether each fan is operational failed or not installed Thermal Monitor Main Page Thermal Mo...

Страница 16: ...em Info pages show IPMI firmware version BIOS firmware version BMC IP Address MAC Address JBOD Control board serial number Product serial number Chassis serial number Power supplies 1 and 2 serial numbers IPMI Event Log Event Log page will show the latest 100 critical errors CPU OverHeating MEM OverHeating PSU FAIL ...

Страница 17: ...and shows the latest three critical errors The user can choose to navigate to event log or ignore message Also there will be an error icon on the bottom right of the page to remind user that there are critical errors that require attention Figure 4 15 Error Message UID Message A message pops up when the user activates UID The UID icon blue circle with a white exclamation mark in the bottom right c...

Страница 18: ...hould be prominently displayed on the outside of the shipping carton and mailed prepaid or hand carried Shipping and handling charges will be applied for all orders that must be mailed when service is complete For faster service RMA authorizations may be requested online http www supermicro com support rma Whenever possible repack the chassis in the original Supermicro carton using the original pa...

Страница 19: ...learance in the back of the rack to allow sufficient space for airflow and access when servicing This product should be installed only in a Restricted Access Location dedicated equipment rooms service closets etc This product is not suitable for use with visual display workplace devices acccording to 2 of the the German Ordinance for Work with Visual Display Units Rack Precautions Ensure that the ...

Страница 20: ...tage spikes and to keep your system operating in case of a power failure Allow any drives and power supply modules to cool before touching them When not servicing always keep the front door of the rack and all covers panels on the servers closed to maintain proper cooling Rack Mounting Considerations Ambient Operating Temperature If installed in a closed or multi unit rack assembly the ambient ope...

Страница 21: ... connections other than the direct connections to the branch circuit i e the use of power strips etc To prevent bodily injury when mounting or servicing this unit in a rack you must take special precautions to ensure that the system remains stable The following guidelines are provided to ensure your safety This unit should be mounted at the bottom of the rack if it is the only unit in the rack Whe...

Страница 22: ...n instructions that came with the specific rack you are using Identifying the Rails The chassis package includes two rail assemblies Each assembly consists of three sections An inner rail that secures directly to the chassis an outer rail that secures to the rack and a middle rail which extends from the outer rail These assemblies are specifically designed for the left and right side of the chassi...

Страница 23: ... server from coming completely out of the rack when when the chassis is pulled out for servicing To mount the rail onto the chassis first release the inner rail from the outer rails 1 Pull the inner rail out of the outer rail until it is fully extended as illustrated below 2 Press the locking tab down to release the inner rail 3 Pull the inner rail all the way out 1 3 2 ...

Страница 24: ...igning the angled posts on the side of the chassis with the holes in the inner rail 3 Slide the inner rail forward toward the front of the chassis and under the angled posts until the rail lock snaps into place securing the rail to the chassis 4 If desired secure the rail with a locking screw Figure 2 3 Installing the Rails Warning Do not pick up the server with the front handles They are designed...

Страница 25: ...square holes on the front of the rack If desired use screws to secure the outer rails to the rack 4 Pull out the rear of the outer rail adjusting the length until it just fits within the posts of the rack 5 Hang the hooks of the rear section of the outer rail onto the square holes on the rear of the rack Take care that the proper holes are used so the rails are level If desired use screws to secur...

Страница 26: ... Place the hooks of the front of the outer rail into the square holes of one of the adapter brackets 2 Place the hooks of the rear of the outer rail into the square holes of a second adapter bracket 3 Adjust the length of the outer rail to fit within the rack uprights 4 Secure the front adapter bracket to the front of the rack using the screws recommended by the rack manufacturer 5 Secure the rear...

Страница 27: ...nner rails on the chassis into the middle rails keeping the pressure even on both sides When partially in the locking levers will stop further progress 4 Press down the locking levers on the inside of the inner rails and push the chassis all the way into the rear of the rack The front latches will click into place Warning When initially installing the server to a rack test that the rail locking ta...

Страница 28: ...ck stabilizing mechanism must be in place or the rack must be bolted to the floor before you slide the unit out for servicing Failure to stabilize the rack can cause the rack to tip over Slide rail mounted equipment is not to be used as a shelf or a work space 2 4 Optional Quick Installation Method The following quick installation method may be used to install the chassis to a rack Installing the ...

Страница 29: ...orts a cable management arm CMA that keeps the rear cables organized and clear of the rail mechanisms when the system is extended out the front of the rack for maintenance The kit includes six fabric Velcro cable ties The CMA attaches to the rack mounting rails by means of four connectors They are labeled on the connectors 1 2 3 and 4 Six Velcro Straps ...

Страница 30: ...e Cable Management Arm 1 Slide CMA connector 1 forward onto the two posts on the rear of the right inner rail right side when viewed from the front It snaps into place 2 Slide CMA connector 2 forward onto the two posts on the rear of the right middle rail It snaps into place 1 2 1 2 Chassis Front ...

Страница 31: ...s 3 and 4 3 Slide CMA connector 3 forward onto the two posts on the rear of the left middle rail It snaps into place 4 For CMA connector 4 align the metal tabs with the slots on the rear of the left outer rail and push it forward It snaps into place 4 3 Chassis Front 4 3 ...

Страница 32: ...igure 2 10 Routing the Cables 5 Open the four red plastic caps and route the cables into the wire carrier 6 If necessary adjust the U brackets to clear chassis components Chassis Front 5 Figure 2 11 Adjusting the U Brackets 6 Chassis Front ...

Страница 33: ...y If necessary loosen the straps for smoother movement If at some time you must remove the cable management arm follow this procedure Removing the Cable Management Arm 1 Remove cables from the CMA releasing the Velcro straps and the red plastic caps 2 For CMA connector 4 pull the metal release tab toward the center of the rack and slide the connector toward the rear to release it 3 For CMA connect...

Страница 34: ...Plug the power cords into the rear of the power supplies 2 Wait until blue Information LED starts to blink 3 Press the power button once The JBOD control board initiates the power up sequence in three seconds After Normal Shutdown by IPMI or Power Button Press the power button once The JBOD control board will initiate the power up sequence in three seconds After a Power Loss The system will power ...

Страница 35: ...power control To enable connect to the storage enclosure using the dedicated IPMI LAN connector Figure 1 3 The default IP address configuration mode is DHCP Dynamic Host and Configuration Protocol When connected to the network you can find the IP address assigned to this system from DHCP server You can now connect using the User name and Password as shown below Note The IP configuration mode can b...

Страница 36: ... head server node host bus adapter HBA card to the top two Primary receptacles marked In If using the E2C model for redundancy connect two more mini SAS HD cables to the top two Secondary receptables also marked In Cables are described in Appendix B To cascade out connect cables from the two receptacles marked In Out to the next JBOD storage enclosure see Figure 3 2 and 3 3 Figure 3 1 SAS and IPMI...

Страница 37: ...K66JBOD Figure 3 2 Sample Cascading Storage Single HBA Cascading Storage The following diagram shows a server with a single host bus adapter HBA The SC946L JBOD storage enclosure model E1C can accomodate this configuration Server with Single Host Bus Adapter HBA External Mini SAS HD Cable ...

Страница 38: ...ion Except for short periods of time do not operate the server without the cover in place It helps provide proper airflow and prevent overheating Opening the Drive Cover On the right side of the chassis release the two thumb screws and lift the cover The cover holds an open position at 100 degrees without additional support Do not open farther Figure 3 4 Opening the Drive Cover Thumb Screws ...

Страница 39: ...ains off See the table below for details Hard Drive Carrier LED Indicators Color Blinking Pattern Behavior for Device Activity LED Blue Solid On SAS drive installed Blue Blinking I O activity Status LED Red Solid On Failure of drive with RSTe support Red Blinking at 1 Hz Rebuild drive with RSTe support Red Blinking with two blinks and one stop at 1 Hz Hot spare for drive with RSTe support Red On f...

Страница 40: ...e bays Removing Hard Drive Carriers from the Chassis 1 Open the top front cover of the chassis 2 Slide the release button on the drive carrier which opens the carrier handle 3 Use the drive carrier handle to pull the drive out of the chassis Figure 3 5 Removing a Hard Drive Carrier Caution Except for short periods of time such as swapping hard drives do not operate the server with the hard drive b...

Страница 41: ...ning the Drive Carrier 2 Remove the dummy drive from the carrier 3 Insert the hard drive into the drive carrier Orient the drive by matching the two alignment pins on the side and by noting the notch in the carrier for the HDD connectors Close the side of the carrier until it snaps in place 4 Slide the carrier assembly into its spot in the chassis until it clicks into locked position Alignment Pin...

Страница 42: ...e to run with a failed fan Replacing a System Fan 1 While the power is running examine the fans to determine which fan has failed 2 Simultaneously press down on the upper release tab and push up the lower release tab of the failed fan 3 Pull the fan out of the bay using the tabs Caution Fans will continue to rotate for a brief time after removing them from the chassis To avoid injury keep fingers ...

Страница 43: ...43 Chapter 3 Maintenance and Component Installation Figure 3 10 Removing the Fan Housing Left Side Figure 3 9 Removing a Fan From the Housing Right Side 1 3 ...

Страница 44: ...er cables The control panel LEDs display system heat status See Control Panel in Chapter 1 for details Overheating There are several possible responses if the system overheats Overheat Temperature Setting Some backplanes allow the overheat temperature to be set at 45 50 or 55 by changing a jumper setting For more information consult the backplane user manual at www supermicro com Click Support the...

Страница 45: ...tatus Solid Green When illuminated indicates that the power supply is on Solid Amber When illuminated indicates the power supply is plugged in and turned off or the system is off but in an abnormal state Blinking Amber When blinking this system power supply temperature has reached 63C The system will automatically power down when the power supply temperature reaches 70C and restart when the power ...

Страница 46: ...cal Support team 1 Power down the system as described in Section 3 1 2 Remove the power supply modules 3 Loosen the power supply holding bracket by removing the thumbscrew on the right side of the chassis near the cover thumbscrew Slide the bracket toward the left side of the chassis and lift up Figure 3 12 Power Supply Bracket Thumbscrew Chassis Right Side Power Supply Bracket Thumbscrew Figure 3...

Страница 47: ...all the cables connected on the control board taking take note of the location for each connector including the ATX power cable FAN power cable IPMI cable I2 C cable and control panel cable 5 Loosen the screws on the control board and lift out the control board Figure 3 13 Removing the JBOD Control Board ...

Страница 48: ...Chassis SC946L JBOD User s Manual 48 Notes ...

Страница 49: ...er Supply Specifications This appendix lists power supply specifications for your chassis system 1000 1600W Redundant MFR Part PWS 1K66P 1R AC Input 1000W Output 100 140V 12 8A 50 60Hz 1600W Output 180 240V 8 6A 50 60Hz DC Output 1000W 12V 82A 1600W 12V 132A ...

Страница 50: ...ring components in the Supermicro chassis These warnings may also be found on our website at http www supermicro com about policies safety_information cfm Warning Definition 警告の定義 この警告サインは危険を意味します 人身事故につながる可能性がありますので いずれの機器でも動作させる前に 電気回路に含まれる危険性に注意して 標準的な事故防止策に精通して下さい 此警告符号代表危险 您正处于可能受到严重伤害的工作环境中 在您使用设备开始工作之前 必须充分意识到触电 的危险 并熟练掌握防止事故发生的标准工作程序 请根据每项警告结尾的声明号码找到此设 备的安全性警告说明的翻译文本 此警告符號代表危險 您目前所處的工作環境可能...

Страница 51: ...á el número que le ayudará a encontrar el texto traducido en el apartado de traducciones que acompaña a este dispositivo GUARDE ESTAS INSTRUCCIONES IMPORTANTES INFORMATIONS DE SÉCURITÉ Ce symbole d avertissement indique un danger Vous vous trouvez dans une situation pouvant entraîner des blessures ou des dommages corporels Avant de travailler sur un équipement soyez conscient des dangers liés aux ...

Страница 52: ...e betrokken risico s en dient u op de hoogte te zijn van de standaard procedures om ongelukken te voorkomen Gebruik de nummers aan het eind van elke waarschuwing om deze te herleiden naar de desbetreffende locatie BEWAAR DEZE INSTRUCTIES ً ف اًك أى ٌوكي حالة ً ف تتسبب اصابة جسذٌة الزهز هذا ًٌ ٌع خطز تحذٌز أى قبل أي على تعول هعذات ك علن على ي عي الٌاجوة بالوخاطز الذوائز الكهزبائٍة وك دراٌة على ي با...

Страница 53: ...ركيب توصيل قبل إلى النظام للطاقة مصدر לקרוא יש למקור המערכת חיבור לפני התקנה הוראות את מתח 시스템을 전원에 연결하기 전에 설치 안내를 읽어주십시오 Waarschuwing Raadpleeg de installatie instructies voordat u het systeem op de voedingsbron aansluit サーキッ ト ブレーカー この製品は 短絡 過電流 保護装置がある建物での設置を前提としています 保護装置の定格が250 V 20 Aを超えないこ とを確認下さい 警告 此产品的短路 过载电流 保护由建筑物的供电系统提供 确保短路保护设备的额定电流不大于 250V 20A 警告 此產品的短路 過載電流 保護由建築物的供電系統提供 確保短路保護設備的額定電...

Страница 54: ...rtension ce produit dépend de l installation électrique du local Vérifiez que le courant nominal du dispositif de protection n est pas supérieur à 250 V 20 A על מסתמך זה מוצר הגנ ה למניעת במבנים המותקנת כי לוודא יש חשמלי קצר הקצר מפני המגן המכשיר החשמלי מ יותר לא הוא 250 V 20 A المنتج هذا على يعتمد معداث الحمايت الدوائرالقصيرة مه تثبيتها تم التي في المبنى 20A 250V من تأكد أن تقييم الجهاز ال وقائي ...

Страница 55: ...s fuentes de energía y del cable eléctrico quitado de los módulos de fuente de alimentación antes de tener acceso el interior del chasis para instalar o para quitar componentes de sistema Attention Le système doit être débranché de toutes les sources de puissance ainsi que de son cordon d alimentation secteur avant d accéder à l intérieur du chassis pour installer ou enlever des composants de syst...

Страница 56: ...em onderdelen dient u alle spanningsbronnen en alle stroomkabels aangesloten op de voeding en van de behuizing te verwijderen Equipment Installation Warning Only trained and qualified personnel should be allowed to install replace or service this equipment 機器の設置 トレーニングを受け認定された人だけがこの装置の設置 交換 またはサービスを許可されていま す 警告 只有经过培训且具有资格的人员才能进行此设备的安装 更换和维修 警告 只有經過受訓且具資格人員才可安裝 更換與維修此設備 Warnung Das Installieren Er...

Страница 57: ...alleen worden geïnstalleerd vervangen of hersteld door geschoold en gekwalificeerd personeel 警告 此部件应安装在限制进出的场所 限制进出的场所指只能通过使用特殊工具 锁和钥匙或其它 安全手段进出的场所 警告 此裝置僅限安裝於進出管制區域 進出管制區域係指僅能以特殊工具 鎖頭及鑰匙或其他安全 方式才能進入的區域 Attention Il est vivement recommandé de confier l installation le remplacement et la maintenance de ces équipements à des personnels qualifiés et expérimentés Warning This unit is intended for inst...

Страница 58: ...cès réservés L accès à une zone d accès réservé n est possible qu en utilisant un outil spécial un mécanisme de verrouillage et une clé ou tout autre moyen de sécurité מוגבלת גישה עם אזור אזהרה בעזרת ניתנת הגישה גישה הגבלת בהם שיש באזורים היחידה את להתקין יש וכד מנעול מפתח בלבד אבטחה כלי تخصيص انىحذة هذه ٍ ف نتركُبها مناطق محظورة تم انىص َمكن ً إن ىل منطقت محظورة فقط استخذاو خالل من خاصت أداة أو ٌ...

Страница 59: ...anera incorrecta Reemplazar la batería exclusivamente con el mismo tipo o el equivalente recomendado por el fabricante Desechar las baterías gastadas según las instrucciones del fabricante 電池の取り扱い 電池交換が正しく行われなかった場合 破裂の危険性があります 交換する電池はメーカーが推 奨する型 または同等のものを使用下さい 使用済電池は製造元の指示に従って処分して下さい אזהרה סכנת קיימת פיצוץ תקינה לא בדרך והוחלפה במידה הסוללה של להחליף יש בסוג הסוללה את מ התואם חברת מומל יצרן צת הסו...

Страница 60: ... de batterij slechts met hetzelfde of een equivalent type die door de fabrikant aanbevolen wordt Gebruikte batterijen dienen overeenkomstig fabrieksvoorschriften afgevoerd te worden Redundant Power Supplies Warning This unit might have more than one power supply connection All connec tions must be removed to de energize the unit 冗長電源装置 このユニッ トは複数の電源装置が接続されている場合があります ユニッ トの電源を切るためには すべての接続を取り外さなければ...

Страница 61: ...니다 Waarschuwing Deze eenheid kan meer dan één stroomtoevoeraansluiting bevatten Alle aansluitingen dienen verwijderd te worden om het apparaat stroomloos te maken Advertencia Puede que esta unidad tenga más de una conexión para fuentes de alimentación Para cortar por completo el suministro de energía deben desconectarse todas las conexiones Attention Cette unité peut avoir plus d une connexion d a...

Страница 62: ...t bei der Wartung Advertencia Cuando el sistema está en funcionamiento el voltaje del plano trasero es peligroso Tenga cuidado cuando lo revise Attention Lorsque le système est en fonctionnement des tensions électriques circulent sur le fond de panier Prendre des précautions lors de la maintenance Warning Hazardous voltage or energy is present on the backplane when the system is operating Use caut...

Страница 63: ...لتيار على المىجىدة أوالطاقة اللىحة يكىن عندما النظام يعمل عند حذرا كه خدمة الجهاس هذا 경고 시스템이 동작 중일 때 후면판 Backplane 에는 위험한 전압이나 에너지가 발생 합니다 서비스 작업 시 주의하십시오 Waarschuwing Een gevaarlijke spanning of energie is aanwezig op de backplane wanneer het systeem in gebruik is Voorzichtigheid is geboden tijdens het onderhoud Attention L équipement doit être installé conformément aux normes électriques nation...

Страница 64: ...aratuur moet worden voldaan aan de lokale en nationale elektriciteitsvoorschriften 製品の廃棄 この製品を廃棄処分する場合 国の関係する全ての法律 条例に従い処理する必要があります 警告 本产品的废弃处理应根据所有国家的法律和规章进行 警告 本產品的廢棄處理應根據所有國家的法律和規章進行 Warnung Die Entsorgung dieses Produkts sollte gemäß allen Bestimmungen und Gesetzen des Landes erfolgen Warning Ultimate disposal of this product should be handled according to all national laws and regulations Adv...

Страница 65: ...ement soumis à des lois et ou directives de respect de l environnement Renseignez vous auprès de l organisme compétent Hot Swap Fan Warning Warning Hazardous moving parts Keep away from moving fan blades The fans might still be turning when you remove the fan assembly from the chassis Keep fingers screwdrivers and other objects away from the openings in the fan assembly s housing ファン ホッ トスワップの警告 警...

Страница 66: ...hâssis Prenez garde à ce que doigts tournevis et autres objets soient éloignés du logement du bloc ventilateur 경고 움직이는 위험한 부품 회전하는 송풍 날개에 접근하지 마세요 섀시로부터 팬 조립품을 제거할 때 팬은 여전히 회전하고 있을 수 있습니다 팬 조림품 외관의 열려있는 부분들로부터 손가락 및 스크류드라이버 다른 물체들이 가까이 하지 않도록 배치해 주십시오 Waarschuwing Gevaarlijk bewegende onderdelen Houd voldoende afstand tot de bewegende ventilatorbladen Het is mogelijk dat de ventilator nog draait t...

Страница 67: ...品安全法は ULまたはCSA認定のケーブル UL CSEマークがコードに表記 を Supermicro が指定する製品以外に使用するこ とを禁止しています 警告 安装此产品时 请使用本身提供的或指定的或采购的连接线 电源线和电源适配器 包含遵照 当地法规和安全要求的合规的电源线尺寸和插头 使用其它线材或适配器可能会引起故障或火 灾 除了Supermicro所指定的产品 电气用品和材料安全法律规定禁止 使用未经UL或CSA认证的线材 线材上会显示UL CSA符号 警告 安裝此產品時 請使用本身提供的或指定的或採購的連接線 電源線和電源適配器 包含遵照 當地法規和安全要求的合規的電源線尺寸和插頭 使用其它線材或適配器可能會引起故障或火 災 除了Supermicro所指定的產品 電氣用品和材料安全法律規定禁止 使用未經UL或CSA認證的線材 線材上會顯示UL CSA符號 Warning When...

Страница 68: ...א שמתשהל םילבכב םיכמסומה ב UL וא ב CSA רשאכ עיפומ םהילע דוק לש UL CSA רובע לכ רצומ ילמשח רחא אלא קר רצומב רשא םאתוה י ע Supermicro דבלב دنع بيكرت جتنملا مق مادختساب تاليصوتلا ةرفوتملا وأ ةددحملا وأ مق ءارشب تالباكلا ةيئابرهكلا تالوحمو رايتلا ددرتملا عم مازتلالا نيناوقب تابلطتمو ةمالسلا ةيلحملا امب يف كلذ مجح لصوملا سباقلاو ميلسلا مادختسا يأ تالباك تالوحمو ىرخأ دق ببستي يف لطع وأ قيرح رظحي نوناق ةم...

Страница 69: ...sluiten van het Product uitsluitend gebruik maken van de geleverde Kabels of een andere geschikte aan te schaffen Aansluitmethode deze moet altijd voldoen aan de lokale voorschriften en veiligheidsnormen inclusief de juiste kabeldikte en stekker Het gebruik van niet geschikte Kabels en of Adapters kan een storing of brand veroorzaken Wetgeving voor Elektrische apparatuur en Materiaalveiligheid ver...

Страница 70: ...odules or gold contacts When handling chips or modules avoid touching their pins Put the backplane and peripherals back into their antistatic bags when not in use General Safety Guidelines Always disconnect power cables before installing or removing any components from the computer including the backplane Disconnect the power cable before installing or removing any cables from the backplane Make s...

Страница 71: ...ower Cable Input NI_TP1 and NI_TP2 5 Ground Cable Input NI_TP3 and NI_ TP4 6 SDB and UART Connector for the Secondary Expander J53 and J54 7 SDB and UART Connector for the Primary Expander J50 and J51 Figure C 1 BPN SAS3 946LEL1 Connector Side Components J30 1 7 J15 J31 J1 J16 1 1 J45 1 6 1 4 1 3 1 2 1 5 Component Side Connectors ...

Страница 72: ... Input Connector The ground cable input connectors are designated NI_TP3 and NI_TP4 6 7 SDB and UART Connectors The Serial Debug SDB and UART connectors for the primary and secondary expanders are designated J50 J51 J53 and J54 The debug connectors are for the manufacturer s diagnostic purposes only Connector Side LED Indicators and SAS Connectors Figure C 2 BPN SAS3 946LEL1 Connector Side LEDs J1...

Страница 73: ... 18 J34 SAS HDD 33 J5 SAS HDD 4 J20 SAS HDD 19 J35 SAS HDD 34 J6 SAS HDD 5 J21 SAS HDD 20 J36 SAS HDD 35 J7 SAS HDD 6 J22 SAS HDD 21 J37 SAS HDD 36 J8 SAS HDD 7 J23 SAS HDD 22 J38 SAS HDD 37 J9 SAS HDD 8 J24 SAS HDD 23 J39 SAS HDD 38 J10 SAS HDD 9 J25 SAS HDD 24 J40 SAS HDD 39 J11 SAS HDD 10 J26 SAS HDD 25 J41 SAS HDD 40 J12 SAS HDD 11 J27 SAS HDD 26 J42 SAS HDD 41 J13 SAS HDD 12 J28 SAS HDD 27 J4...

Страница 74: ...LEDF7 J30 LEDA30 LEDF30 J8 LEDA8 LEDF8 J31 LEDA31 LEDF31 J9 LEDA9 LEDF9 J32 LEDA32 LEDF32 J10 LEDA10 LEDF10 J33 LEDA33 LEDF33 J11 LEDA11 LEDF11 J34 LEDA34 LEDF34 J12 LEDA12 LEDF12 J35 LEDA35 LEDF35 J13 LEDA13 LEDF13 J36 LEDA36 LEDF36 J14 LEDA14 LEDF14 J37 LEDA37 LEDF37 J15 LEDA15 LEDF15 J38 LEDA38 LEDF38 J16 LEDA16 LEDF16 J39 LEDA39 LEDF39 J17 LEDA17 LEDF17 J40 LEDA40 LEDF40 J18 LEDA18 LEDF18 J41 ...

Страница 75: ...2 1 1 1 5 1 3 1 3 Figure C 3 BPN SAS3 946LEL1 Expander Chip Side Components 1 Primary Expander Chip 2 Secondary Expander Chip 3 Primary SAS Slim Line Connectors CN1 and CN2 4 Secondary SAS Slim Line Connectors CN3 and CN4 5 Primary UART Connector J52 6 I2 C Connector J48 ...

Страница 76: ... Slim Line Connectors These secondary SAS slim line connectors are designated CN3 and CN4 5 Primary UART Connector The primary UART connector is designated J52 and is used for the manufacturer s diagnostic purposes only 6 I2 C Connector The I2 C connector is designated J48 This connector is used to monitor hard drive activity and status through LEDs See the table on the right for pin definitions J...

Страница 77: ...an be cascaded to a second BPN SAS3 946LEL1 backplane and an AOM S3108M H8L P SAS RAID AOC S3108L H8IR SAS RAID AOC S3008L L8E HBA or AOM S3008 L8 SB HBA controller using the primary and secondary expander components of the backplane Note that the connectors are located on the undersides of the boards in the following illustrations ...

Страница 78: ... 10 5 10 20 9 A C A C A C A 1 E 3 K 7 9 R A 1 E 3 K 7 9 R A 1 E 3 K 7 9 R A 1 E 3 K 7 9 R A 1 E 3 7 9 1 2 3 Y E R 34 AP A DESIGNED IN USA AOM S3108M H8L REV 1 10 MH1 SD3 Y1 OSC1 J4 U457 J10 JP5 Q125 C2476 C2469 C2472 L399 L400 L401 Q1 Q113 U440 R5100 R149 C2299 C2294 U11 LED3 LED2 LED1 TP28 C37 U424 U27 U26 U25 U24 U23 MH6 MH2 LED3 FAIL_LED LED2 SYS_HB LED1 ACTIVE_LED SAS4 7 SAS0 3 JP5 1 Tx 2 GND ...

Страница 79: ...es CBL SAST 0573 into the server out port and into the JBOD in upstream port of the JBOD where the 2nd backplane is located as illustrated in Figure C 4 5 A 3rd backplane can be added using a connection from CN3 and CN4 of the 2nd backplane through its JBOD out downstream port 6 Close the chassis cover plug the power cords into the rear of the power supplies and power up the system ...

Страница 80: ...Cascading Configuration Primary Expander Secondary Expander Primary Expander Secondary Expander 1 2 1 3 JBOD System JBOD System Server JBOD In Upstream Port JBOD In Upstream Port JBOD Out Downstream Port JBOD Out Downstream Port Cascading Configuration Backplanes to External Controller Connecting Backplanes in JBODs to External Controller 1 Power down the system and remove the power cords from the...

Страница 81: ... downstream port of the JBOD where the 1st backplane is located and into the JBOD in upstream port of the JBOD where the 2nd backplane is located as illustrated in Figure C 5 4 A 3rd backplane can be added using a connection from CN3 and CN4 of the 2nd backplane through its JBOD out downstream port 5 Close the chassis cover plug the power cords into the rear of the power supplies and power up the ...

Страница 82: ...1 ACTIVE_LED SAS4 7 SAS0 3 JP5 1 Tx 2 GND 3 Rx 4 VCC J10 UART Debug CN2 CN1 CN1 CN2 BPN SAS3 946LEL1 Backplane Figure C 6 Backplane Cascading Configuration Primary Expander Secondary Expander 1 3 1 5 Server System Cascading Configuration Backplane to Internal HBA Controllers A server configures two internal HBA cards for MPIO maximum performance Connecting Backplane in a Server to Internal HBAs 1 ...

Страница 83: ... 1 6 5 10 5 10 20 9 A C A C A C A 1 E 3 K 7 9 R A 1 E 3 K 7 9 R A 1 E 3 K 7 9 R A 1 E 3 K 7 9 R A 1 E 3 7 9 1 2 3 Y E R 34 AP A DESIGNED IN USA AOM S3108M H8L REV 1 10 MH1 SD3 Y1 OSC1 J4 U457 J10 JP5 Q125 C2476 C2469 C2472 L399 L400 L401 Q1 Q113 U440 R5100 R149 C2299 C2294 U11 LED3 LED2 LED1 TP28 C37 U424 U27 U26 U25 U24 U23 MH6 MH2 LED3 FAIL_LED LED2 SYS_HB LED1 ACTIVE_LED SAS4 7 SAS0 3 JP5 1 Tx ...

Страница 84: ... backplane 5 Connect the cables to CN3 and CN4 then route them to CN1 and CN2 on the underside of the AOC S3108L H8IR RAID controller card in the same server as illustrated in Figure C 7 6 Close the chassis cover plug the power cords into the rear of the power supplies and power up the system ...

Страница 85: ...permicro web site at www supermicro com for the latest updates compatible parts and supported configurations D 2 Safety Guidelines ESD Safety Guidelines Electrostatic Discharge ESD can damage electronic com ponents To prevent damage to your system it is important to handle it very carefully The following measures are generally sufficient to protect your equipment from ESD Use a grounded wrist stra...

Страница 86: ...on the CSE PTJBOD CB3 1 2 5 6 1 3 1 3 3 2 1 4 3 2 1 4 3 2 1 4 3 2 1 4 24 13 12 1 A 1 E 3 K 7 9 R 3 2 1 1 2 3 1 2 7 8 1 2 7 8 1 2 7 8 1 2 7 8 1 2 19 20 1 5 1 5 6 9 1 2 10 4 1 4 1 4 1 4 1 4 1 4 1 4 1 4 1 4 1 4 1 1 7 6 12 15 17 13 14 16 19 18 A C A C A E K R Y 1 5 10 20 12 13 24 25 36 37 48 MH2 MH4 JP6 U U18 U17 U16 U14 U13 JP7 JP5 JP1 JP2 JP3 JP4 JPW1 BT1 C10 Y2 U9 MH3 MH1 C153 J4 J6 J7 J5 JF1 JPI2C...

Страница 87: ...hassis using cable CBL NTWK 0584 or CBL NTWK 0587 6 IPMI LAN Connector The Intelligent Platform Management Interface IPMI LAN connector is designated J8 and supports connectivity with a local network using cable CBL NTWK 0584 or CBL NTWK 0587 7 SC847D SAS2 I2 C Connectors Used for SC847D only The backplane connectors designated J4 J7 accept internal cables to connect to up to four SC847D expanders...

Страница 88: ...pers To enable SAS2 or SAS3 functionality on the I2 C connectors set the JP5 jumper as noted 1 2 5 6 1 3 1 3 3 2 1 4 3 2 1 4 3 2 1 4 3 2 1 4 24 13 12 1 A 1 E 3 K 7 9 R 3 2 1 1 2 3 1 2 7 8 1 2 7 8 1 2 7 8 1 2 7 8 1 2 19 20 1 5 1 5 6 9 1 2 10 4 1 4 1 4 1 4 1 4 1 4 1 4 1 4 1 4 1 4 1 1 7 6 12 15 17 13 14 16 19 18 A C A C A E K R Y 1 5 10 20 12 13 24 25 36 37 48 MH2 MH4 JP6 U U18 U17 U16 U14 U13 JP7 JP...

Страница 89: ... 1 4 1 4 1 4 1 4 1 4 1 4 1 4 1 4 1 1 7 6 12 15 17 13 14 16 19 18 A C A C A E K R Y 1 5 10 20 12 13 24 25 36 37 48 MH2 MH4 JP6 U U18 U17 U16 U14 U13 JP7 JP5 JP1 JP2 JP3 JP4 JPW1 BT1 C10 Y2 U9 MH3 MH1 C153 J4 J6 J7 J5 JF1 JPI2C1 J3 J2 U12 U11 C131 C8 C9 FAN1 FAN2 FAN3 FAN4 FAN5 FAN6 FAN7 FAN8 FAN10 FAN9 J8 U8 Q27 Q16 D16 FB1 C6 C21 C4 LE2 LE1 F1 Y1 Q5 Q4 U1 U5 U6 U3 U7 L7 JP5 JP7 2 3 DHCP 1 2 Static...

Страница 90: ...2 FAN3 FAN4 FAN5 FAN6 FAN7 FAN8 FAN10 FAN9 J8 U8 Q3 Q16 R138 C144 C160 C130 C4 C115 C93 C89 LE2 LE1 F1 Y1 U1 U5 U6 U3 U7 L7 JP5 JP7 2 3 DHCP 1 2 Static IP 2 3 SAS2_847D 1 2 SAS3 JF1 NMI X PWR LED X NIC1 X OH FF X RST ON PWR ON CB3 JBOD Control Board JP1 to JP4 see table below Backplane Connect to the Primary I2 C Connector Cable CBL CDAT 0601 Connections for SC946L JBOD Chassis Specific I2 C conne...

Страница 91: ...itiates the power up sequence in three seconds After Normal Shutdown by IPMI or Power Button Press the power button once The JBOD control board will initiate the power up sequence in three seconds After a Power Loss The system will power up automatically approximately fifteen seconds after the power returns Power Down 1 Hold down the power button The blue Information LED will begin blinking Contin...

Страница 92: ...ton for more than ten seconds to reset to default You will observe that the fan speed will slow and then return to normal Continue to change to DHCP mode when the fan reaches normal speed 7 Save the new setting 8 Change the host IP back to DHCP mode 9 Determine the DHCP IP address of the host for example 10 1 1 50 10 Run the command prompt with administrative privileges 11 Go to the utility folder...

Отзывы: