background image

4-8

4-9

Chapter 4: Warning Statements for AC Systems

S

UPER

S

TORAGE

S

YSTEM 6048R-E1CR60N/L User's Manual

Equipment Installation

機器の設置

トレーニングを受け認定された人だけがこの装置の設置、交換、またはサービスを許可

されています。

 Warning!

Only trained and qualified personnel should be allowed to install, replace, or service 

this equipment.

アクセス制限区域
このユニットは、アクセス制限区域に設置されることを想定しています。
アクセス制限区域は、特別なツール、鍵と錠前、その他のセキュリティの手段を用いての

み出入りが可能です。

 Warning!

This unit is intended for installation in restricted access areas. A restricted access 
area can be accessed only through the use of a special tool, lock and key, or other 
means of security. (This warning does not apply to workstations).

Restricted Area

Warnung 
Das Installieren, Ersetzen oder Bedienen dieser Ausrüstung sollte nur geschultem, 

qualifiziertem Personal gestattet werden.

¡Advertencia! 

Solamente el personal calificado debe instalar, reemplazar o utilizar este equipo.

Attention 
Il est vivement recommandé de confier l'installation, le remplacement et la 

maintenance de ces équipements à des personnels qualifiés et expérimentés.


!הרהזא


שר דבלב ךמסומ תווצ

תא ףילחהל ,ןיקתהל יא


.דויצה רובע תוריש תתל וא דויצה


هيبردملاو


و بيكزتل

لادبتسا


وأ


ةمدخ


ساهجلا اذه


حمسي نأ بجي


طقف


هيلهؤملا هيفظىملل


경고!

훈련을 받고 공인된 기술자만이 이 장비의 설치, 교체 또는 서비스를 수행할 수 
있습니다.

Waarschuwing 
Deze apparatuur mag alleen worden geïnstalleerd, vervangen of hersteld door 

geschoold en gekwalificeerd personeel.

Warnung 
Diese Einheit ist zur Installation in Bereichen mit beschränktem Zutritt vorgesehen. 
Der Zutritt zu derartigen Bereichen ist nur mit einem Spezialwerkzeug, Schloss und 
Schlüssel oder einer sonstigen Sicherheitsvorkehrung möglich.

¡Advertencia! 
Esta unidad ha sido diseñada para instalación en áreas de acceso restringido. 
Sólo puede obtenerse acceso a una de estas áreas mediante la utilización de una 
herramienta especial, cerradura con llave u otro medio de seguridad.

Attention 
Cet appareil doit être installée dans des zones d'accès réservés. L'accès à une 
zone d'accès réservé n'est possible qu'en utilisant un outil spécial, un mécanisme 
de verrouillage et une clé, ou tout autre moyen de sécurité.

警告

只有经过培训且具有资格的人员才能进行此设备的安装、更换和维修。

警告

只有經過受訓且具資格人員才可安裝、更換與維修此設備。

警告

此部件应安装在限制进出的场所,限制进出的场所指只能通过使用特殊工具、锁和

钥匙或其它安全手段进出的场所。

警告

此裝置僅限安裝於進出管制區域,進出管制區域係指僅能以特殊工具、鎖頭及鑰匙

或其他安全方式才能進入的區域。

Содержание 6048R-E1CR60L

Страница 1: ...SUPER STORAGE SYSTEM 6048R E1CR60N 6048R E1CR60L USER S MANUAL 1 0 ...

Страница 2: ...aid license IN NO EVENT WILL SUPERMICRO BE LIABLE FOR DIRECT INDIRECT SPECIAL INCIDENTAL SPECULATIVE OR CONSEQUENTIAL DAMAGES ARISING FROM THE USE OR INABILITY TO USE THIS PRODUCT OR DOCUMENTATION EVEN IF ADVISED OF THE POSSIBILITY OF SUCH DAMAGES IN PARTICULAR SUPERMICRO SHALL NOT HAVE LIABILITY FOR ANY HARDWARE SOFTWARE OR DATA STORED OR USED WITH THE PRODUCT INCLUDING THE COSTS OF REPAIRING REP...

Страница 3: ...guring the serverboard Chapter 6 Advanced Chassis Setup Refer to Chapter 6 for detailed information on the SC946TS R2K05P chassis You should follow the procedures given in this chapter when installing removing or reconfiguring SATA or peripheral drives and when replacing system power supply units and cooling fans Chapter 7 BIOS The BIOS chapter includes an introduction to BIOS and provides detaile...

Страница 4: ...Accessing Top Loading Hard Drives 2 10 Adapters for Round and Threaded Hole Racks 2 10 Chapter 3 System Interface 3 1 Overview 3 1 3 2 Control Panel Buttons 3 2 3 3 Control Panel LEDs 3 2 3 4 Drive Carrier LEDs 3 4 SAS3 SATA3 Drives 3 4 Chapter 4 Standardized Warning Statements for AC Systems 4 1 About Standardized Warning Statements 4 1 Warning Definition 4 1 Installation Instructions 4 4 Circuit...

Страница 5: ...Swappable Drives 6 9 Installing Hard Drives Into the Rear Carriers 6 9 6 8 Installing Hot Swappable Optional NVMe Drives 6 12 Installing the NVMe Drive Cage 6 12 Installing NVMe Drive Carriers into the NVMe Drive Cage 6 13 6 9 Accessing the Motherboard for Memory Upgrades and Maintenance 6 14 Expansion Card Setup 6 15 PCI Slot Setup for Expansion Cards 6 15 Installing the SIOM Network Module 6 16 ...

Страница 6: ...Notes SUPERSTORAGESYSTEM 6048R E1CR60N L User s Manual x ...

Страница 7: ...Hardware RAID controller 6048R E1CR60N AOC S3108M H8L P 6048R E1CR60L AOC S3008L L8 P SAS SATA Accessories Two SAS SATA backplanes BPN SAS3 946SEL1 Sixty 3 5 toolless drive carriers MCP 220 00075 0B Two 2 5 toolless drive carriers MCP 220 00117 0B One set of mounting rails MCP 290 00137 0N Note For your system to work properly please follow the links below to download all necessary drivers utiliti...

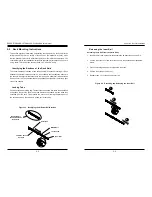
Страница 8: ... case drives may be identified through the naming rule shown above Serial ATA A SATA controller is also integrated into the chipset to provide 10 SATA 3 0 6 Gbps ports which are RAID 0 1 and 10 supported RAID 5 supported with Windows OS only PCI Expansion Slots The X10DSC has two PCI E 3 0 x16 and one PCI E x8 slot one PCI E 3 0 x8 slots is used for the are available for add on cards Rear I O Port...

Страница 9: ...o com tw Website www supermicro com tw Figure 1 1 Intel C612 Chipset System Block Diagram Note This is a general block diagram Please see Chapter 5 for details DDR4 DIMM X10DSC Block Diagram C D 3 2 1 1 1 1 2 3 2 3 3 2 QPI0 DMI PE3 PE2 PE1 A B H G 3 2 SocketID 01 1 1 1 1 2 3 2 3 3 2 E CPU2 DDR4 DIMM F QPI1 DMI x16 NCSI DDR3 UART x4 8 11 x4 4 7 0 3 port 1 2 with RJ45 REAR port 3 TYPE A x8 x16 PCIe ...

Страница 10: ...1 6 SUPERSTORAGESYSTEM 6048R E1CR60N L User s Manual Notes ...

Страница 11: ...a suitable location for the rack unit that will hold the 6048R E1CR60N L It should be situated in a clean dust free area that is well ventilated Avoid areas where heat electrical noise and electromagnetic fields are generated You will also need it placed near a grounded power outlet Read the Rack and Server Precau tions in the next section 2 3 Preparing for Setup The box the 6048R E1CR60N L was sh...

Страница 12: ...erature If installed in a closed or multi unit rack assembly the ambient operating tempera ture of the rack environment may be greater than the room s ambient temperature Therefore consideration should be given to installing the equipment in an environ ment compatible with the manufacturer s maximum rated ambient temperature Tmra Reduced Airflow Equipment should be mounted into a rack so that the ...

Страница 13: ...uter rail These assemblies are specifically designed for the left and right side of the chassis Locking Tabs Each inner rail has a locking tab This tab locks the chassis into place when installed and pushed fully into the rack These tabs also lock the chassis in place when fully extended from the rack This prevents the server from coming completely out of the rack when when the chassis is pulled o...

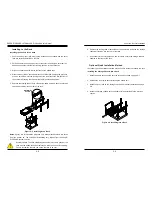
Страница 14: ...nto the slots on the rear of the rack If necessary use screws to secure the rear of the outer rail to the rear of the rack 6 Repeat steps 1 5 for the remaining outer rail Figure 2 4 Extending and Releasing the Outer Rails 1 1 1 2 1 3 1 4 Figure 2 3 Installing the Inner Rails Installing The Inner Rails on the Storage Chassis Installing the Inner Rails 1 Confirm that the left and right inner rails h...

Страница 15: ...hazard The rack stabilizing mechanism must be in place or the rack must be bolted to the floor before you slide the unit out for servicing Failure to stabilize the rack can cause the rack to tip over 6 Depress the locking tabs of both sides at the same time and push the storage chassis all the way into the rear of the rack 7 If necessary for security purposes use screws to secure the storage chass...

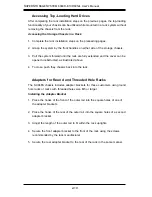
Страница 16: ...pened unobstructed as illustrated above 4 To close push they chassis back into the rack Adapters for Round and Threaded Hole Racks The SC946S chassis includes adapter brackets for those customers using round hole racks or racks with threaded holes size M5 or larger Installing the Adapter Bracket 1 Place the hooks of the front of the outer rail into the square holes of one of the adapter brackets 2...

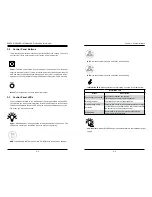
Страница 17: ...ontrol panel is located on the front edgre of the storage chassis and features system status LEDs a power on off button and reset button There are other LEDs on the drive carriers to help monitor the activity and status of the system and components This chapter explains the meanings of the LED indicators and appropriate responses Figure 3 1 Control Panel and LCD Screen LCD Screen Up Down Cancel En...

Страница 18: ...ch LED indicates when illuminated and any correc tive action you may need to take Power Indicates power is being supplied to the system s power supply units This LED should normally be illuminated when the system is operating HDD Indicates SAS SATA drive and or DVD ROM drive activity when flashing NIC1 Indicates network activity on GLAN1 when flashing NIC2 Indicates network activity on GLAN2 when ...

Страница 19: ... Solid on Drive failure Blinking RAID activity When the red LED is blinking it indicates that the system is either building initializing or rebuilding RAID Note Backplane naming rule follows P0 01 00 indicates 1st expander board 1st drive slot1 out of 60 drives P0 02 00 indicates 2nd expander board 1st drive slot31 out of 60 drives The 3108 controller will recognize both backplanes in the system a...

Страница 20: ... configuring components in the Supermicro chassis These warnings may also be found on our web site at http www supermicro com about policies safety_information cfm Warning This warning symbol means danger You are in a situation that could cause bodily injury Before you work on any equipment be aware of the hazards involved with electrical circuitry and be familiar with standard practices for preve...

Страница 21: ...édures couramment utilisées pour éviter les accidents Pour prendre connaissance des traductions des avertissements figurant dans les consignes de sécurité traduites qui accompagnent cet appareil référez vous au numéro de l instruction situé à la fin de chaque avertissement CONSERVEZ CES INFORMATIONS 안전을 위한 주의사항 경고 이 경고 기호는 위험이 있음을 알려 줍니다 작업자의 신체에 부상을 야기 할 수 있는 상태에 있게 됩니다 모든 장비에 대한 작업을 수행하기 전에 전기회로...

Страница 22: ...t systeem op de voedingsbron aansluit サーキッ ト ブレーカー この製品は 短絡 過電流 保護装置がある建物での設置を前提としています 保護装置の定格が250 V 20 Aを超えないこ とを確認下さい Warnung Dieses Produkt ist darauf angewiesen dass im Gebäude ein Kurzschluss bzw Überstromschutz installiert ist Stellen Sie sicher dass der Nennwert der Schutzvorrichtung nicht mehr als 250 V 20 A beträgt Advertencia Este equipo utiliza el sistema de protección contra cortocircu...

Страница 23: ...troleer of het beveiligde aparaat niet groter gedimensioneerd is dan 220V 20A Advertencia El sistema debe ser disconnected de todas las fuentes de energía y del cable eléctrico quitado de los módulos de fuente de alimentación antes de tener acceso el interior del chasis para instalar o para quitar componentes de sistema Attention Le système doit être débranché de toutes les sources de puissance ai...

Страница 24: ...entés אזהרה רש בלבד מוסמך צוות את להחליף להתקין אי הציוד עבור שירות לתת או הציוד والمدربيه و لتزكيب استبدال أو خدمة الجهاس هذا يسمح أن يجب فقط المؤهليه للمىظفيه 경고 훈련을 받고 공인된 기술자만이 이 장비의 설치 교체 또는 서비스를 수행할 수 있습니다 Waarschuwing Deze apparatuur mag alleen worden geïnstalleerd vervangen of hersteld door geschoold en gekwalificeerd personeel Warnung Diese Einheit ist zur Installation in Bereichen mit be...

Страница 25: ...ه ٍ ف نتركُبها مناطق محظورة تم انىص َمكن ً إن ىل منطقت محظورة فقط استخذاو خالل من خاصت أداة أو ٌ أ نال أخري وسُهت مألما ومفتاح قفم 경고 이 장치는 접근이 제한된 구역에 설치하도록 되어있습니다 특수도구 잠금 장치 및 키 또는 기타 보안 수단을 통해서만 접근 제한 구역에 들어갈 수 있습니다 Waarschuwing Dit apparaat is bedoeld voor installatie in gebieden met een beperkte toegang Toegang tot dergelijke gebieden kunnen alleen verkregen worden door gebruik te maken van s...

Страница 26: ... Cuando el sistema está en funcionamiento el voltaje del plano trasero es peligroso Tenga cuidado cuando lo revise Attention Lorsque le système est en fonctionnement des tensions électriques circulent sur le fond de panier Prendre des précautions lors de la maintenance Warning Hazardous voltage or energy is present on the backplane when the system is operating Use caution when servicing Redundant ...

Страница 27: ...מיים החשמל לחוקי תואמת להיות חייבת הציוד المعدات تركيب الكهربائية لل يمتثل أن يجب قىاويه والىطىية المحلية المتعلقة بالكهرباء 경고 시스템이 동작 중일 때 후면판 Backplane 에는 위험한 전압이나 에너지가 발생 합니다 서비스 작업 시 주의하십시오 Waarschuwing Een gevaarlijke spanning of energie is aanwezig op de backplane wanneer het systeem in gebruik is Voorzichtigheid is geboden tijdens het onderhoud האחורי בפנל מתח אז הרה במהלך להיזהר יש המערכת...

Страница 28: ...Advertencia Los ventiladores podran dar vuelta cuando usted quite ell montaje del ventilador del chasis Mandtenga los dedos los destornilladores y todos los objetos lejos de las aberturas del ventilador Attention Il est possible que les ventilateurs soient toujours en rotation lorsque vous retirerez le bloc ventilateur du châssis Prenez garde à ce que doigts tournevis et autres objets soient éloig...

Страница 29: ...os que tienen UL o CSA se muestra en el código de otros dispositivos eléctricos que los productos designados por Supermicro solamente 電源コードとACアダプター 製品を設置する場合 提供または指定された接続ケーブル 電源コードとACアダプター を使用下さい 他のケーブルやアダプタを使用すると故障や火災の原因になるこ とがあ り ます 電気用品安全法は ULまたはCSA認定のケーブル UL CSEマークがコードに表 記 を Supermicroが指定する製品以外に使用するこ とを禁止しています ומתא חשמליים מ י AC אזהרה ומתאמים ספקים בכבלים להשתמש יש המוצר את מתקינים כאשר AC אש...

Страница 30: ...4 20 SUPERSTORAGESYSTEM 6048R E1CR60N L User s Manual Notes ...

Страница 31: ...fully see previous chapter To prevent the serverboard from bending keep one hand under the center of the board to support it when handling The following measures are generally sufficient to protect your equipment from electric static discharge Precautions Use a grounded wrist strap designed to prevent Electrostatic Discharge ESD Touch a grounded metal object before removing any board from its anti...

Страница 32: ...rs JPW2 and JPW3 that must be connected to your power supply See Section 5 9 for power connector pin definitions Connecting the Control Panel JF1 contains header pins for various front control panel connectors See Figure 5 1 for the pin locations of the various front control panel buttons and LED indicators All JF1 wires have been bundled into a single cable to simplify this connection Make sure t...

Страница 33: ...When receiving a serverboard without a processor pre installed make sure that the plastic CPU socket cap is in place and none of the socket pins are bent otherwise contact your retailer immediately Refer to the Supermicro web site for updates on CPU support OPEN1st WARNING OPEN1st WARNING Press down on the lever labeled Close 1st Pull lever away from the socket Gently push down to pop the load pla...

Страница 34: ...quired amount has already been applied 2 Place the heatsink on top of the CPU so that the four mounting holes are aligned with those on the serverboard and the heatsink bracket underneath 3 Screw in two diagonal screws i e the 1 and the 2 screws until just snug do not over tighten the screws to avoid possible damage to the CPU 4 Finish the installation by fully tightening all four screws Figure 5 ...

Страница 35: ...D1 A2 B2 C2 D2 A3 B3 C3 D3 CPU2 E1 F1 G1 H1 E2 F2 G2 H3 E3 F3 G3 H3 Processor and Memory Module Population for Optimal Performance Number of CPUs DIMMs CPU and Memory Population Configuration Table 1 CPU 2 DIMMs CPU1 P1 DIMMA1 P1 DIMMB1 1 CPU 4 DIMMs CPU1 P1 DIMMA1 P1 DIMMB1 P1 DIMMC1 P1 DIMMD1 1 CPU 6 8 DIMMs CPU1 P1 DIMMA1 P1 DIMMB1 P1 DIMMC1 P1 DIMMD1 any pair of P1 DIMMA2 P1 DIMMB2 P1 DIMMC2 P...

Страница 36: ...X10DSC Quick Reference Jumper Description Default Setting JBT1 Clear CMOS Reset BIOS Configuration See Section 5 8 JPB1 BMC Enable Pins 1 2 Enabled JPG1 VGA Enable Pins 1 2 Enabled JPME2 Manufacture ME Mode Select Pins 1 2 Normal JWD1 Watch Dog Timer Enable Pins 1 2 Reset Connectors Description COM1 Rear COM Port FAN1 FAN5 System Fan Headers Fan 1 Fan 5 JF1 Front Control Panel Header JI2 C_EXP1 2 ...

Страница 37: ...on nected to the power supply See the table on the right for pin definitions Required Connection 12V 8 pin Power Pin Definitions Pins Definition 1 4 Ground 5 8 12V Warning To provide adequate power supply to the serverboard be sure to connect JPW1 and both JPW2 and JPW3 to the power supply Failure to do so will void the manufacturer warranty on your power supply and serverboard Power Connectors A ...

Страница 38: ...e table on the right for pin definitions PWR Fail LED Pin Definitions JF1 Pin Definition 5 3 3V 6 PWR Supply Fail OH Fan Fail PWR Fail Blue_UID LED Pin Definitions JF1 Pin Definition 7 Blue_UID LED 8 OH Fan Fail Power Fail OH Fan Fail PWR Fail LED Status Red LED State Definition Off Normal On Overheat Flashing Fan Fail Fan Headers There are five fan headers on the serverboard all of which are 4 pi...

Страница 39: ...N 8 D 9 D Power Supply SMBus I2 C Header The power System Management Bus header at JPI2 C1 is used to monitor the status of the power supply fan and system temperature See the table on the right for pin definitions PWR SMBus Header Pin Definitions Pin Definition 1 Clock 2 Data 3 PWR Fail 4 Ground 5 3 3V IPMB A System Management Bus header for IPMI 2 0 is located at JIPMB1 Connect the appropriate c...

Страница 40: ... Module Port 80 header is located at JTPM1 to provide TPM support and a Port 80 connec tion Use this header to enhance system performance and data secu rity See the table on the right for pin definitions TPM Port 80 Header Pin Definitions Pin Definition Pin Definition 1 LCLK 2 GND 3 LFRAME 4 KEY 5 LRESET 6 5V X 7 LAD 3 8 LAD 2 9 3 3V 10 LAD1 11 LAD0 12 GND 13 SMB_CLK4 14 SMB_DAT4 15 3V_DUAL 16 SER...

Страница 41: ...position is on pins 1 and 2 to enable VGA See the table on the right for jumper settings VGA Enable Disable Jumper Settings Jumper Setting Definition Pins 1 2 Enabled Pins 2 3 Disabled BMC Enable Jumper JPB1 allows you to enable the embedded the ASpeed AST 2400 BMC Baseboard Management Controller to provide IPMI 2 0 KVM support on the serverboard See the table on the right for jumper settings BMC ...

Страница 42: ...ts See the tables at right for more information HDD LED An HDD LED indicator located at HDD_ LED1 on the motherboard indi cates the status of onboard hard drive disks including SATA devices When HDD_ LED1 is blinking all onboard HDDs are functioning normally See the table at right for more information Onboard Memory_Fault LED Indicators The memory fault LED indicators are located at LED_A1 LED_H3 ...

Страница 43: ...to install each item from top to the bottom one at a time After installing each item you must re boot the system before moving on to the next item on the list The bottom icon with a CD on it allows you to view the entire contents SuperDoctor 5 The Supermicro SuperDoctor 5 is a program that functions in a command line or web based interface in Windows and Linux operating systems The program moni to...

Страница 44: ...occur if this practice is not strictly followed Figure 5 8 Installing the Onboard Battery OR Please handle used batteries carefully Do not damage the battery in any way a damaged battery may release hazardous materials into the environment Do not discard a used battery in the garbage or a public landfill Please comply with the regulations set up by your local hazardous waste management agency to d...

Страница 45: ...To prevent damage to any printed circuit boards PCBs it is important to handle them very carefully The following measures are generally sufficient to protect your equipment from ESD damage Precautions Use a grounded wrist strap designed to prevent static discharge Touch a grounded metal object before removing any board from its antistatic bag Handle a board by its edges only do not touch its compo...

Страница 46: ... LCD Screen 6 3 Opening and Closing the Chassis Cover Figure 6 2 Removing the Chassis Cover Warning Except for short periods of time do not operate the server without the chas sis cover in place The cover must be in place to allow proper airflow and prevent overheating 2 5 Drives 2 Expansion Card Slots Power Supplies 2 I O Ports Network LAN Ports Opening the Chassis Cover 1 Power down the system a...

Страница 47: ...fingers clear of the rotating fan blades 4 Place the new fan into the vacant fan bay 5 Confirm that the fan is fully seated in the fan bay and functioning properly Figure 6 3 Individual Rear Fan Figure 6 4 Removing an Individual Fan From the Housing 1 3 Release Tabs Replacing a System Fan 1 While the power is running examine the fans to determine which fan has failed 2 Simultaneously press the upp...

Страница 48: ...e chassis using five screws 6 Close the storage chassis cover reconnect the power cords to the rear of the power supplies and power up the system 6 6 Installing Hot Swappable 3 5 Hard Drives The SC946S chassis supports sixty 3 5 hard drives in toolless hard drive carriers to simplify their removal from the chassis These carriers also help promote proper airflow through the storage chassis Removing...

Страница 49: ...permicro com Installing Hard Drive Carriers into the Storage Chassis Installing 3 5 Hard Drives and Carriers into the Storage Chassis 1 Grasp the hard drive carrier handle 2 Push the hard drive carrier into the hard drive bay until it clicks into the locked position Note See Figure 6 15 for a layout of the logical numbering of the hard drives 6 7 Installing Optional Rear 2 5 Hot Swappable Drives T...

Страница 50: ...d Drive Carriers 1 Using the drive carrier handle push the hard drive and carrier into the rear bay of the storage chassis 2 Push the drive carrier into the drive bay until it clicks into the locked position Figure 6 13 Installing a 2 5 Rear Hard Drive Carrier 1 Note Backplane naming rule follows P0 01 00 indicates 1st expander board 1st drive slot1 out of 60 drives P0 02 00 indicates 2nd expander...

Страница 51: ...e NVMe Drive Cage Figure 6 15 Logical Numbering of Hard Drive Layout 2 Warning Enterprise level hard disk drives are recommended for use in Supermicro storage chassis and servers For information on recommended HDDs visit the Supermicro website at www supermicro com Installing NVMe Drive Carriers into the NVMe Drive Cage NVMe drives are hot swappable and once the NVMe drive cage has been installed ...

Страница 52: ...ng access method allows the motherboard to be accessed for memory upgrades and other maintenance without removing the motherboard tray from the chassis Expansion Card Setup The X10DSC motherboard has three PCI slots available to populate with expan sion cards Figure 6 17 PCI Card Slot Shown with MB removed during initial setup PCI Slot Setup for Expansion Cards Installing Expansion Cards 1 Power d...

Страница 53: ...e power cords back into the power supplies return the dual fan mod ule to the fan bay replace the covers and power up the system Installing the SIOM Network Module Installing Heatsinks Installing Heatsinks 1 Power down the system and disconnect the AC power cords from power sup plies 2 Pull the motherboard tray out only two inches and access the motherboard as described at the beginning of this se...

Страница 54: ...wer card are stored in a backplane tray which is accessible through the top of the storage chassis The following actions are to be performed by authorized personel only Removing the Backplane 1 Power down the system and disconnect the AC power cords from the power supplies Open the top cover as described in Section 6 3 2 Remove the four screws securing the two HDD support partitions and set them a...

Страница 55: ...ich enables them to automatically sense and operate at a 100v to 240v input voltage An amber light will be illuminated on the power supply when the power is off An illuminated green light indicates that the power supply is operating Redundant power supplies are hot swappable and can be changed without powering down the system New units can be ordered directly from Supermicro see contact informatio...

Страница 56: ...6 22 SUPERSTORAGESYSTEM 6048R E1CR60N L User s Manual Notes ...
Страница 57: ...t be configured Options in blue can be configured by the user The right frame displays the key legend Above the key legend is an area reserved for a text message When an option is selected in the left frame it is highlighted in white Often a text message will accompany it Note the AMI BIOS has default text messages built in Supermicro retains the option to include omit or change any of these text ...

Страница 58: ...mory Speed This item displays the default speed of the memory modules installed in the system How to Start the Setup Utility Normally the only visible Power On Self Test POST routine is the memory test As the memory is being tested press the Delete key to enter the main menu of the AMI BIOS setup utility From the main menu you can access the other setup screens An AMI BIOS identification string is...

Страница 59: ...nction as bootable disks If this item is set to Postponed the ROM BIOS of the host adaptors will not capture Interrupt 19 immediately to allow the drives attached to the adaptors to function as bootable devices at bootup The options are Immediate and Postponed Re try Boot Select EFI Boot to allow the BIOS to automatically reboot the system from an EFI boot device after the initial boot failure Sel...

Страница 60: ...able and Disable Direct Cache Access DCA Select Enable to use Intel DCA Direct Cache Access Technology to improve the efficiency of data transferring and accessing The options are Auto Enable and Disable X2 APIC Advanced Programmable Interrupt Controller Based on Intel s Hyper Threading architecture each logical processor thread is assigned 256 APIC IDs APIDs in 8 bit bandwidth When this feature i...

Страница 61: ...wer to boost system performance The options are Performance Balanced Performance Balanced Power and Power Energy Efficiency Turbo Available when Power Technology is set to Custom or Energy Efficient Select Enable for the system to operate at turbo mode with reduced power con sumption so that your machine can achieve maximum system performance with the maximum power efficiency possible The options ...

Страница 62: ...em configures the PCI E port Bifuraction setting for a PCI E port specified by the user The options are x4x4x4x4 x4x4x8 x8x4x4 x8x8 x16 and Auto IIO1 Port 2A Link Speed This item configures the link speed of a PCI E port specified by the user The options are Gen 1 Generation 1 2 5 GT s Gen 2 Generation 2 5 GT s and Gen 3 Generation 3 8 GT s IIO1 Port 2C Link Speed This item configures the link spe...

Страница 63: ...nments to the VMM Virtual Machine Monitor through the DMAR ACPI tables This feature offers fully protected I O resource sharing across Intel platforms providing greater reliability security and availability in networking and data sharing The options are Enable and Disable Interrupt Remapping Select Enable for Interrupt Remapping support to enhance system performance The options are Enable and Disa...

Страница 64: ...ing Memory RAS settings RAS Mode When Independent is selected all memory modules operate independently When Mirror is selected the motherboard maintains two identical copies of all data in memory for data backup When Lockstep is selected the motherboard uses two areas of memory to run the same set of operations in parallel to boost performance The options are Independent Mirror and Lockstep Mode M...

Страница 65: ...least one USB 2 0 connector should be enabled for EHCI support The options are Disabled and Enabled EHCI2 Select Enabled to enable EHCI Enhanced Host Controller Interface support on USB 2 0 connector 2 at least one USB 2 0 connector should be enabled for EHCI support The options are Disabled and Enabled XHCI Pre Boot Driver Select Enabled to load Intel XHCI pre boot driver The settings are Enabled...

Страница 66: ...he options are Disabled and Enabled sSATA RAID Option ROM UEFI Driver Select EFI to load the EFI driver for system boot Select Legacy to load a legacy OPROM for system boot The options are Disabled EFI and Legacy SATA sSATA RAID Boot Select Select SATA Controller to boot the system from a SATA RAID device Select sSATA Controller to boot the system from a sSATA RAID device Select Both to boot the s...

Страница 67: ...d 1TB MMIO High Size Use this item to select the high I O memory size according to memory address mapping for the PCH chip The options are 256G 128G 512G and 1024G PCI Devices Option ROM Settings CPU2 PCI E 3 0x8 Slot1 OPROM CPU2 PCI E 3 0x16 Slot2 OPROM CPU2 PCI E 3 0x16 Slot3 OPROM CPU1 SAS AOM1 Add On Module 1 Slot4 OPROM CPU1 SIOM Card Slot5 OPROM Select Enabled to enable Option ROM support to...

Страница 68: ... second Data Bits Use this item to set the data transmission size for Console Redirection The options are 7 Bits and 8 Bits Parity A parity bit can be sent along with regular data bits to detect data transmission errors Select Even if the parity bit is set to 0 and the number of 1 s in data bits is even Select Odd if the parity bit is set to 0 and the number of 1 s in data bits is odd Select None ...

Страница 69: ...lect Odd if the parity bit is set to 0 and the number of 1 s in data bits is odd Select None if you do not want to send a parity bit with your data bits in transmission Select Mark to add a mark as a parity bit to be sent along with the data bits Select Space to add a Space as a parity bit to be sent with your data bits The options are None Even Odd Mark and Space Stop Bits A stop bit indicates th...

Страница 70: ...ed for a serial port used in Console Redirec tion Make sure that the same speed is used in both host computer and the client computer A lower transmission speed may be required for long and busy lines The options are 9600 19200 57600 and 115200 bits per second Flow Control Use this item to set the flow control for Console Redirection to prevent data loss caused by buffer overflow Send a Stop signa...

Страница 71: ...em to work properly EV DFX is under IIO Configuration in the Chipset North Bridge submenu on Page 4 10 For more information on TPM please refer to the TPM manual at http www supermicro com manuals other AOM TPM 9655V_9655H pdf ACPI Settings WHEA Support Select Enabled to support the Windows Hardware Error Architecture WHEA plat form and provide a common infrastructure for the system to handle hard...

Страница 72: ... reset and Yes every reset When Log is Full Select Erase Immediately to immediately erase all errors in the SMBIOS event log when the event log is full Select Do Nothing for the system to do nothing when the SMBIOS event log is full The options are Do Nothing and Erase Immediately SMBIOS Event Log Standard Settings Log System Boot Event Select Enabled to log system boot events The options are Disa...

Страница 73: ...tems will be displayed IPMI LAN Selection IPMI Network Link Status Update IPMI LAN Configuration Select Yes for the system BIOS to automatically reset the following IPMI settings upon next system boot The options are Yes and No Configuration Address Source Available when the item above Update IPMI LAN Configuration is set to Yes Use this item to select the IP address source for this computer If St...

Страница 74: ...IOS setup utility The length of the password should be from 3 characters to 20 char acters long Secure Boot Menu The following items will display System Mode Secure Boot Vendor Keys Secure Boot Select Enable for secure boot support to ensure system security at bootup The options are Enabled and Disabled Secure Boot Mode This item allows the user to select the desired secure boot mode for the syste...

Страница 75: ... Boot Mode Select Use this item to select the type of device to be used for system boot The options are Legacy UEFI and Dual Fixed Boot Order Priorities This option prioritizes the order of bootable devices from which the system will boot Press Enter on each entry from top to bottom to select devices When the item above Boot Mode Select is set to Dual default the following items will be displayed ...

Страница 76: ...rameters to take effect Select Yes and press Enter to save the changes you ve made and reboot the system Save Options Save Changes When you have completed the system configuration changes select this item to save all changes made This will not reset reboot the system Discard Changes Select this item to discard all the changes and return to the AMI BIOS setup utility Select Yes and press Enter to d...

Страница 77: ...7 40 SUPERSTORAGESYSTEM 6048R E1CR60N L User s Manual Notes ...

Страница 78: ...se fatal errors are usually communicated through a series of audible beeps The numbers on the fatal error list correspond to the number of beeps for the cor responding error Motherboard BIOS Error Beep Codes Beep Code LED Error Message Description 1 beep Refresh Ready to boot 5 short beeps 1 long beep Memory error No memory detected in the system 5 beeps No Con In or No Con Out devices Con In incl...

Страница 79: ...A 2 SUPERSTORAGESYSTEM 6048R E1CR60N L User s Manual Notes ...
Страница 80: ...to 1 5 TB of Load Reduced LRDIMM or 768 GB of Registered RDIMM ECC DDR4 2133 1866 1600 memory Note see Section 5 6 for details Drive Bays Sixty top loading hot swap drive bays for 3 5 SAS or SATA drives and two rear hot swap drive bays for 2 5 SAS or SATA drives Expansion Slots Up to three PCI E expansion cards may be added to the system See Section 6 9 Serverboard X10DSC Extended ATX form factor ...

Страница 81: ... 40º to 60º C 40º to 140º F Operating Relative Humidity 8 to 90 non condensing Non operating Relative Humidity 5 to 95 non condensing Regulatory Compliance Electromagnetic Emissions FCC Class A EN 55022 Class A EN 61000 3 2 3 3 CISPR 22 Class A Electromagnetic Immunity EN 55024 CISPR 24 EN 61000 4 2 EN 61000 4 3 EN 61000 4 4 EN 61000 4 5 EN 61000 4 6 EN 61000 4 8 EN 61000 4 11 Safety CSA EN IEC UL...

Страница 82: ...e to perform be reasonably expected to result in significant injury or loss of life or catastrophic property damage Accordingly Supermicro dis claims any and all liability and should buyer use or sell such products for use in such ultra hazardous applications it does so entirely at its own risk Furthermore buyer agrees to fully indemnify defend and hold Supermicro harmless for and against any and ...

Отзывы: