


Chapter 5: Advanced Serverboard Setup
5-3
5-2
S
UPER
S
TORAGE
S
YSTEM 6038R-DE2CR16L User's Manual
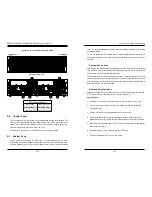
5-2 Cable and Device Connectiions
All data and power connections between the serverboard to the system (including
the power supplies and the hard drives) are provided through the midplane. Most of
these connections are made automatically when the system is assembled. "Right"
and "left" refer to the side of the chassis as viewed from the front of the system.
Also refer to Chapter 6 Section 5 for an image of the midplane with the connec-
tions listed below.
Power Connections
Power is routed from the power supplies to the power distribution board which in
turn connects to the midplane. When the serverboards are seated in their bays they
plug into the midplane to receive power.
Fan Cabling
All six sets of cooling fans are connected to headers on the serverboard and may
be monitored through IPMI. Fans can be accessed for replacement by removing
the entire hot-swap server module.
Control Panels
A ribbon cable connects each control panel to the midplane. The right and left side
control panels connect to JP1 and JP2 on the midplane, respectively.
5-3 Installing the Processor and Heatsink
Caution:
When handling the processor package, avoid placing direct pressure on the
label area of the fan.
Notes:
•
Always connect the power cord last and always remove it before adding, re-
moving or changing any hardware components. Make sure that you install the
processor into the CPU socket before you install the CPU heatsink.
•
If you buy a CPU separately, make sure that you use an Intel-certified multi-
directional heatsink only.
•
Make sure to install the serverboard into the chassis before you install the CPU
heatsinks.
•
When receiving a serverboard without a processor pre-installed, make sure that
the plastic CPU socket cap is in place and none of the socket pins are bent;
otherwise, contact your retailer immediately.
•
Refer to the Supermicro web site for updates on CPU support.
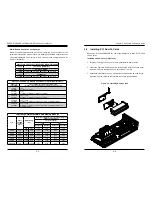
1. There are two levers on the
LGA2011 socket. First press and
release the load lever labeled
'Open 1st'.
2. Press the second load lever
labeled 'Close 1st' to release the
load plate from its locked position.
Installing an LGA2011 Processor
OPEN 1st
WARNING
!
OPEN 1st
WARNING
!
Press down on the lever labeled
'Close 1st'
Pull lever away
from the socket
Содержание 6038R-DE2CR16L
Страница 1: ...USER S MANUAL 1 0a SUPER STORAGE SYSTEM 6038R DE2CR16L ...
Страница 6: ...SUPERSTORAGESYSTEM 6038R DE2CR16L User s Manual x Notes ...
Страница 17: ...3 4 SUPERSTORAGESYSTEM 6038R DE2CR16L User s Manual Notes ...
Страница 45: ...6 10 SUPERSTORAGESYSTEM 6038R DE2CR16L User s Manual Notes ...
Страница 69: ...A 2 SUPERSTORAGESYSTEM 6038R DE2CR16L User s Manual Notes ...


