16
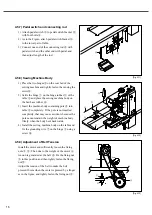
4.5.7) Pedal switch and connecting rod
1) Attach pedal switch
①
to pedal switch bracket
②
with four bolts
③
.
2) As in the Figure, attach pedal switch bracket
②
to the lower part of table.
3) Connect one end of the connecting rod
④
with
pedal switch and the other end with pedal, and
then adjust length of the rod.
4.5.9) Adjustment of Belt Tension
Install the motor and sufficiently loosen the fixing
nuts
①
,
②
. Then due to the weight of the motor
③
,
tension is generated at the belt
④
. Fix the fixing nut
①
in this position and then tightly fasten the fixing
nut
②
.
Adjust the tension of the belt to make the belt
pressed 10mm when the center is pressed by a finger
as in the figure, and tightly fasten the fixing nut
②
.
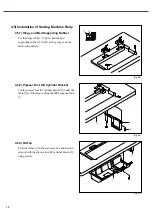
4.5.8) Sewing Machine Body
1) Place the two hinges
①
on the rear bed of the
sewing machine and tightly fasten them using the
screw
⑤
.
2) Settle the hinge
①
on the hinge rubber
②
of the
table
③
and place the sewing machine body on
the bed base rubber
⑥
.
3) Insert the machine body sustaining pole
④
into
table
③
completely. If the pole is not inserted
completely, that may cause accidents because the
pole cannot sustain the weight of machine body
firmly, when the body bent backwards.
4) Install the sewing machine body on the table and
fix the grounding wire
⑦
on the hinge
①
using a
screw
⑧
.
[Fig. 4-11]
[Fig. 4-12]
[Fig. 4-13]
①
②
③
④
④
①
②
③
10mm
①
②
③
④
⑤
⑥
⑦
⑧
Содержание KM-1080 Series
Страница 2: ......
Страница 13: ...13 4 4 2 Flat table Fig 4 4 ...


