21
EN
GLISH
Q700 M/M HD/F/R/UP-M/UP-F Rev.G
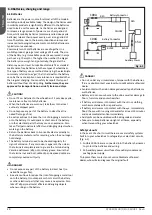
6.2 Charging batteries:
&
Battery charger: Please read the owner’s manual with the
charger supplied carefully. The general procedures and effects
for the interference with the chair and the batteries remain
valid.
Battery care plan
Below is set out a battery care plan for maintenance free
batteries. This has been agreed between Sunrise Medical
and the battery manufacturers, to enable you to get the best
out of your batteries. If a different care plan is followed, this
may result in lower than expected performance from your
mobility vehicle.
•
Only use an approved Sunrise Medical charger compatible
with the vehicle to be charged.
•
Charge your batteries every night, regardless of the amount
of use your mobility device has had during the day.
•
Do not interrupt the charging cycle.
•
If your mobility device is not required for use, it should
remain connected to the charger until required. This will
not damage your batteries, as long as the mains socket/plug
is left switched on. Turning the mains socket/plug off, but
leaving the mains cable plugged in will eventually deplete
your battery charge.
•
If you leave your vehicle for an extended period (more than
15 days) charge the batteries fully and then disconnect the
main battery lead.
•
Failure to allow for recharge will damage the batteries and
can lead to shortened distances and premature failure.
•
Do not top up the charge of your batteries during the day.
Wait until the evening for a full overnight charge.
•
As a general rule, maintenance free batteries take longer to
fully charge than “wet” lead acid batteries.
•
The battery terminals need to be checked regularly for
signs of corrosion. If any corrosion is apparent, then clean
the terminals completely and re-grease the terminal using
Vaseline petroleum jelly, not ordinary grease. Ensure that
the terminal nut and bolt, cable clip and exposed cable are
completely covered with jelly.
•
Following all the points above should result in a healthier
battery, greater range for the vehicle user and a longer life
for your batteries.
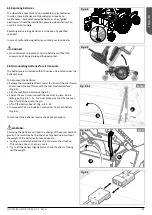
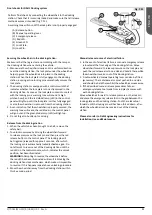
Connecting the battery charger
Procedure for connecting the charger and charging
•
Switch off the wheelchair controller.
&
Controller:
•
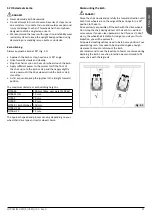
Connect the battery charger round output plug to the
charging socket on the front of the joystick module.
&
Controller:
•
Connect the charger to the mains supply by means of the
mains plug and switch on.
For more information about the charger operation, consult the
instructions provided with the charger.
&
BATTERY CHARGER.
Depending on how depleted the batteries are, it may take up
to 12 hours to fully charge the batteries again.
DANGER!
•
Make sure the cord is located so that it will not be stepped
on, tripped over or otherwise subjected to damage or stress.
•
Do not rest a battery on top of the charger.
•
Do not stand the charger on a carpet or other soft surface.
Always place it on a hard flat surface.
•
Do not operate the charger if it has received a sharp blow,
been dropped or otherwise damaged in any way. Take it to a
qualified technician.
•
Never place the charger directly above the battery being
charged; gases from the battery will corrode and damage
the charger.
•
Never charge a frozen battery. A fully charged battery will
rarely freeze but the electrolyte of a discharged battery can
freeze at -9° Centigrade. Any battery that is suspected of
being frozen should be thawed completely before charging.
•
Never sit with the charger on your lap when charging your
batteries
•
The charger casing will get hot during its normal operation.
•
Do not disassemble charger; only have it repaired by the
manufacturers. Incorrect re-assembly may result in a risk of
electric shock or fire.
•
To reduce the risk of an electric shock, unplug the charger
from the outlet before attempting any maintenance or
cleaning. Turning off the controls will not reduce the risk.
•
Never smoke or allow a spark or flame in the vicinity of
battery or charger.
•
You should not charge your batteries in outdoor conditions.
•
It is advised to use a smoke detector in the charging area.
Содержание Quickie Q700 M
Страница 150: ...150 Q700 M M HD F R UP M UP F Rev G ...
Страница 151: ...151 Q700 M M HD F R UP M UP F Rev G ...

