SunFounder TS-10 10.1-inch Touch Screen
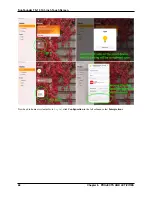
For more styles, you can refer to
5.4.6 Start the Home Assistant Service at Boot
Normally, Docker is self-starting after booting by default, which also means that after you install Home Assistant, you
can use it as long as you start the Raspberry Pi.
You can use the following command to view the boot list. The
docker.service
should be in the
enabled
state.
sudo systemctl
list
-
unit
-
files
|
grep enable
To turn off Docker’s self-startup, please enter the following command:
sudo systemctl disable docker
.
service
To enable Docker’s self-startup, please enter the following command:
sudo systemctl enable docker
.
service
5.4.7 Enter the Home Assisant Page at Boot
Experience the full-screen self-boot interface first. Please close the already open Home Assistant URL and run
chromium-browser --start-fullscreen "http://localhost:8123"
.
If you want to automatically display the Home Assistant interface in full screen after booting, then do the following.
1. Go to the
autostart
folder.
cd
/
home
/
pi
/.
config
/
autostart
/
Note:
If the
autostart
folder does not exist, you need to create a new one.
sudo mkdir
-
p
/
home
/
pi
/.
config
/
autostart
/
2. Create
chrome_start_fullscreen.desktop
file.
sudo nano chrome_start_fullscreen
.
desktop
3. Edit the
chrome_start_fullscreen.desktop
file as follows.
[Desktop Entry]
Type
=
Application
Exec
=
chromium
-
browser
--
start
-
fullscreen
"http://localhost:8123"
Save and exit:
Ctrl + X
,
Y
,
Enter
.
Note:
If you want to cancel the full-screen self-start, comment out the contents of the
.desktop
file (by
“#”
)and
restart the Raspberry Pi.
cd
/
home
/
pi
/.
config
/
autostart
/
sudo nano chrome_start_fullscreen
.
desktop
5.4. Home Assistant
75
Содержание TS-10
Страница 1: ...SunFounder TS 10 10 1 inch Touch Screen www sunfounder com Nov 19 2021 ...
Страница 2: ......
Страница 6: ...SunFounder TS 10 10 1 inch Touch Screen 2 CONTENTS ...
Страница 9: ...SunFounder TS 10 10 1 inch Touch Screen 5 ...
Страница 10: ...SunFounder TS 10 10 1 inch Touch Screen 6 Chapter 1 HARDWARE DESCRIPTION ...
Страница 16: ...SunFounder TS 10 10 1 inch Touch Screen 12 Chapter 2 INSTALL THE RASPBERRY PI OS ...
Страница 21: ...SunFounder TS 10 10 1 inch Touch Screen pi 3 Step 5 17 ...
Страница 53: ...SunFounder TS 10 10 1 inch Touch Screen Now you have entered OctoPrint 5 3 3D Printer Monitor 49 ...
Страница 123: ...SunFounder TS 10 10 1 inch Touch Screen Also let it appear at the right time 5 7 Scratch Projects 119 ...
Страница 130: ...SunFounder TS 10 10 1 inch Touch Screen Set the balloon to a random position 126 Chapter 5 PROJECTS AND ACTIVITIES ...
Страница 131: ...SunFounder TS 10 10 1 inch Touch Screen Let it change the color and size randomly 5 7 Scratch Projects 127 ...
Страница 141: ...SunFounder TS 10 10 1 inch Touch Screen 5 7 Scratch Projects 137 ...
Страница 160: ...SunFounder TS 10 10 1 inch Touch Screen Copy out the second Trees 156 Chapter 5 PROJECTS AND ACTIVITIES ...
Страница 165: ...SunFounder TS 10 10 1 inch Touch Screen 5 7 Scratch Projects 161 ...
Страница 167: ...SunFounder TS 10 10 1 inch Touch Screen 5 7 Scratch Projects 163 ...
Страница 171: ...SunFounder TS 10 10 1 inch Touch Screen Then we add the Pen extension function 5 7 Scratch Projects 167 ...
Страница 181: ...SunFounder TS 10 10 1 inch Touch Screen 5 7 Scratch Projects 177 ...
Страница 209: ...SunFounder TS 10 10 1 inch Touch Screen 205 ...
Страница 210: ...SunFounder TS 10 10 1 inch Touch Screen 206 Chapter 7 3D PRINTED SUPPORT ...
Страница 212: ...SunFounder TS 10 10 1 inch Touch Screen 208 Chapter 8 FAQ ...


