background image

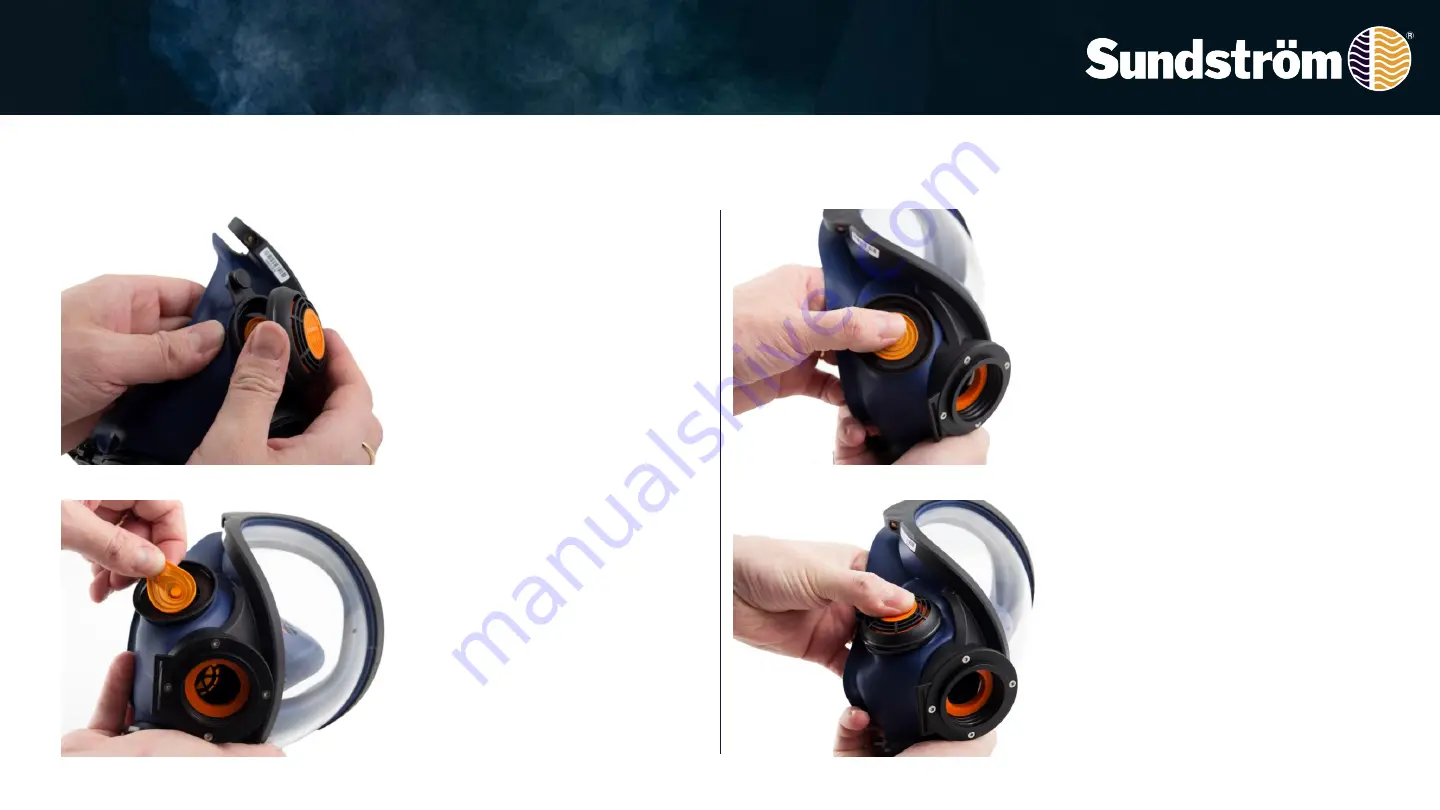
14. Change the exhalation membranes

2020-10-06

OI03H-1021 SR 200 Airline

20

14.1

The exhalation 

membranes are mounted on 
a fixed dowel on the inside of 
the valve covers on each side 
of the outer mask. The covers 
should be changed whenever 
the membranes are changed. 
Snap the valve covers off the 
valve seats.

14.2 

Prise off the 

membranes.

14.3 

Press the new 

membranes onto the dowels. 
Carefully check that the 
membranes are in contact 
with the valve seats all round.

14.4

Press the valve covers 

into place. A clicking sound 
indicates that the cover has 
snapped into place. Carry out 
a negative fit check.

Содержание H03-1021

Страница 1: ...2020 10 06 OI03H 1021 SR 200 Airline 1 Operation Instruction SR 200 Airline Compressed air line full face mask Revision 02...

Страница 2: ...tection to a user SR 200 Airline is a compressed air full face mask with filter back up in accordance to NIOSH approval label When selecting equipment for SR 200 Airline some of the factors that shoul...

Страница 3: ...requirements of CGA G 7 1 Grade D or higher quality In the event of uncertainty as to whether the above demands have been met a filter such as the Sundstr m type SR 99 1 compressed air filter should b...

Страница 4: ...ng SR 200 Airline Packing list Facepiece with breathing hose Control valve Belt Sealing plug Sealing cover Pre filter holder Flow meter Filter adapter User instructions 2020 10 06 OI03H 1021 SR 200 Ai...

Страница 5: ...The membranes are consumables and must be replaced if there are any signs of damage or ageing 1 2 The membranes are consumables and must be replaced if there are any signs of damage or ageing Check t...

Страница 6: ...d through the mask is at least 5 3 CFM 150 l min Connect the breathing hose of the mask to the control valve 1 5 Connect the compressed air supply tube to the control valve 1 6 Turn the control valve...

Страница 7: ...ith the other hand and hold it so that it points vertically up from the bag 2 2 Read the position of the ball in the tube It should float level with or just above the marking on the tube 5 3 CFM 150 l...

Страница 8: ...d particle filters must be combined 3 3 Place the particulate filter on top of the cartridge Grasp both protective elements Squeeze hard until you hear the particle filter snap onto the gas filter 3 4...

Страница 9: ...2 Arrange the control valve in a way that allows easy adjustment of the flow rate and a strict watch over the breathing hose i e it must not be placed on the back of the waist 4 3 Filter If the equip...

Страница 10: ...head harness Repeat the fit check until there is no leakage Leakage may occur in cases such as if you wear a beard or sideboards or if your face is unshaven or deeply wrinkled if you wear glasses or i...

Страница 11: ...d air hose 2020 10 06 OI03H 1021 SR 200 Airline 11 6 2 Unroll the compressed air hose and make sure that it is not twisted Connect the hose to the control valve inlet 6 1 Connect the breathing hose to...

Страница 12: ...aps by opening the buckles 7 2 Move the head harness upwards place your chin in the facepiece chin support and pull the head harness over your head 7 3 Tension the elastic straps in pairs by pulling t...

Страница 13: ...he control valve knob to set the air flow rate to suit your current work intensity In the fully closed position turn the knob anti clockwise the flow is about 5 3 CFM 150 l min In the fully open posit...

Страница 14: ...if fitted 9 2 Disconnect the compressed air hose from the control valve Leave the polluted work area and take the equipment off 9 3 Slacken the four elastic straps in pairs by moving the strap holders...

Страница 15: ...ct the compressed air hose from the control valve Leave the polluted work area and then take the equipment off 10 2 Slacken the four elastic straps in pairs by moving the strap holders forward The two...

Страница 16: ...2020 10 06 OI03H 1021 SR 200 Airline 16 11 1 Both couplings are of safety type and are released in two stages Push the coupling towards the nipple 11 2 Pull the locking ring back 11 3 Push the couplin...

Страница 17: ...rise the top part of the mask off the visor and remove the visor from the lower groove 12 3 Take this opportunity to clean the groove if necessary Change a glass visor SR 365 Take great care to ensure...

Страница 18: ...line To make assembly easier coat the slot with a soap solution or similar liquid 12 5 Carefully prise the top half of the face piece over the visor and make sure that the visor is in the groove in t...

Страница 19: ...re fitted i e one on each inside of the inner mask The dowels for these membranes are removable and should be changed whenever the membrane is changed Prise off the membrane and dowels 13 3 The membra...

Страница 20: ...k The covers should be changed whenever the membranes are changed Snap the valve covers off the valve seats 14 2 Prise off the membranes 14 3 Press the new membranes onto the dowels Carefully check th...

Страница 21: ...021 SR 200 Airline 21 15 1 The head harness can be ordered as a spare part only as a complete harness Snap the six strap holders of the head harness of the mask strap mountings 15 2 Check that straps...

Страница 22: ...followed by rinsing with clean water and drying in air at room temperature If necessary spray the product with 70 ethanol or isopropanol solution for disinfection NOTE Never use solvent for cleaning...

Страница 23: ...Airline 23 16 4 Critical areas are the exhalation membranes and the valve seats which must have clean and undamaged contact surfaces Inspect all parts and replace with new parts as necessary 16 5 Lea...

Страница 24: ...he schedule represents the recommended minimum requirement for maintenance routines in order to ensure that the equipment will always be in functional condition Before use After use Annually Visual in...

Отзывы: