


38
7
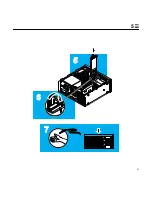
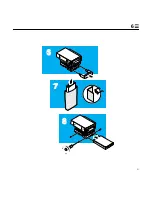
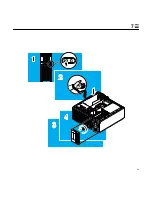
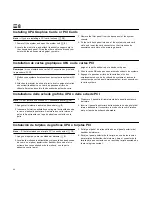
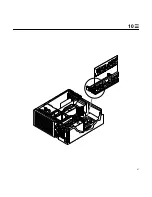
Installing the CD-ROM Drive or Tape Drive
8. Use a Phillips screwdriver to attach the drive to the bracket
using the four screws provided.
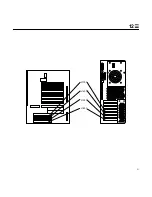
9. Partially lower the bracket into the chassis and attach the cables
to the drive:
• CD-ROM drive: connectors labeled CD and P3
• Tape drive: power cable and data cable
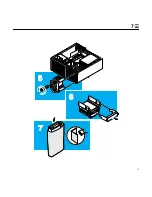
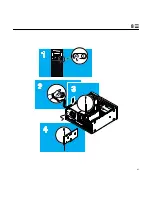
10. Complete lowering the drive bracket into the chassis. Tighten
the two screws holding the drive bracket to the system.
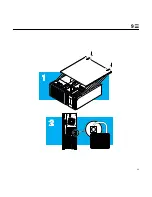
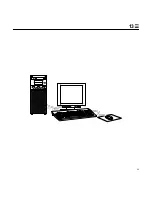
11. Replace the drive bezel on the front of the system.
12. Detach the wrist strap and close the system unit (
9).
Installation du lecteur de CD-ROM ou du lecteur de bande
8. A l’aide d’un tournevis cruciforme, vissez le lecteur sur le
support à l’aide des quatre vis fournies à cet effet.
9. Insérez partiellement le support dans le châssis et reliez les
câbles au lecteur :
• Lecteur de CD-ROM : connecteurs étiquetés CD et P3.
• Lecteur de bande : câble d’alimentation et câble de données.
10. Insérez complètement le support dans le châssis. Serrez les
deux vis fixant le support au système.
11. Replacez l’encadrement du lecteur à l’avant du système.
12. Détachez le bracelet de mise à la terre et refermez l’unité
système (
9)
Installazione dell’unità CD-ROM o dell’unità a nastro
8. Con un cacciavite a croce, collegare l’unità al supporto
utilizzando le quattro viti in dotazione.
9. Abbassare parzialmente il supporto nel telaio e collegare i cavi
all’unità:
• Unità CD-ROM: connettori con dicitura CD e P3
• Unità a nastro: cavo di alimentazione e cavo dei dati
10. Abbassare completamente il supporto dell’unità nel telaio.
Stringere le quattro viti di fissaggio del supporto dell’unità al
sistema.
11. Rimettere la lunetta frontale nell’unità centrale.
12. Togliere il cinturino antistatico e chiudere l’unità centrale (
9).
Instalación de la unidad de CD-ROM o de cinta
8. Utilice un destornillador en estrella para fijar la unidad al
soporte con los cuatro tornillos suministrados.
9. Acerque el soporte al bastidor y conecte los cables a la unidad:
• Unidad de CD-ROM: conectores CD y P3
• Unidad de cinta: cable de alimentación y de datos
10. Fije el soporte de la unidad en el bastidor, apretando los dos
tornillos que sujetan el soporte de la unidad al sistema.
11. Vuelva a colocar el panel de relleno de la parte frontal del
sistema.
12. Despegue la muñequera antiestática y cierre la unidad del
sistema (
9).
Содержание Ultra 30
Страница 11: ...9...
Страница 13: ...11 1...
Страница 15: ...13 2...
Страница 17: ...15 3...
Страница 19: ...17 3...
Страница 21: ...19 4...
Страница 25: ...23 5...
Страница 27: ...25 5...
Страница 29: ...27 5...
Страница 31: ...29 6...
Страница 33: ...31 6...
Страница 35: ...33 6...
Страница 37: ...35 7...
Страница 39: ...37 7...
Страница 41: ...39 7...
Страница 43: ...41 8...
Страница 45: ...43 8...
Страница 47: ...45 9...
Страница 49: ...47 10...
Страница 51: ...49 11 U1004 U0904 U0804 U0704 U1003 U0903 U0803 U0703 U1002 U0902 U0802 U0702 U1001 U0901 U0801 U0701 3 2 1 0...
Страница 53: ...51 12 J1301 J1401 J1501 J1601...
Страница 55: ...53 13...
Страница 61: ...59...


