background image

2

Sun Elite3D Graphics Card Installation Guide • May 1999

Installing the Horizontal Elite3D
Graphics into an Ultra 2 System

To install the horizontal Elite3D graphics into an Ultra 2, proceed as follows:

Note –

Refer to the Sun Ultra 2 Series Service Manual or the Sun Ultra 2 Series System

Product Notes, part number 802-5936-12 for additional Ultra 2 installation information.

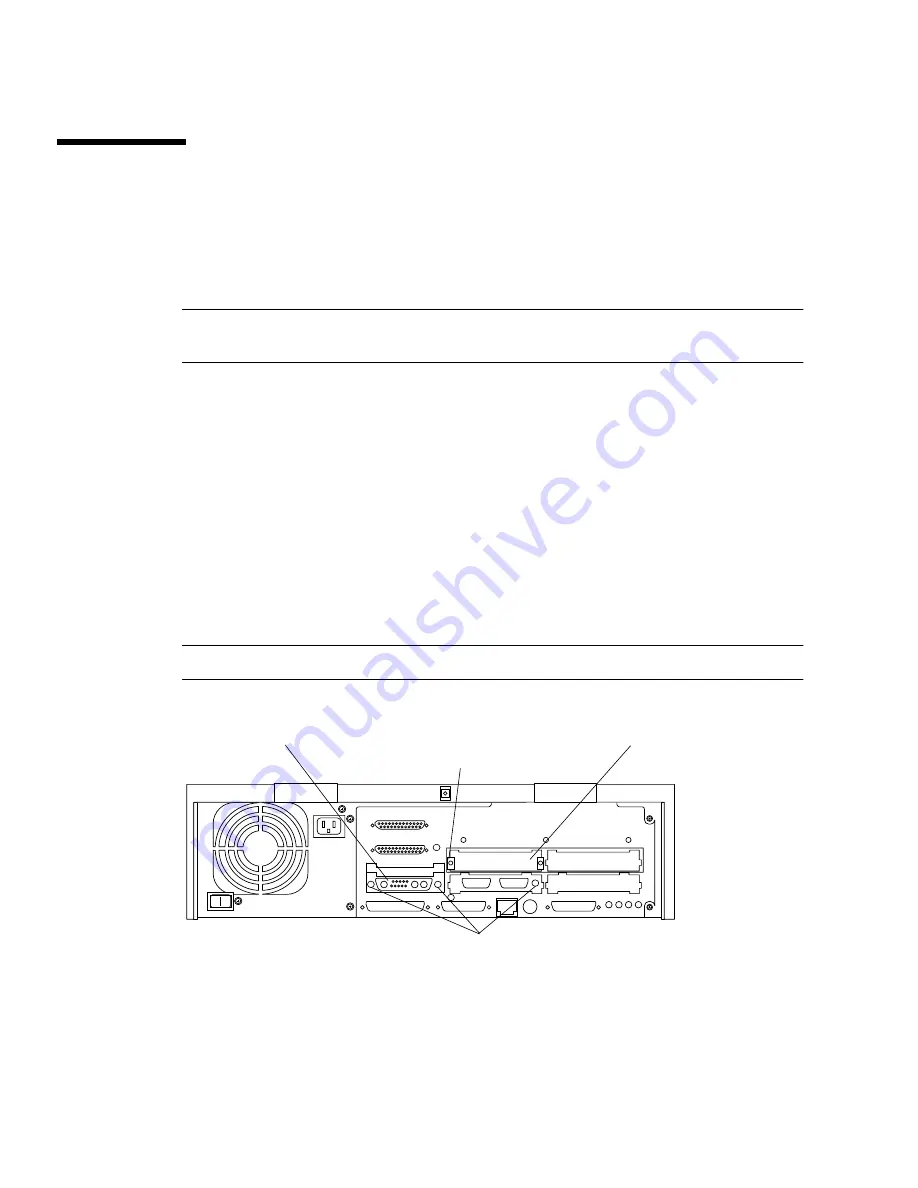
1. Locate the UPA bus connector on the Ultra 2 motherboard (

FIGURE 1

).

2. Remove the retainer clip closest to the power supply.

3. Remove the Ultra 2 filler panel on slot 3 (

FIGURE 1

).

If applicable, remove any existing SBus boards from slots 2 and 3.

If applicable, remove any existing UPA graphics from the UPA bus.

4. Remove the Elite3D graphics board from the antistatic bag.

5. Install the Elite3D filler panel, supplied in the installation kit, on SBus slot 3.

Using a number 2 Phillips-head screwdriver, secure the washers and screws
provided in the installation kit.

Note –

The cosmetic strip side must face the chassis exterior (

FIGURE 1

).

FIGURE 1

Ultra 2 Back Panel

UPA slot
(Elite3D 13W3 connector)

SBus slot 3
(Elite3D filler panel)

Filler panel screw/washer (2)

Elite3D Backplate screw (3)

Содержание Elite3D

Страница 1: ... Palo Alto CA 94303 4900 USA 650 960 1300 Fax 650 969 9131 Sun Elite3D Graphics Card Installation Guide Part No 806 1600 10 May 1999 Revision A Sun Microsystems Inc Send comments about this document to docfeedback sun com ...

Страница 2: ...9 Sun Microsystems Inc 901 San Antonio Road Palo Alto CA 94303 Etats Unis Tous droits réservés Ce produit ou document est protégé par un copyright et distribué avec des licences qui en restreignent l utilisation la copie la distribution et la décompilation Aucune partie de ce produit ou document ne peut être reproduite sous aucune forme par quelque moyen que ce soit sans l autorisation préalable e...

Страница 3: ... may void the authority granted to the user by the FCC to operate this equipment FCC Class B Notice This device complies with Part 15 of the FCC Rules Operation is subject to the following two conditions 1 This device may not cause harmful interference 2 This device must accept any interference received including interference that may cause undesired operation Note This equipment has been tested a...

Страница 4: ...Regulations Cet appareil numérique de la classe A respecte toutes les exigences du Règlement sur le matériel brouilleur du Canada DOC Class B Notice Avis DOC Classe B This Class B digital apparatus meets all requirements of the Canadian Interference Causing Equipment Regulations Cet appareil numérique de la classe B respecte toutes les exigences du Règlement sur le matériel brouilleur du Canada ...

Страница 5: ...te3D Graphics 1 Attaching An Antistatic Wriststrap 1 Installing the Horizontal Elite3D Graphics into an Ultra 2 System 2 Installing the Vertical Elite3D Graphics 4 Changing the Monitor Screen Resolution 4 Sun Documentation on the Web 4 Sun Welcomes Your Comments 5 ...

Страница 6: ...iv Sun Elite3D Graphics Card Installation Guide May 1999 ...

Страница 7: ...ly shut down the system before installing any internal cards and rebooting your system after installation Installing the Elite3D Graphics Refer to the documentation that came with your system or enclosure Locate the section that describes how to install or remove and replace a UPA graphics card Follow the UPA graphics card installation procedure or the removal and replacement procedure to install ...

Страница 8: ...est to the power supply 3 Remove the Ultra 2 filler panel on slot 3 FIGURE 1 If applicable remove any existing SBus boards from slots 2 and 3 If applicable remove any existing UPA graphics from the UPA bus 4 Remove the Elite3D graphics board from the antistatic bag 5 Install the Elite3D filler panel supplied in the installation kit on SBus slot 3 Using a number 2 Phillips head screwdriver secure t...

Страница 9: ...ding up the Elite3D backplate extension tab lower the Elite3D over the UPA bus connector on the motherboard FIGURE 2 FIGURE 2 Installing Elite3D 9 Pushing the Elite3D against the chassis back panel carefully press both corners of the board evenly to push the Elite3D interface connector into the motherboard UPA bus connector 10 Lock the UPA bus connector retainer clip onto the Elite3D UPA bus conne...

Страница 10: ... platform installation guide Changing the Monitor Screen Resolution For most installations the Elite3D automatically configures itself to the proper screen resolution and refresh rate for your monitor However if a non Sun monitor is connected to the Elite3D the monitor may have the wrong screen resolution To change the screen resolution read the afbconfig man page and the Solaris Handbook for Sun ...

Страница 11: ... Comments We are interested in improving our documentation and welcome your comments and suggestions You can email your comments to us at docfeedback sun com Please include the part number of your document in the subject line of your email ...

Отзывы: