background image

1.1  g

enerAl


notes


on


sAfety

This operation manual is applicable for the machine LWG 
12.

The machine may only be handled by personnel 
who are qualified.

1.2  u

se


of


the


mAchine


for


PurPoses


for


which


it


is


intended

The machine ist intended for the cutting, roughing and 
brushing of metal and stone materials.

1.3  i

ncorrect


use

All uses other than those described under section 
1.2 are regarded as incorrect use and are there-
fore not admissible.

1.4  ec 

declArAtion


of


conformity

Otto Suhner GmbH, Trottäcker 50, D-79701 Bad Säck-
ingen, hereby declares under sole responsibility that 
the product with the serial or batch no. (see reverse 
side) complies with the requirements under the Directive 
2006/42/EG. Applied standards: EN ISO 12100, EN ISO 
11148. Document Agent: M. Voyame. D-Bad Säckingen, 
08/2017. 
M. Voyame/Division manager


2. c

ommISSIonIng

2.1  P

rior


to


tAKing


the


mAchine


into


serVice

Fitting of hose coupling (inside diameter min. 7 
mm, available as optional accessory, item no. 908 
057, type DN 8). Use oiled compressed air (see 

also air quality under section 2.3). Observe national regu-
lations.

2.2  t

AKing


the


mAchine


into


serVice

2.2.1 

turn


on

/t

urn


off


1. n

oteS


on

 S

afety

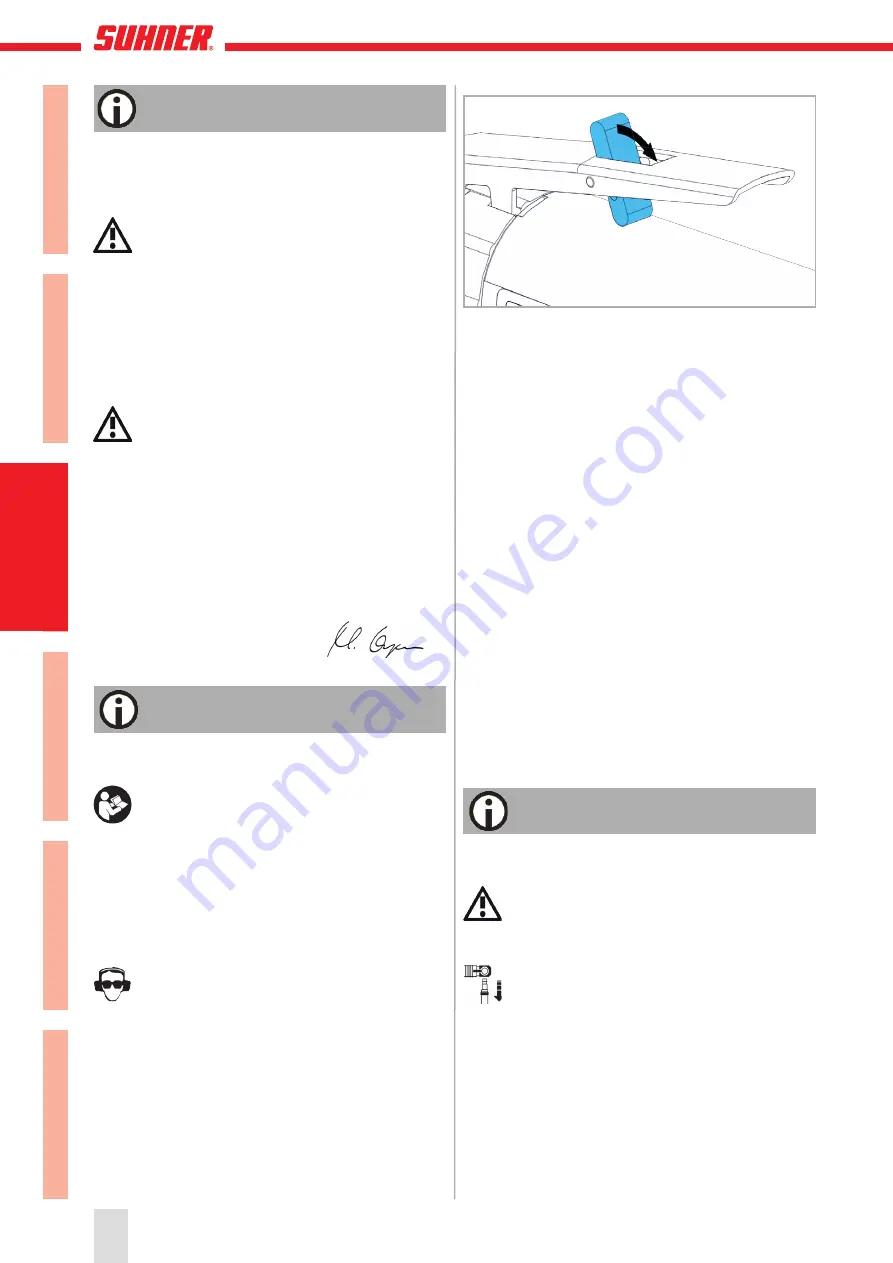
Tilt lock forward an press lever onplastic sleeve. Releas-
ing the lever switches the machine OFF.

2.3  r

Ating


dAtA

Pressure 

max. 6.3bar

Power output 

900W

Air consumption full load 

1.1m

3

/min

Air consumption at idling 

0.6m

3

/min

Setting oiler idle  

2-3 drops/min

Wheel diameter 

max. 125mm

Spindel thread 

M14 / 5/8”

Length of spindle thread stud 

20mm

No-load speed 

12’000min

-1

Sound pressure level EN ISO 15744  81dB(A), K=3dB(A)
Sound power level EN ISO 15744 

92dB(A), K=3dB(A)

Vibration EN ISO 28927-12 

7.8m/s

2

, K=2.6m/s

2

Air quality DIN ISO 8573-1 

3/4/4

Weight 1.700kg

2.4  o

PerAting


conditions

Temperature range during operation: 0 to +40°C
Relative air humidity: 95% at +10°C not condensed


3. h

andlIng

/o

peratIon

3.1  P

rotection


deVices

The machine may only be operated with the safety 
guards and the additional handle fitted!

3.1.1  s

Afety


guArd

The safety guard was already correctly adjusted in 
the factory. With this adjustment it can be brought 
into the desired working position, or removed. 

When the pressure point is overcome the protective guard 
must rotate and snap in again without the use of exces-
sive force. Otherwise, either the protective guard has to 
be readjusted or the locking mechanism has to be 
cleaned.

16

P

ortugúes

Español

Italiano

English

F

rançais

Deutsch

English

Содержание LWG12

Страница 1: ...e Original Betriebsanleitung Manuale tecnico Traduzione delle Original Betriebsanleitung Documentaci n t cnica Traducci n del Original Betriebsanleitung Manual de Instru es Tradu o do Original Betrieb...

Страница 2: ...English Spare Parts Fran ais Pi ces de rechange Deutsch Ersatzteile 2 2...

Страница 3: ...Portug es Pe as de reposi o Espa ol Refacciones Italiano Pezzi di ricambio 3...

Страница 4: ...non observation la s curit de l utilisa teur n est pas garantie Information Cette information sert la com pr hension du fonctionnement du produit Par cela la pleine capa cit de fonctionnement du prod...

Страница 5: ...la seguridad del usuario Informaci n Esta informaci n sirve para comprender el funcionamiento del producto Ello per mite aprovechar al m ximo sus presta ciones Documentaci n t cnica Leer la documentac...

Страница 6: ...la desti nation 12 1 3 Utilisation contraire la desti nation 12 1 4 D claration de conformit CE 12 2 1 Avant la mise en service 12 2 2 Mise en service 12 2 3 Performances 12 2 4 Conditions d exploitat...

Страница 7: ...forme al previsto 24 1 4 Declaraci n de conformidad CE 24 2 1 Antes de la puesta en servicio 24 2 2 Puesta en servicio 24 2 3 Datos de rendimiento 24 2 4 Condiciones de uso 24 3 1 Dispositivos de prot...

Страница 8: ...ten 1 Sicherheitshinweis Sperre nach vorne kippen und Hebel auf Kunststoffh lle dr cken Durch Loslassen des Hebels stellt die Maschine ab 2 3 Leistungsdaten Druck max 6 3bar Leistung 900W Luftverbrauc...

Страница 9: ...pannflansch entfernen L sen und entfernen der drei Spannschrauben Federscheibe mit den drei Kugeln die Mitnehmer und die Unterlagsscheibe vorsichtig entfernen Alle Teile gr ndlich reinigen Defekte Tei...

Страница 10: ...de oder vibrierende Schleifwerkzeuge nicht ver wenden 3 3 Arbeitshinweise Maschine l uft noch aus wenn der Ventilhebel losgelassen wird Bei Druckluftausfall ist der Ven tilhebel loszulassen Das Werkze...

Страница 11: ...2 Ersetzen des Zuluftschlauches Abluftschlauch entfernen siehe Pkt 4 1 1 Schlauchklemme l sen und Zuluftschlauch vomAn schlussnippel ziehen 11 Portug es Espa ol Italiano English Fran ais Deutsch Deut...

Страница 12: ...f de verrouillage vers l avant et appuyez le levier sur l enveloppe en plastique La ma chine s arr te quand on rel che le levier 2 3 Performances Pression max 6 3bar Puissance 900W Consommation d air...

Страница 13: ...ur et la bride de tension Lib rer et enlever les trois vis de tension Enlever avec pr caution la rondelle lastique avec les trois billes le disque d entra nement et la rondelle Net toyer minutieusemen...

Страница 14: ...de polissage endommag s pr sentant un d faut de rondeur ou des vibrations ne doivent pas tre utilis s 3 3 Indications de travail La machine continue de tourner apr s avoir rel ch le levier de soupape...

Страница 15: ...remplacer 4 1 2 Remplacement du tuyau d amen e d air Retierer le tuyau d chappement d air voir point 4 1 1 Desserrer le collier de serrage et retierer le tuyau d ame n e d air du raccord du branchemen...

Страница 16: ...ervice 2 2 1 turn on Turn off 1 Notes on Safety Tilt lock forward an press lever onplastic sleeve Releas ing the lever switches the machine OFF 2 3 Rating data Pressure max 6 3bar Power output 900W Ai...

Страница 17: ...cking flange Loosen and remove the three clamping screws Carefully remove the spring washer with the three balls the drive plate and the washer Thoroughly clean all parts Replace defective parts Lubri...

Страница 18: ...d grinding tools which are dam aged which do not run true or which vibrate 3 3 Working instructions To run the machine down release the valve lever On failure of the compressed air release the valve l...

Страница 19: ...Replacement of the supply hose Remove the exhaust air hose see 4 1 1 Detach the hose clamp and pull the supply hose off the connection nipple 19 Portug es Espa ol Italiano English Fran ais Deutsch En...

Страница 20: ...mento 1 Prescrizioni di sicurezza Ribaltare in avanti il bloccaggio e premere la leva contro la guaina in plastica Rilasciando la leva la macchina si spegne 2 3 Dati sulle prestazioni Pressione massim...

Страница 21: ...i tensione Allentare e togliere le tre viti ad espansione Togliere con cura il disco a molla con le tre sfere il trasci natore e la ranella Pulire accuratamente tutte le parti So stituire i pezzi dife...

Страница 22: ...namento senza carico almeno per 30 secondi Non utilizzare utensili abrasivi danneggiati non rotondi oppure vibranti 3 3 Modalit di lavoro La macchina continua ancora a funzionare per un certo periodo...

Страница 23: ...Sostituzione del tubo di alimentazione dell aria Togliere il tubo di espulsione dell aria vedere pun to 4 1 1 Staccare la cravatta fermatubi e sfilare il tubo di alimenta zione dell aria di alimentaz...

Страница 24: ...relativas a seguridad El bloqueo se debe inclinar hacia delante y presionar la palanca contra la cubierta de pl stico Soltando la palan ca se detiene la m quina 2 3 Datos de rendimiento Presi n m x 6...

Страница 25: ...se ha descrito an teriormente Quitar la tuerca y la brida de sujeci n Aflojar y quitar los tres tornillos tensores Quitar con cuidado el disco el stico con las tres bolas as como el disco de arrastre...

Страница 26: ...gundos sin carga No utilizar tiles para lijar deteriorados desequilibrados o que vibren 3 3 Instrucciones de trabajo La m quina sigue trabajando aunque se haya soltado la palanca de accionamiento de l...

Страница 27: ...suministro del empalme de conexi n 4 1 2 Substitui o da mangueira de alimenta o de ar Remover a mangueira de escape ver ponto 4 1 1 Soltar a abra adeira da mangueira e puxar a mangueira del alimenta...

Страница 28: ...dicac es sobre seguranca Inclinar o bloqueio para a frente e premir a alavanca no inv lucro de pl stico Altrav s da liberta o da alavanca a m quina p ra 2 3 Caracter sticas t cnicas Press o m x 6 3bar...

Страница 29: ...montar a porca e a flange de aperto Soltar e retirar os tr s parafusos de aperto Retirar cuidadosamente o disco de mola com as tr s esferas o disco propulsoro e a anilha Limpar todas as partes cons ci...

Страница 30: ...s N o utilizar ferramentas para polir danificadas que n o estejam redondas ou que pro duzam vibra es 3 3 Indica es para o trabalho A m quina continua a trabalhar mesmo depois de se soltar a alavanca...

Страница 31: ...e substitu la 31 Portug es Espa ol Italiano English Fran ais Deutsch Portug es...

Страница 32: ...er la futura consultazione Salvo modificaciones Guardar esta documentaci n para un uso futuro Sujeito a modifica es Para ler e conservar OTTO SUHNER AG CH 5201 Brugg Phone 41 56 464 28 28 Fax 41 56 46...

Отзывы: