background image

7

4. S/PDIF (optical) 

 Use an optical cable to connect your TV to a compatible digital amplifier or Home 

theatre set.

5. CI 


Insert a Conditional Access Module (CAM).

6. Mini AV IN   

 To connect your video camera or other device using 3.5 mm AV cable to your TV to 

play videos on your TV screen.

7. USB 2.0 


USB 2.0 port. 

8. HEADPHONE 

 Headphone or Earphone audio output, speakers will be muted when earphone is 

plugged in and headphone selected.

9. LAN 


 Connect to your Internet router to access the internet/apps.

10. HDMI 3   

 Connect HDMI input signal from a signal source such as DVD, Blu-ray player or game 

console.

11. HDMI 2   

 Connect HDMI input signal from a signal source such as DVD, Blu-ray player or game 

console.

12. USB 2.0   

USB 2.0 port. 

50UD7553 & 55UD7553

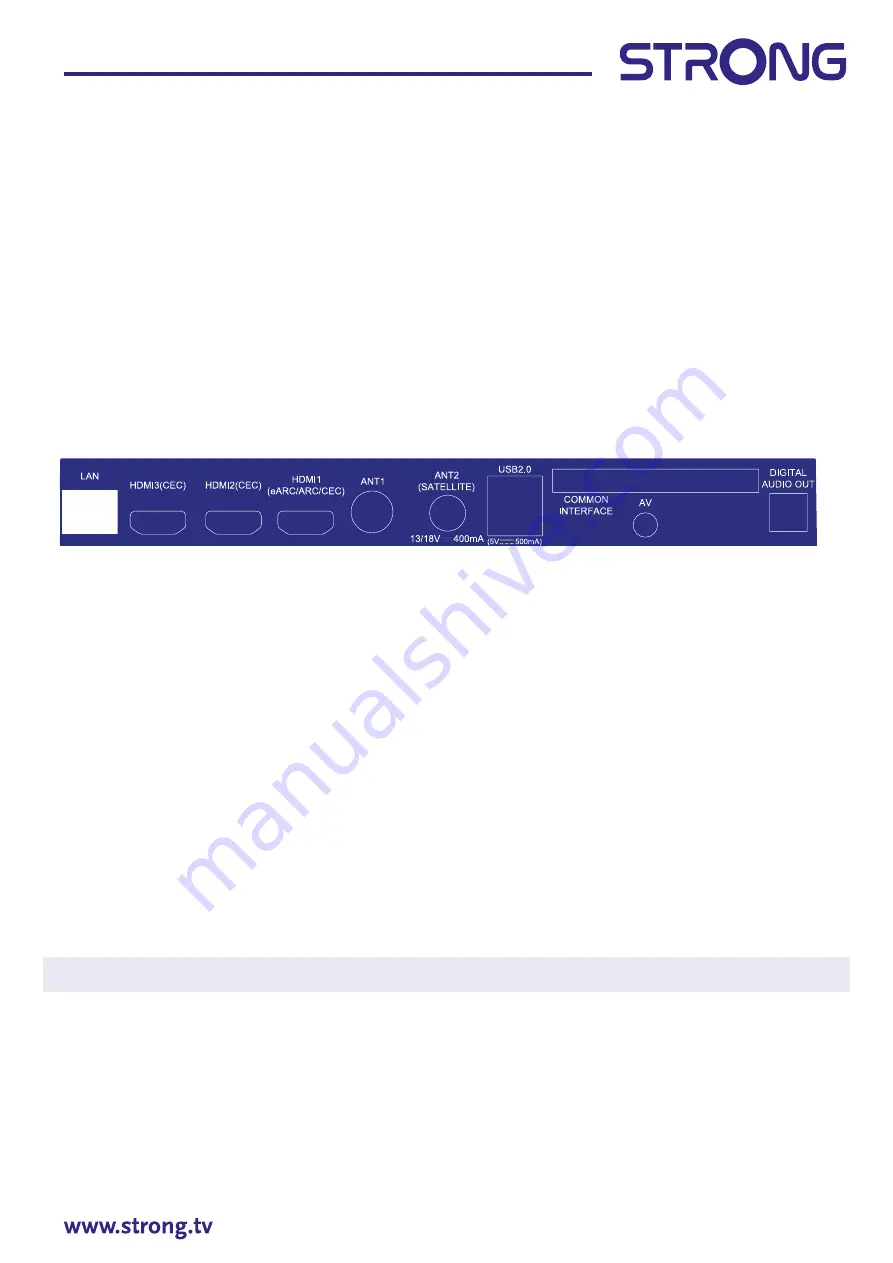
1. LAN 


 Connect to your Internet router to access the internet/apps.

2. HDMI 3 


 Connect HDMI input signal from a signal source such as DVD, Blu-ray player or game 

console.

3. HDMI 2 


 Connect HDMI input signal from a signal source such as DVD, Blu-ray player or game 

console.

4. HDMI 1 (ARC) 

 Connect HDMI input signal from a signal source such as DVD, Blu-ray player or 

game console or directly to a Digital Amplifier that supports the ARC function. This 

input is equipped with the ARC (Audio Return Channel) feature to implement audio 

connections and for a full Dolby Audio support.

5. ANTENNA IN 1 

 Connect a coaxial cable to receive signal from the DVB-T/T2 antenna or DVB-C cable.

6. ANT 2/ SAT IN 

 Connect a coaxial cable to receive signal from the Dish LNB. Connect a coaxial cable 

to receive signal from the DVB-T/T2 antenna or DVB-C cable.

7. USB 2.0 


2x USB 2.0 port. 

8. CI 


Insert a Conditional Access Module (CAM).

9. Mini AV IN   

 To connect your video camera or other device using 3.5 mm AV cable to your TV to 

play videos on your TV screen.

10. S/PDIF (optical) 

 Use an optical cable to connect your TV to a compatible digital amplifier or Home 

theatre set.

11. HEADPHONE 

 Headphone or Earphone audio output, speakers will be muted when earphone is 

plugged in and headphone selected.

NOTE: If the TV turns off when you plug a cable to any connector, just turn it on again.

2.4 Remote controls

This TV model supplies with 2 Remote control units (RCU). 

First one is simpler and more modern. It has minimalistic design, small quantity of buttons and is good 

enough for everyday usage. This is IR and RF RCU. This meaning, that you could use it as traditional IR RCU, 

pointing it on your TV and, if you made pairing of it via Bluetooth wireless connection, you will be able to 

control your TV without pointing RCU directly on your TV. Please refer to <Chapter 3> and other chapters for 

more information how to make pairing of this RCU with your TV 

Содержание 32HD5553

Страница 1: ...ti útmutató Uživatelský manuál Brugervejledning Brukerveiledning Gebruiksaanwijzing Användarhandbok Korisnički priručnik Ръководство на потребителя Посібник користувача SMART ANDROID TV WITH DVB T2 C S2 32HD5553 SRT 40FD5553 HD 43UD7553 50UD7553 55UD7553 UHD Picture similar www strong tv 02 12 2022 14 59 ...

Страница 2: ...2 100 06 125 support_sk strong tv 0850 15 05 50 support_ua strong tv 380 44 238 61 50 386 1 828 08 58 support_nl strong tv support_it strong tv 199 404 032 Da rete fissa 24 8 cent al min 12 5 cent scatto alla riposta Da rete mobile max 49 cent al min 15 6 cent scatto allo risposta support_bg strong tv 359 32 634451 support_es strong tv 34 91 119 61 76 support_cz strong tv 844 44 44 90 support_de s...

Страница 3: ...Y THE OWNER OF THE PRODUCT THIS PRODUCT MAY NOT BE USED IN CONNECTION WITH HEVC ENCODED CONTENT CREATED BY A THIRD PARTY WHICH THE USER HAS ORDERED OR PURCHASED FROM A THIRD PARTY UNLESS THE USER IS SEPARATELY GRANTED RIGHTS TO USE THE PRODUCT WITH SUCH CONTENT BY A LICENSED SELLER OF THE CONTENT YOUR USE OF THIS PRODUCT IN CONNECTION WITH HEVC ENCODED CONTENT IS DEEMED ACCEPTANCE OF THE LIMITED A...

Страница 4: ...installations for Antenna 15 3 3 Channel installations for Satellite 16 4 HOME SCREEN 18 4 1 Inputs 19 4 2 Network Internet 19 5 0 LIVE TV USAGE 21 5 1 Channel installation 22 5 2 Watching TV channels 22 5 3 Electronic Program Guide EPG 22 5 4 TV Menus 23 6 SMART TV POSSIBILITIES 24 7 SYSTEM SETTINGS 25 7 1 Settings main menu 25 7 2 Device Preferences menu 25 8 MULTIMEDIA 26 8 1 Reminder when usin...

Страница 5: ...something like that It shall be free from sharp edges or similar which can cause abrasion of the power cord set When put into use again please make sure the power cord is not damaged In case of damages please get the power cord replaced by a similar one with the same specifications The absence of a light indication on the apparatus does not mean that it is fully disconnected from the mains To disc...

Страница 6: ... unsafe situations please do not place any objects on top of the set This apparatus can be used in tropical and or moderate climates This user manual provides complete instructions for installing and using this TV The symbols serve as follows WARNING Indicates warning information NOTE Indicates any other additional important or helpful information MENU Represents a button on the remote control or ...

Страница 7: ...e DVB T T2 antenna or DVB C cable 5 HDMI 1 ARC Connect HDMI input signal from a signal source such as DVD Blu ray player or game console or directly to a Digital Amplifier that supports the ARC function This input is equipped with the ARC Audio Return Channel feature to implement audio connections and for a full Dolby Audio support 6 CI Insert a Conditional Access Module CAM 7 Mini AV IN To connec...

Страница 8: ...e audio output speakers will be muted when earphone is plugged in and headphone selected 9 LAN Connect to your Internet router to access the internet apps 10 HDMI 3 Connect HDMI input signal from a signal source such as DVD Blu ray player or game console 11 HDMI 2 Connect HDMI input signal from a signal source such as DVD Blu ray player or game console 12 USB 2 0 USB 2 0 port 43UD7553 1 HDMI 1 ARC...

Страница 9: ...urn Channel feature to implement audio connections and for a full Dolby Audio support 5 ANTENNA IN 1 Connect a coaxial cable to receive signal from the DVB T T2 antenna or DVB C cable 6 ANT 2 SAT IN Connect a coaxial cable to receive signal from the Dish LNB Connect a coaxial cable to receive signal from the DVB T T2 antenna or DVB C cable 7 USB 2 0 2x USB 2 0 port 8 CI Insert a Conditional Access...

Страница 10: ...gle Play Press for direct access to Google Play 12 VOL Adjust the volume up or down 13 Press to activate the voice control function Membership is not included Netflix is available in selected countries Streaming Netflix requires to set up an account Broadband Internet required See www netflix com TermsOfUse for details Membership is not included Prime is available in selected countries Streaming p...

Страница 11: ...information about the current source 5 Press to display EPG info in TV mode 6 Press to access the TV settings 7 EXIT Exit the current menu 8 Press to go back to previously viewed channel In menu Back to previous menu 9 Enter the home desktop 10 Navigate the menu 11 OK Confirm the selection 12 NETFLIX Press for direct access to Netflix 13 YouTube Press for direct access to YouTube 14 prime video Pr...

Страница 12: ...unt Broadband Internet required See www primevideo com for details 2 5 Installing the batteries Fig 5 Place 2x AA batteries in the battery compartment of the smaller remote control and 2 x AAA in the battery compartment of the bigger remote control Make sure to match the polarity markings inside the compartment Note Pictures are for reference only Actual items may be different 1 Open the cover 2 P...

Страница 13: ...s TV is equipped with two remote controls You can choose to use both remote controls or just one However it is possible to pair only one Remote Control no matter which one in any case the second remote control can still be used in the traditional way without a Bluetooth connection as the first one 3 FIRST TIME INSTALLATION After all connections have been made properly switch your TV on Please foll...

Страница 14: ...f it usage Step 3 You can easily transfer your Android phone s Wi Fi network and Google Account to your TV Step 4 Select your Wi Fi network to connect to the internet Alternatively it is also possible to connect an Ethernet cable to the input on the rear panel Step 5 Password setting Input password Password Please set password 0000 is invalid Con nue Skip Quickly set up your TV with your Android p...

Страница 15: ...igital Analogue 3 1 Channel installations for cable Select the tuner mode Cable and press OK to continue Select one operator from the following list or select Other if you don t have a predefined operator or it is different from those listed Once done press OK to continue Note Not all countries have predefined operators If the country you have selected does not have one this step will be skipped S...

Страница 16: ...g the value and to start the channel scan In the next step the channel scan started and will take some minutes to complete Scanning The channel scan may take a while to complete Digital Channels 0 Analog Channels 0 Progress 7 Channel scan First please connect the cable Star the channel scan now If you skip this step the channel scan could be performed in Menu Digital and analog channels Only analo...

Страница 17: ...ic channel ordering is the default method Pay TV ordering allows the customer to select the display of channel numbers that is suitable for them Use Automatic channel ordering when Pay TV ordering cannot install channels Press OK to continue First step is to connect the Antenna cable Then you must start the channel scan You can choose between Digital and analogue channels Only analogue channels or...

Страница 18: ...atellite and press OK to continue Press OK to start with the satellite channel installation Satellite installa on Do you want to start satellite channel installa on Start Antenna Cable Satellite Tuner Mode Please select your tuner mode Scanning The channel scan may take a while to complete Digital Channels 0 Analog Channels 0 Progress 7 ...

Страница 19: ...t Single By selecting Next you go to the Select the Operator page while by selecting More you access the Satellite antenna type page if it is necessary to set the DiSEqC or Unicable If you are looking for the LNB list you have to go to General and press OK LNB list Next Astra4A SES5 5E On Eutelsat 7E Off Eutelsat 9E Off Hotbird 13E Off ...

Страница 20: ... search information or content related with this text Notification corner which provide information about system notifications and messages It also gives quick access to TV inputs connections settings and show current system time Application line Apps which contain the list of most used applications including Live TV application and others and icon Apps for access to complete applications list ins...

Страница 21: ...TV installed channels preview or HDMI 1 HDMI 2 HDMI 3 and AV to select connection from external devices To access to this option select Inputs item on Home screen or press INPUT button on RCU Select the input sources for the devices which are connected to the TV through the different inputs or ports 4 2 Network Internet Connection to internet allows to install and use internet applications i e You...

Страница 22: ...et service provider NOTE Instructions below are just the usual ways to connect your TV to a wired or wireless network The connection method may differ depending on your actual network configuration If you have any questions about your home network please refer to your Internet service provider Connecting to a wired network Fig 6a Note The graphics are for representation only Search Home Discover A...

Страница 23: ...le networks list and enter password for connection 3 Use other options of menu to configure the connection if required Please refer to chapter 6 to read more about Smart features of your TV 5 0 LIVE TV USAGE Select Live TV application from Home screen or one of TV sources from input menu to watch live TV channels Press OK to start this application This application gives you access to live TV to wa...

Страница 24: ...ompleted you can use TV set for watching of installed TV programs Some helpful features for comfortable watching Changing channels Following ways are possible for changing channels Via direct access using the 0 9 buttons Via the or P P buttons Via the channel list using OK and buttons Use P P or buttons in the list to move through list Page Up or Down Info Banner While watching TV you can press IN...

Страница 25: ...ne in time bar shows current time Selected program has progress bar in different colour which shows how much time passed from the beginning of the program 5 4 TV Menus You can use access to menus of Live TV application to make changes in channels viewing and set other options It has 2 levels Channels and TV options default This menu organized as lines of icons To display the TV options menu press ...

Страница 26: ... to modify the settings relating to the Audio in all its parameters Power allows you to change all settings related to device management such as the Sleep Timer or automatic Power off in case of no signal CI Card if an CAM device is used this option allows access to the main menu of the CAM or the Card connected to it Advanced Options allows you to manage among other things the primary and seconda...

Страница 27: ...een or by pressing the button on the remote control 7 1 Settings main menu In this menu it is possible to add modify and manage your account Accounts sign in manage the network connection Network internet or Applications Apps and other important functions necessary for optimal use of the TV For Network internet connections please refer to Chapter 4 2 It is possible to pair external devices such as...

Страница 28: ...be compatible to operate smoothly with this TV 2 Back up all the data in the USB storage device in case data is lost due to an unexpected accident STRONG does not assume any liability for the losses by misuse or malfunction Data backup is consumer s responsibility 3 For large file sizes the loading speed may be slightly longer 4 The recognition speed of a USB storage device may depend on each devi...

Страница 29: ...ould contain built in abilities to support various formats and types of Multimedia files Connect a USB storage device to the USB port run Smart Player and select the types of media on the Multimedia selection part of screen Video Picture or Music In Device you can select the device containing the files to be played Your TV will collect all supported files of selected media type and will show them ...

Страница 30: ...out the file Available Menu options Picture gives access to all settings relating to the screen Sound gives access to all settings relating to audio Aspect Ratio this option allows you to adapt the video format to the screen Play Mode video file playback settings Subtitle to show subtitles on screen if available Audio Track to select the audio track if available Menu Sound Sub tle Picture Aspect R...

Страница 31: ... to control playback during playback press OK button to display the menu or button to display more content Available options Rotation to rotate picture on screen Play Pause to play or pause the slideshow playback Information display detailed information about file Menu access the menu to set the background music 8 2 3 Play music Select Music from Multimedia type selection and choose file for playb...

Страница 32: ...tion No picture no sound 1 Check if the fuse or circuit breaker is working 2 Plug another electrical device into the outlet to make sure it is working or turned on 3 The power plug is in bad contact with the outlet 4 Check the signal source No colour 1 Change the colour system 2 Adjust the saturation 3 Try another channel Black white programme may be received The remote control does not work 1 Cha...

Страница 33: ...D content Read write speed of your USB device could be too low Make sure to use a USB storage device with sufficient speed and space Pen drives USB sticks may not support sufficient speed No signal or weak signal intermittent reception a Cables might have loosened moisture might have entered into cables or connectors heavy rain at present or heavy storm at present Check the cable connections LNB a...

Страница 34: ...N 1x SAT IN 1x CI 3x HDMI 2x USB 1x LAN RJ 45 1x S PDIF optical 1x AV IN 3 5 mm 1x HEADPHONES General Data Operating voltage 100 240 V AC 50 60 Hz Power consumption 32 max 55 W typ 33 W 40 max 74 W typ 47 W 43 max 110 W typ 66 W 50 max 135 W typ 80 W 55 max 160 W typ 100 W Power consumption in standby 0 5 W Operating temperature 5 C 35 C Storage temperature 15 C 45 C Operating humidity 20 80 RH no...

Страница 35: ...he providers of the services may use such information to improve its products or to provide services or technologies to you as long as it is in a form that does not personally identify you Additionally please keep in mind that some services provided already in the device or installed by you may request a registration for which you have to provide personal data Besides that please be aware that som...

Отзывы: