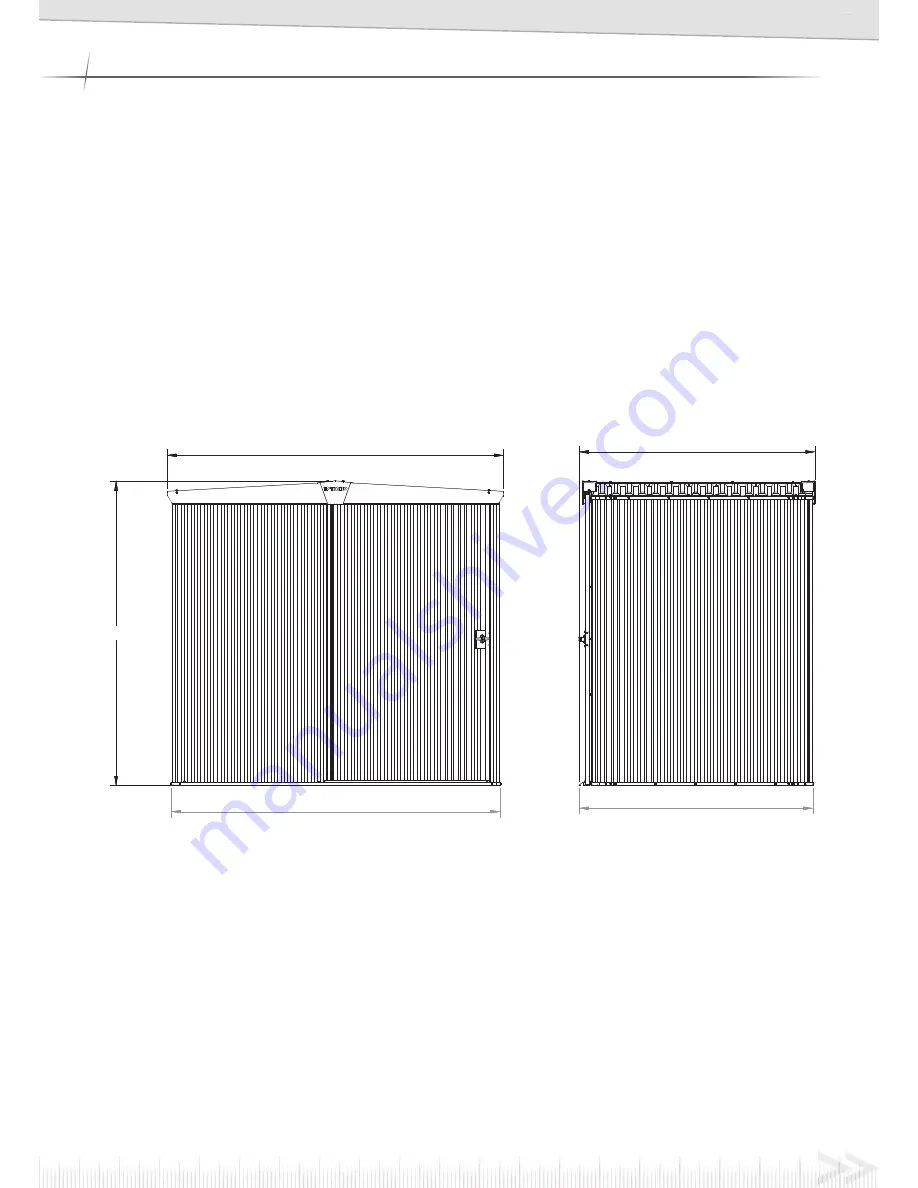
2.21
2.00
1.55
2.16
1.53
4
SITE AND ASSEMBLY PREPARATION
Preventing Wind Uplift
All Stratco Handi-Mate
TM
Sheds must be securely bolted to a permanent concrete base with sufficient
masonry anchors to prevent wind uplift. It is particularly important that masonry anchors are placed
within all four corner brackets of the Handi-Mate
TM
Shed. Further anchors and mounting brackets are
also used to fix the Hand-Mate Garden Shed to the permanent concrete base according to shed size. The
mounting brackets are to be evenly spaced along the length of the wall.
Stratco Handi-Mate
TM
mounting bracket kits can be purchased at Stratco Home Improvement Stores.
Concrete Floor
Option 1
- Before building the shed, pour a base that is larger than the area by at least 200mm in each
direction. The base should be poured so the concrete that will be outside the shed floor area slopes away
from the shed to help prevent water from entering the shed.
Option 2
- Substantial concrete squares may be used at each anchor location as an alternative to a
complete concrete floor.
Important Notes
It is essential to clear and level the site prior to assembling your Stratco Handi-Mate
TM
Shed.
Before starting to build the shed, please refer to the previous pages of this guide for a list of recommended
shed assembly tools and shed components.
Also note there are different types and colour screws. Ensure that the right type and colour screw is
being used at each location.
It is recommended to not walk on the roof. Should the roof need to be traversed, weight shall be kept
to the ridge support beam. Wear flat, rubber soled shoes and walk flat footed, spreading your weight as
close to the peak of HMRC1450GA as possible.
Содержание Handi-Mate HMGSHM4AZ
Страница 6: ...1 2 5 DOOR ASSEMBLY HMDW HMDW HMNN6 HMNN6 HMDCTO1090GA HMDCVE1900GA WTK1016 ...
Страница 9: ...1 2 8 WALL ASSEMBLY SSPHMWSCNR1900 SSPHMWS1900 SSPHMWS1900 HMWC2100GA HMWC2100GA ...
Страница 14: ...13 3 ...
Страница 16: ...5 15 TEKNNW1016 TEKNNW1016 HMRRBO2047GA HMBS2047GA ...
Страница 18: ...8 17 TURN UP VALLEYS ON SHEET TO ENCOURAGE WATER TO FLOW TOWARDS WALLS TEK1016 0mm 1 2 3 1 3 2 ...
Страница 20: ...11 19 WTK1022 TIGHTEN SCREW ...
Страница 21: ...12 20 HMDSBO1010GA TEKNNW1016 X2 TEKNNW1016 ...
Страница 22: ...13 21 TEK1016 10mm MAX 20mm HMBCL1090 ...
Страница 23: ...HMBCR1090 HMBCL1090 TEK1016 HMBCR1090 14 22 ...


