background image

Stratasys J4100 User Guide

4 Operating and Maintaining the Printer

DOC-26000 Rev. C

4-55

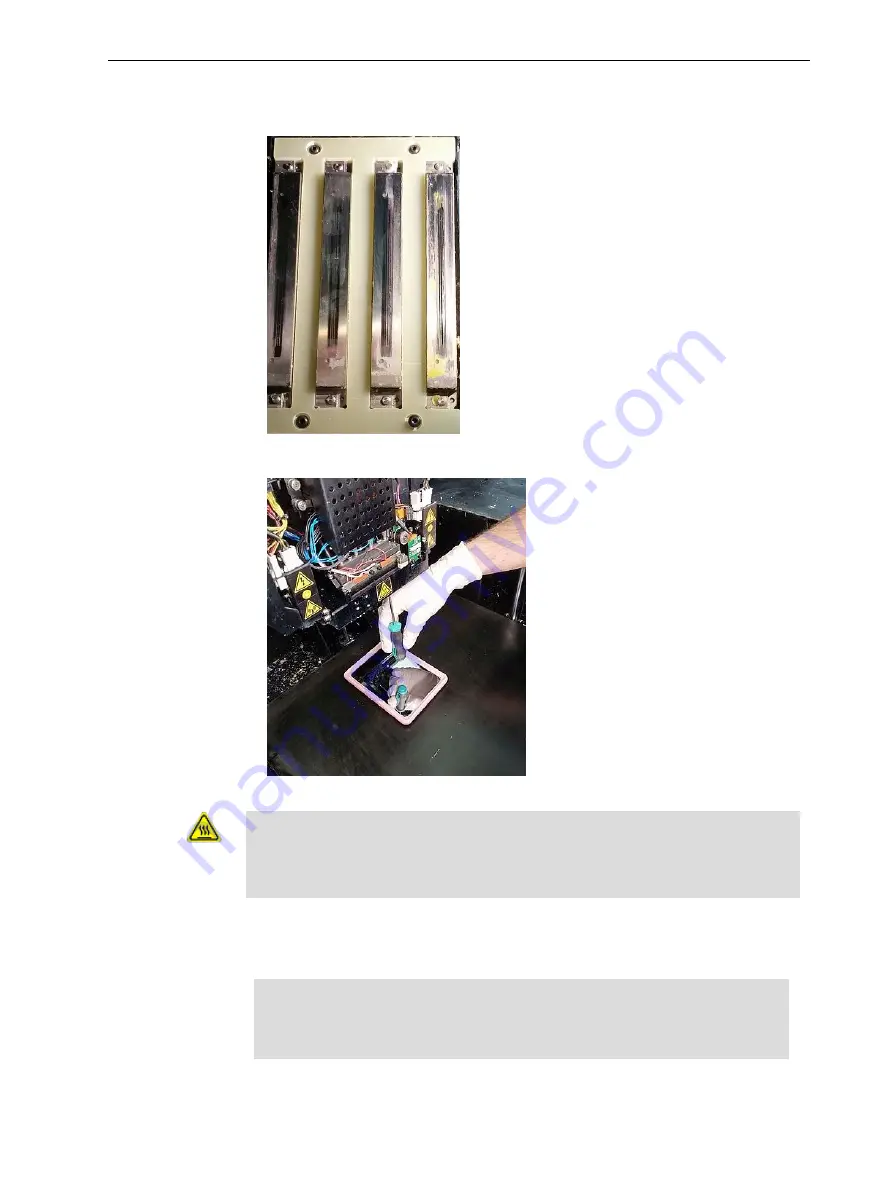
4.  Using a 2-mm hex (Allen) key, remove the screws to remove the splash 

shield.

Figure 4-68    Print-head splash shield installed on the print block

Figure 4-69    Removing the print-head splash shield

Warning: Hot Surface

The print head orifice plates (bottom surface) may be hot. Do not touch them 
with your bare hands, and proceed with caution.

5.  Soak a cleaning cloth with 90% alcohol and clean the splash shield.

6.  Return the splash shield to the print block and secure it with four (4) screws.

After cleaning the print heads and the splash shield, continue with step 9 in 
the daily cleaning routine (see "Cleaning the Print Heads, UV Lamp Glass, 
Roller and Wiper" 
on page 4-40).

Содержание J4100

Страница 1: ...DOC 26000 Rev C 3D Printing System User Guide Stratasys J4100 ...

Страница 2: ...Union this symbol indicates that when the last user wishes to discard a product it must be sent to appropriate facilities for recovery and recycling For information about proper disposal check your purchase contract or contact the supplier of the equipment Limitation of Liability The product software or services are being provided on an as is and as available basis Except as may be stated specific...

Страница 3: ...3 7 209 797 7 364 686 7 369 915 7 500 846 7 604 768 7 628 857 7 658 976 7 725 209 7 896 639 7 958 841 7 962 237 7 991 498 7 996 101 8 219 234 8 278 866 8 323 017 8 469 692 8 781 615 8 865 047 8 932 511 9 017 589 9 020 627 9 031 680 9 227 365 Stratasys Ltd www stratasys com DOC 26000 Revision C January 2021 DOC 26000 Rev C ...

Страница 4: ... 2 5 Printer Installation 2 5 Printer Operation 2 5 UV Radiation 2 6 Printer Maintenance 2 6 Model and Support Materials 2 6 UV Lamps 2 7 First Aid for Working with Printing Materials 2 8 Contact with Skin 2 8 Contact with Eyes 2 8 Ingestion 2 8 Inhalation 2 9 Waste Disposal 2 9 3 Introducing the 3D Printer Work Configurations 3 2 Source Files 3 3 Printing Materials 3 4 Storage 3 4 Shelf Life 3 4 ...

Страница 5: ...Backing up the Printer Configuration 4 36 Improving Print Quality 4 37 Cleaning the Print Heads UV Lamp Glass Roller and Wiper 4 37 Cleaning the Roller Waste Collector and Inspecting the Roller Scraper 4 42 Replacing the Roller Scraper 4 46 Aligning the Print Heads 4 49 Cleaning the Print Head Splash Shield 4 54 Optimizing Calibrating Print Heads 4 56 Replacing Print Heads 4 64 Testing and Calibra...

Страница 6: ...terial 5 3 Removing Support by Hand 5 3 Removing Support with Water Pressure 5 4 Removing SUP705 with Caustic Soda 5 4 Post Printing Treatment 5 5 Photobleaching for Transparent Models 5 5 Storing Models 5 5 DOC 26000 Rev C v ...

Страница 7: ... 1 1 1 About This Guide Using This Guide 1 2 For More Information 1 2 Revision History 1 2 Terms Used in This Guide 1 3 Additional Resources 1 4 Stratasys Academy 1 4 Stratasys Support Center 1 5 GrabCAD Community 1 5 ...

Страница 8: ... Windows PC platform For More Information Visit the Stratasys Support Center to download the latest revision of this document This document is also available on the Support Center in other languages If you have any questions or comments about the way information is presented in this guide or if you have any suggestions for future editions please send a message to c support stratasys com Revision H...

Страница 9: ...o the number of client workstations GrabCAD Print A software application for preparing print jobs on a variety of 3D printers including J4100 printers Mixed part Models whose parts are printed using more than one model material Mixed tray A build tray containing objects each of which is designed to be printed using a different model material Model material Material used for building models Printer...

Страница 10: ...nd the technology A wealth of information is available on our online digital platforms Stratasys Academy Stratasys Academy is your online learning platform Here you can browse our extensive and growing course catalog register to webinars view tutorials and videos at your own pace and enroll in face to face in person courses We encourage you register and start your leaning journey today ...

Страница 11: ...on you can check the latest revision of the user guide for your printer and download documents in different languages The Support Center is available in multiple languages You can change the display language using the language drop down menu in the top left corner of the homepage GrabCAD Community The Tutorials section of GrabCAD Community portal is a valuable source for Stratasys sponsored and us...

Страница 12: ...Guidelines 2 5 Printer Installation 2 5 Printer Operation 2 5 UV Radiation 2 6 Printer Maintenance 2 6 Model and Support Materials 2 6 UV Lamps 2 7 First Aid for Working with Printing Materials 2 8 Contact with Skin 2 8 Contact with Eyes 2 8 Ingestion 2 8 Inhalation 2 9 Waste Disposal 2 9 ...

Страница 13: ...sult in serious personal injury If the safety lock does not function correctly do not use the printer and contact your service provider UV Screening The transparent section of the doors blocks harmful UV radiation allowing the operator to view the model as it is being made Circuit Breaker The power to the printer is turned off in case of electrical overcurrent Note The circuit breaker is only acce...

Страница 14: ...er Important Pushing the emergency stop switch disconnects power to the motors only This switch does not disconnect the power supply to the printer printer circuits remain live Figure 2 1 J4100 front view Figure 2 2 J4100 rear view If the printer is not used as specified in this guide these safety features may not provide adequate protection ...

Страница 15: ... the printer Hot surface On the print block Risk of burns Do not touch this surface after printing High voltage Near the UV lamp connectors Near the power supply enclosures Risk of electric shock Disconnect the power before servicing Ultraviolet radiation Risk of injury to skin and eyes from ultraviolet radiation Disconnect the power before servicing Moving parts At the sides of the build tray vis...

Страница 16: ...nected to a grounded power outlet FI Laite on liitettävä suojakoskettimilla varustettuun pistorasiaan NO Apparatet må tilkoples jordet stikkontakt SE Apparaten skall anslutas till jordat uttag DK Apparatets stikprop skal tilsluttes en stikkontakt med jord som giver forbindelse til stikproppens jord Leave a minimum of 100 centimeters 40 inches between ventilation openings and walls or other objects...

Страница 17: ...vant safety precautions Notify co workers and those who have access to the printer before beginning non routine and hazardous work Report any potential dangers and safety related accidents to your safety officer or to other appropriate authorities Model and Support Materials Model and Support materials are made of chemical substances Although precautions must be taken when handling these materials...

Страница 18: ...llowed by soap and water Dispose of the absorbent material in accordance with local regulations Do not wash contaminated clothing at home clothing should be professionally laundered Dispose of contaminated shoes belts and other leather items in accordance with any applicable regulations Absorbed printing material may re expose the user when these items are worn UV Lamps UV lamps used by the printe...

Страница 19: ...kin Do not use solvents to clean skin If large areas of skin have been exposed or if prolonged contact results in blisters seek medical attention In any case if irritation persists seek medical attention Avoid the accidental transfer of printing material from the hands to other areas of the body especially to the eyes If protective cream was used do not reapply it until the skin has been completel...

Страница 20: ...st be packaged and disposed of in a manner that prevents human contact with it and contamination of water sources Empty Model material and Support material containers contain residue of their contents Some leakage of this residue may occur through the broken container seal Therefore handle and store empty containers with care Do not attempt to reuse empty containers and do not puncture them Dispos...

Страница 21: ...Rev C 3 1 3 Introducing the 3D Printer Work Configurations 3 2 Source Files 3 3 Printing Materials 3 4 Storage 3 4 Shelf Life 3 4 Exposure to Light 3 4 Safety Considerations 3 5 Disposal 3 5 Work Environment 3 5 ...

Страница 22: ... systems or as multi station systems When connected to a local computer network the system can serve multiple users In such configurations each user client prepares files for production A server in the printer processes jobs and controls the printing Figure 3 1 shows the printer set up in a multi client configuration Figure 3 1 Multi client network configuration ...

Страница 23: ...me other 3D applications GrabCAD Print supports STL VRML OBJ and 3MF files In addition GrabCAD Print supports native CAD formats from these programs Creo SOLIDWORKS NX CATIA and Inventor To see the complete list of file formats supported by GrabCAD Print go to help grabcad com print file formats J4100 systems feature the capability of producing different types of model files simultaneously ...

Страница 24: ...lastics made from monomer soluble substances such as polystyrene or polyvinyl chloride are not suitable for storing PolyJet printing materials When not in use keep material containers tightly sealed to prevent contamination the effects of exposure to UV radiation and accidental spillage Store material containers indoors in a dry area with adequate ventilation between 15 25 degrees Celsius 59 77 de...

Страница 25: ...ndled Keep them separate from food and drink Cured plastic parts however are safe They can be handled and stored without precautions You can find more safety information about resins in l Safety Guidelines on page 2 5 l First Aid for Working with Printing Materials on page 2 8 Disposal Dispose of containers of model and support material in accordance with all applicable laws and regulations Work E...

Страница 26: ...ing 4 20 Advanced Settings 4 23 Keeping the Printer in Idle Mode 4 26 Shutting Down the Printer 4 27 Maintaining the Printer 4 30 Routine Maintenance Schedule 4 30 Maintenance Counters 4 31 UV Lamp Check 4 33 Pattern Test 4 33 Backing up the Printer Configuration 4 36 Improving Print Quality 4 37 Cleaning the Print Heads UV Lamp Glass Roller and Wiper 4 37 Cleaning the Roller Waste Collector and I...

Страница 27: ...brating the UV Lamps 4 74 Replacing the Roller Waste Tubes 4 82 Calibrating the Load Cells 4 87 Replacing the UV Lamps 4 88 Dynamic Nozzle Test 4 98 Built in Tests 4 99 Replacing Waste Containers 4 105 Cleaning the Exterior Panels 4 105 Cleaning the UV Screen 4 105 ...

Страница 28: ...not attempt to operate the printer before being trained by an authorized Stratasys representative l Observe all safety warnings and follow the safety guidelines described in Chapter 2 1 Turn on the main power switch located at the back of the printer Figure 4 2 Main power switch The main power switch turns on the J4100 printer which includes the built in computer ...

Страница 29: ...dows Start menu select All Programs Objet J4100 A HASP plug containing a valid product activation key is required on the printer computer This is supplied during printer installation or upgrade If the application does not open and a HASP message appears contact your Stratasys dealer or service provider The printer control computer displays the main printer interface All monitoring and controlling ...

Страница 30: ...n in the interface screen corresponds to their location in the printer The waste containers are placed outside of the printer typically in the back The printer uses RFID technology to automatically identify containers of printing material Tampering with the RFID module will render the printer inoperable and may void Stratasys warranties and service contracts Important If you need to replace the pr...

Страница 31: ...about loading and replacing material containers l You can replace material containers either before or during printing l You can load partially used containers provided that they contain more than 100 grams of material l You can replace a partially used container to avoid the need for replacing it during printing l The container type is automatically detected by the printer If you replace a contai...

Страница 32: ...and handling of printed models Make sure that the build tray is installed when preparing the printer for producing models Caution Use protective gloves when cleaning the build tray and be careful of the sharp edges of the scraper blade 2 Check that the print heads and roller assembly are clean If not clean them before printing especially if the print job is longer than 100 hours 3 Make sure that t...

Страница 33: ...ue it is sent to the printer When switching the printer to online mode a message is displayed if a maintenance activity is required to ensure optimum printing quality See Routine Maintenance Schedule on page 4 30 Maintenance notifications can be disabled enabled from the Options menu Before printing a job the software executes a set of hardware and software tests to ensure optimum printing results...

Страница 34: ...or printing Green suitable ready for printing For example in Figure 4 6 on the previous page Heads C The heads have reached the temperature required for printing models Ambient The ambient temperature of the printing chamber is within the acceptable range Heads Liquid The level of Model and Support material in the print block reservoir is OK Heads Vacuum The vacuum level in the system is within th...

Страница 35: ...e The mode changes from Pre print to Printing The specific activity being performed is shown in the current activity field Current job printing information is displayed The printing progress bar is displayed The Stop and Pause buttons are enabled When the weight of a container drops below 100 grams the display of the material level in the printer interface is red Figure 4 7 Printer interface durin...

Страница 36: ...u need to resume printing from the print manager in GrabCAD Print After printing stops the printer goes into Standby mode when heating of the print heads is reduced About 10 hours later the printer goes into Idle mode when heating of the print heads is stopped To continue printing the model 1 If the printer is in offline mode switch it to online mode by clicking the red button at the bottom of the...

Страница 37: ...pped job Figure 4 9 Stopped job in the Schedule screen 5 Click on the job to display the Job Status details and click the Resume icon OR Right click on the job to display the pop up menu and select Resume job 6 In GrabCAD Print make sure that the correct slice number is entered in the dialog box Figure 4 10 Slice confirmation in GrabCAD Print ...

Страница 38: ... not appear in the printer interface even if the server computer displays the confirmation dialog box There was a relatively long interruption in printing even if the last slice and indicators are correct This is because the part already printed might slightly deform or shrink before printing continues causing a visible difference between it and the part of the model printed later The effects of a...

Страница 39: ...the Cancel icon 2 Remove the partially printed model from the build tray 3 Resend the job to the printer Click You can stop printing from either the printer interface or from GrabCAD Print After clicking the Stop button in GrabCAD Print you can resume printing from GrabCAD Print or from the printer interface After stopping printing from the printer interface you can resume printing only from the p...

Страница 40: ...ting models with different materials to avoid unnecessary waste of the materials currently loaded Note When performing manual material replacement certain replacement options are blocked to protect the system In these cases follow the recommendations of the Material Replacement wizard for best replacement options To replace the printing material with the wizard 1 Start the Material Replacement wiz...

Страница 41: ...for producing models 3 Materials High Speed Single Material Super High Speed Figure 4 13 Material Replacement Options 3 Materials Both sections of each print head are loaded with the same material Figure 4 14 Three materials loaded in the print heads Up to three Model materials are available with high speed printing ...

Страница 42: ... requires less flushing of material currently in the system However when one container is not sufficient loading two containers enables continuous printing until the print job is completed When one container empties and the other one is being used you can replace the empty container with a new one 7 For Support material select Both if you need to load two replacement containers In High Speed mode ...

Страница 43: ...f the printed models is unimportant Use this cycle when replacing cleaning fluid with any Model material The wizard flushes the system with the minimum amount of material needed to ensure that models have the mechanical properties of the new material Full Use this cycle when the printed models must have the exact color of the new material The wizard thoroughly flushes the feed tubes and print head...

Страница 44: ...on date of the container in this position has passed 11 Replace material containers as necessary according to the instructions in the wizard screen Make sure to securely attach the cap to partially used material containers when not loaded in the printer If not properly capped exposure to UV light could cause polymerization curing of the material making it unsuitable for printing 12 Click Start 13 ...

Страница 45: ... in these cases after changing the printing mode after replacing Vero with Digital ABS or Agilus30 Model materials and the reverse after replacing the Support material with cleaning fluid and the reverse See Optimizing Calibrating Print Heads on page 4 56 Changing Model Materials Without Flushing If you do not change the printing mode High Speed Super High Speed you can replace the Model materials...

Страница 46: ...When the Material Replacement Options screen opens select the Replace materials without flushing check box and click Next Figure 4 18 Replace materials without flushing 4 In the confirmation message that appears click Yes to continue Figure 4 19 Replace without flushing confirmation message ...

Страница 47: ...000 Rev C 4 22 5 In the Cartridge Positioning and Process Progression screen click Start Figure 4 20 Cartridge Positioning and Process Progression screen 6 Read the Warning message that appears and click OK to continue Figure 4 21 Warning message Material replacement begins ...

Страница 48: ... if there is a special need to load material containers in certain slot locations if you only want to change one of the material containers for a given material channel Some materials cannot replace certain other materials If you attempt to do so the wizard notifies you To select the container positions manually 1 In the Material Replacement Options screen click Advanced Settings 2 In the Advanced...

Страница 49: ...inter DOC 26000 Rev C 4 24 4 After selecting the materials for the appropriate cartridge slots the Cartridge Positioning screen appears Place the cartridges in the materials cabinet as shown in this screen Figure 4 24 Cartridge Positioning screen High Speed mode ...

Страница 50: ...require a more thorough flushing to ensure accurate model color Or you may notice that printed models are not satisfactory because they contain traces of the previous material If so you can flush out more material so that the next models will be printed with pure material To perform additional flushing cycles In the Advanced Settings screen select Enable flush again options and click Apply Figure ...

Страница 51: ...andby 1 no change next 1 minute Standby 2 after Standby 2 Idle heating stopped Note The printer mode is indicated in the upper section of the main printer interface screen see the figures on pages 4 4 and 4 10 If after printing a job you know that the printer will not be used for 16 minutes or more you can immediately turn off the heating of the print heads by putting the printer into Idle mode To...

Страница 52: ... for immediate servicing do not attempt to shut down the printer by simply closing the computer interface the printer control application and never disconnect power to the printer before completing this wizard Caution Turning off the printer for an extended period without first running the wizard can cause serious damage to print heads and other expensive printer parts Depending on the length of t...

Страница 53: ...he length of time that the printer will not be used less or more than 30 days Note Before selecting More than 30 days make sure that cleaning fluid cartridges are available Figure 4 27 Shutdown options 4 In the next screen verify that the tray is empty and click Next The shutdown procedure begins Figure 4 28 Shutdown progress ...

Страница 54: ...C 4 29 5 When the final wizard screen appears close all open programs on both computers and shut down the computers Figure 4 29 Final Shutdown wizard screen 6 After both printer computers shut down turn off the main power switch at the back of the printer see Figure 4 2 on page 4 3 ...

Страница 55: ...ler surface wiper build tray and surrounding area Cleaning the Print Heads UV Lamp Glass Roller and Wiper on page 4 37 Weekly Clean the purge unit waste collector See step 12 of Cleaning the Print Heads UV Lamp Glass Roller and Wiper Weekly Perform the Pattern test See Pattern Test on page 4 33 Weekly Back up the printer s configuration files See Backing up the Printer Configuration on page 4 36 W...

Страница 56: ...49 Monthly Remove and clean the print head splash shield See Cleaning the Print Head Splash Shield on page 4 54 Monthly Clean debris from the Z axis shaft with a vacuum cleaner Monthly Inspect the exhaust system duct fan connections Monthly Calibrate the load cells See Calibrating the Load Cells on page 4 87 Every two years or every 2500 hours of printing Preventive maintenance visit by service en...

Страница 57: ... Counters screen The Maintenance Required indicator appears by default for most operator performed maintenance tasks The check box under User Warning controls whether or not it appears when a particular task is due For maintenance tasks that are controlled by wizards the dates and printing times are reset automatically when the relevant wizard is run and completed successfully Manual maintenance t...

Страница 58: ...90 C 194 F a heat fuse turns off the electricity to the power to the UV lamp and the motors for the X Y and Z axes In the unlikely event that this occurs the printer cannot be used until it is serviced by an authorized service engineer Pattern Test The pattern test is the basic verification of the printer s ability to produce quality models since it demonstrates the condition of the nozzles in the...

Страница 59: ...re 4 34 Selecting Pattern Test 5 Click Yes in the Confirm dialog box to begin Figure 4 35 Pattern Test confirmation 6 If the build tray is not clear click No in the following dialog box Figure 4 36 Build tray Z level adjustment The build tray is lowered to prevent damage to models on the tray ...

Страница 60: ...same area indicates that the quality of printing when producing models will be poor If this is the case see Improving Print Quality on page 4 37 Note Acceptable model quality is subjective and depends on the type and scale size of the models produced As a rule however more than 10 missing lines in one area of a column is considered unacceptable If you do not see many missing lines but you suspect ...

Страница 61: ...ters can be restored from the backup The backup also saves the printer s log and the calibration and maintenance history To back up the printer configuration files 1 From the Options menu select Collect Service Data or Press F2 Figure 4 38 Selecting Collect Service Data from the Options menu 2 In the confirmation dialog box click Yes A zip file is saved in this folder STRATASYS_J4100 ServiceData 3...

Страница 62: ...ge sequence 3 Perform the pattern test If the results of the pattern test are still poor 1 Carefully clean the print heads again making sure there is no residue left on them 2 Perform the purge sequence 3 Perform the pattern test If the results of the pattern test are still poor Optimize the print heads and replace faulty print heads if necessary see Optimizing Calibrating Print Heads on page 4 56...

Страница 63: ...h or equivalent a mirror 2 Start the Cleaning wizard from the Options menu Figure 4 39 Options Wizards menu 3 Make sure that the build tray is in the printer and close the printer doors Confirm this in the wizard screen and click Next Figure 4 40 Preparation check After you indicate whether or not the build tray is clear the printer moves components to the cleaning position If there are models on ...

Страница 64: ...ning tasks Warning Hot Surface The print head orifice plates bottom surface may be hot Do not touch them with your bare hands and proceed with caution 5 Place the mirror on the build tray 6 Put on the gloves Caution Uncured printing material on the print heads might cause skin irritation Use disposable cleaning gloves to protect your hands 7 Soak the cleaning cloth with alcohol ...

Страница 65: ...ad splash shield See step 4 on page 4 55 9 Using the supplied cleaning sponge clean the glass lens on both UV lamps 10 Open the service window on the left side of the printer to access the wiper 11 Using the alcohol soaked cleaning cloth remove any material remaining on the wiper and the surrounding area 12 Remove any pieces of waste material collected in the purge unit If necessary remove the was...

Страница 66: ...er blade making sure that it is straight and secured well on both sides 14 Select the confirmation check boxes in the wizard screen see Figure 4 41 and click Next 15 Activate the roller so that it rotates while you clean it Figure 4 44 Roller rotation activation 16 With a cleaning cloth soaked with alcohol clean the roller surface as it is rotating Caution Use caution when cleaning the rotating ro...

Страница 67: ...oller Waste Collector and Inspecting the Roller Scraper The roller waste collector removes waste material scraped from the roller Suction removes this waste to the printer s waste container This assembly should be cleaned weekly to prevent a blockage in the tubes leading to the waste container so that waste material does not overflow into the printer To clean the roller waste collector 1 Prepare M...

Страница 68: ...e Printer DOC 26000 Rev C 4 43 4 Remove the right UV lamp assembly a Disconnect the UV power cable and the fan power cable Figure 4 46 Disconnecting the right UV assembly b Remove the screw that secures the right UV lamp and then pull and lift up the UV lamp ...

Страница 69: ... C b Remove screws D and E Figure 4 47 UV bracket attached to the print block c Slide the bracket upward to separate it from the print block Figure 4 48 UV bracket detached from the print block 6 Loosen the two screws securing the suction tube on the print block Figure 4 49 Lifting the suction tube 7 Lift the suction tube to secure it in a raised position ...

Страница 70: ...e scraper blade surface using cotton swabs Make sure to remove any remaining printing materials Figure 4 51 Cleaning the roller waste collector Before replacing the covering you can check the effectiveness of the roller scraper see below To check the effectiveness of the roller scraper 1 Put on the cleaning gloves 2 Wet a cloth with isopropanol 3 Use the cloth to wet the bottom of the roller 4 Tur...

Страница 71: ... tube Figure 4 53 Positioning the suction tube 3 Lower the suction tube so that the hole in the panel behind the tube is visible and tighten the screws to secure the tube 4 Attach the right UV lamp assembly to the print block and reconnect the UV power and fan cables Replacing the Roller Scraper You should replace the roller scraper blade after 1 000 hours of printing if it does not effectively ke...

Страница 72: ... screwdriver a 2 5 mm and a 2 mm hex Allen key 2 Remove the right UV lamp and the roller waste collector covering see steps 4 to 8 on page 4 43 3 Loosen the two screws securing the roller waste collector and pull it out Figure 4 54 Removing the roller waste collector 4 Remove the screws that secure the roller scraper assembly Figure 4 55 Removing the roller scraper screws ...

Страница 73: ...aining the Printer DOC 26000 Rev C 4 48 5 Remove the scraper blade and discard it Figure 4 56 Removing the old roller scraper blade 6 Place the new scraper blade onto the pins in the holder as shown Figure 4 57 Inserting the new roller scraper blade ...

Страница 74: ...he right UV lamp to the print block See steps 6 to 8 on page 4 43 in Cleaning the Roller Waste Collector and Inspecting the Roller Scraper Aligning the Print Heads You should check the alignment of the print heads once a month after replacing one or more heads if model quality is not acceptable even after cleaning the orifice plate on the bottom of the print block see Cleaning the Print Heads UV L...

Страница 75: ...ansparency on the build tray 4 Make sure that the transparency sheet is lying flat and tape it to the tray 5 Close the printer cover 6 In the wizard screen select the check box to confirm that the transparency sheet is secured to the build tray and click Next When you click Next the printer prints the head alignment test on the transparency When printing is finished the following screen appears Fi...

Страница 76: ...nment lines Note It does not matter which pair of lines you inspect since they were all printed by the same head Choose a pair of clearly printed lines for the inspection Since some nozzles may not print clearly you may have to inspect several pairs of lines to properly view the alignment Optimum head alignment is shown when the fourth lines in the upper and lower rows are aligned as in Figure 4 6...

Страница 77: ...gnment accordingly 11 Click Next to display the next head alignment screen and again select the number representing the most closely aligned vertical lines on the transparency for that print head When you have finished aligning all of the heads the following screen is displayed Figure 4 65 Parameter update confirmation 12 Continue as follows To make the alignment changes in the printer make sure t...

Страница 78: ...epeat head alignment option If the most closely aligned vertical lines for a print head were at either extreme choose Repeat the test then click Next The additional transparency test will show if the heads are now properly aligned and if not the wizard will allow you to fine tune the alignment If the vertical lines for the print heads were not aligned at either extreme choose End this wizard then ...

Страница 79: ...he print heads see Cleaning the Print Heads UV Lamp Glass Roller and Wiper on page 4 37 To remove the print head splash shield 1 Run the Cleaning wizard from the Options menu When the printer moves components to the cleaning position the following screen appears Figure 4 67 Wizard screen during cleaning tasks 2 Open the printer and place a mirror on the build tray 3 Put on cleaning gloves Caution ...

Страница 80: ...h shield Warning Hot Surface The print head orifice plates bottom surface may be hot Do not touch them with your bare hands and proceed with caution 5 Soak a cleaning cloth with 90 alcohol and clean the splash shield 6 Return the splash shield to the print block and secure it with four 4 screws After cleaning the print heads and the splash shield continue with step 9 in the daily cleaning routine ...

Страница 81: ...hat it is negatively affecting layer uniformity with the current head configuration the wizard instructs you to replace it If this happens you can continue the wizard to replace the print head or abort the wizard to replace the head at another time Run the Head Optimization wizard every 300 hours of printing or whenever the condition of print heads is negatively affecting the quality of printed mo...

Страница 82: ...he Head Optimization wizard 3 In the opening wizard screen click Next to begin The Wizard Conditions screen appears 4 Read the conditions select I Agree and click Next 5 In the following screen select Continue with Head optimization if you have recently cleaned the print heads Otherwise cancel the wizard and run the Cleaning wizard Figure 4 71 Clean print heads screen ...

Страница 83: ...re 4 72 Procedure selection screen 7 Select the printing mode for which you want to optimize the print heads and click Next Figure 4 73 Printing mode selection Note The mode options depend on the materials loaded in the printer 8 Check that the build tray is empty and that the printer doors are closed Confirm this in the wizard screen and click Next Figure 4 74 Preparation check ...

Страница 84: ...the build tray for positioning the scale Figure 4 75 Scale positioning frame on the build tray 9 When the Preparation for Pattern Test screen appears open the printer and tape a sheet of pink paper to the surface left of the build tray as shown below Figure 4 76 Pattern Test paper positioned next to the build tray 10 Close the printer doors and click Next in the wizard screen ...

Страница 85: ...Test paper Figure 4 77 Enter Missing Nozzles screen 12 Carefully inspect the Pattern Test paper with the Missing Nozzles Ruler to see if there are missing lines Figure 4 78 Inspecting the Pattern Test Each missing line represents a faulty nozzle in the print head 13 In the Missing Nozzles screen enter the number of missing nozzles for each print head and click Next ...

Страница 86: ...epared to replace print heads now the wizard guides you through the procedure when you click Next Make sure you have replacement heads and the required tools see page 4 65 Then continue with Preparing the Print Block on page 4 66 Figure 4 79 Head replacement due to missing nozzles If the number of missing nozzles in all print heads is acceptable the wizard continues with the head optimization proc...

Страница 87: ...en return the container to the scale Caution The resin in the container is uncured l To prevent contact with skin wear neoprene or nitrile gloves l Dispose of uncured resin in accordance with applicable regulations By emptying the container into the purge unit the resin is stored in the printer s sealed waste container 18 Close the printer cover confirm the items listed in the wizard screen and cl...

Страница 88: ...d screen after optimizing print heads If the wizard determines that a print head is faulty or that it is negatively affecting model quality with the current head configuration you need to replace it Indicate whether or not you want to do so now Figure 4 84 Defective print heads found Select Replace defective head s if you are prepared to replace the print heads now see below or Select Abort wizard...

Страница 89: ...ng Print Heads below Replacing Print Heads The condition of the print heads directly affects the quality of printed models You may need to replace a print head if one or more of the following symptoms occurs The Head Optimization wizard determines that a print head is defective See Optimizing Calibrating Print Heads on page 4 56 There are noticeable grooves in the surface of printed models Visual ...

Страница 90: ...print head E Optimizing the print heads done automatically by the wizard F Performing head alignment To replace a print head 1 Prepare replacement print head s 90 isopropanol IPA isopropyl alcohol or ethanol ethyl alcohol disposable cleaning gloves use clean powder free gloves lint free cleaning cloths a mirror the scale supplied for use in the Head Optimization wizard Weight Test the Missing Nozz...

Страница 91: ... have recently cleaned the print heads Otherwise cancel the wizard and run the Cleaning wizard Figure 4 85 Clean print heads screen 6 In the following screen select Replace faulty heads and click Next Figure 4 86 Procedure selection screen Preparing the Print Block 7 Select the print head s needing replacement and click Next Figure 4 87 Head selection screen ...

Страница 92: ...e printer is ready for you to replace print heads Figure 4 88 Printer ready for head replacement 8 Put on the protective gloves and open the printer cover Note The printer disconnects power to the heads for your safety Removing the Defective Head 9 On the front of the print block loosen the screws that secure the cover protecting the print head driver cards Figure 4 89 Loosening the driver card co...

Страница 93: ...ining the Printer DOC 26000 Rev C 4 68 11 Loosen the screws that secure the driver card bracket and lower the bracket Figure 4 90 Loosening the driver card bracket screws 12 Release the driver card support Figure 4 91 Releasing the driver card support ...

Страница 94: ...the driver card by releasing the latch at the points shown Figure 4 92 Releasing the driver card latch 14 Release the upper and lower screws that secure the print head in the block If necessary you may use a 4 mm hex Allen key to loosen the screws Figure 4 93 Releasing the print head locking screws ...

Страница 95: ...0 15 Press down on the upper and lower locking screws to release the print head and remove it from the bottom of the print block Figure 4 94 Releasing the print head 16 Make sure that along with the head you remove the four 4 rubber O ring seals Figure 4 95 O ring seals on the print head ...

Страница 96: ... on the previous page 18 Position the head in the print block making sure that the location pins are in place Note Make sure to insert the head with the contacts on the driver card facing the print block 19 Tighten the upper and lower screws that secure the print head in the print block see Figure 4 94 on the previous page Note Hand tighten these screws To avoid over tightening do not use a hex Al...

Страница 97: ...u have replaced the head s and click Next Figure 4 98 Head replacement confirmation 23 With your fingers make sure that the new head is level and even with the other heads Figure 4 99 Checking the level of the new head 24 Confirm that the heads are level by selecting the check box in the following wizard screen and click Next Figure 4 100 Installation check screen ...

Страница 98: ...s you how to continue see Installation Problems below 27 After replacing print heads you should run the wizard again to optimize the new heads and to make sure that they are optimized for printing with the other heads In the final wizard screen select Optimize all print heads and click Next Figure 4 102 Final wizard Screen Installation Problems If the printer detects that there is a problem after ...

Страница 99: ...e or a stand alone UV radiation meter approved for use with the printer The wizard compares the measured radiation to the recommended radiation level for each of the lamps at each printing mode When calibrating the lamps the wizard attempts to adjust the radiation level if necessary If the reading is within the acceptable range the wizard continues to the next phase If further adjustment is necess...

Страница 100: ...evel to the acceptable range Figure 4 104 UV Test Calibration selection 3 In the following screen select the UV sensor and measuring device to be used Figure 4 105 UV device selection UV Measuring Device When you use the Stratasys UV sensor box TOL 03005 S you connect it to the printer The wizard automatically measures and calibrates the UV radiation If you use a stand alone UV radiation meter you...

Страница 101: ...is empty Confirm this in the wizard screen and click Next Figure 4 106 Printer preparation When using a Stratasys UV sensor box that you connect to the printer TOL 03005 S continue with UV Sensor Connected to Printer on the next page When using a stand alone UV radiation meter continue with External UV Meter on page 4 78 ...

Страница 102: ...ox that you connect to the printer They do not apply when using a UV external radiation measuring device 1 To synchronize the wizard and the UV sensor enter the CF number from the label on the back of the UV sensor box Figure 4 107 UV sensor synchronization Figure 4 108 Label on the bottom of the UV sensor box 2 Click Next The build tray lowers so you can connect the UV sensor box ...

Страница 103: ...lick Next Figure 4 109 Sensor positioning Continue with UV Measurement on page 4 80 External UV Meter The following steps apply when using a stand alone UV meter This section does not apply when using the Stratasys UV sensor box connected to the printer 1 When the following screen appears open the printer and place the UV sensor probe at the rear edge of the tray in the center Figure 4 110 Sensor ...

Страница 104: ...gure 4 111 Correct UV sensor placement 3 Close the printer while checking that the sensor does not move out of position 4 Set the UV meter to measure mJ cm2 5 Set the range on the meter to 2 000 6 Connect the cable from the sensor to the UV meter 7 Turn on the UV meter and wait until 0 0 0 0 appears on the display 8 In the wizard screen confirm that the sensor is positioned correctly and click Nex...

Страница 105: ...s the measured radiation to the recommended level for each UV lamp During this process which takes 20 40 minutes you need to monitor the progress as displayed in the wizard screen Figure 4 112 UV measurement progress When using a stand alone radiation meter not the Stratasys UV sensor box connected to the printer Reset the meter and enter the reading measurement when you are prompted to do so Figu...

Страница 106: ...results are displayed showing the condition of the lamps after calibration see Figure 4 114 below Figure 4 114 Results and condition of UV lamps after calibration After examining the UV calibration results 1 Click Next 2 Remove the UV sensor and close the printer cover After confirming the items listed in the wizard screen click Next Figure 4 115 UV sensor removal If the results are not acceptable...

Страница 107: ...ste pumps every 700 hours of printing Note Older printers have one roller waste pump newer installations and upgraded printers have two pumps To replace the roller waste tube 1 Prepare two cleaning cloths a Norprene tube supplied in the Start Up Kit 2 Make sure that the printer is either in Standby2 or in Idle mode 3 Press F8 or From the Options menu select Go to Head Inspection The print block mo...

Страница 108: ...ating and Maintaining the Printer DOC 26000 Rev C 4 83 4 Open the printer doors and locate the roller waste pumps Figure 4 117 Roller waste pumps 5 Release the tube latch on the pump as shown below Figure 4 118 Releasing the tube latch ...

Страница 109: ... tube at both ends Use the cleaning cloths to prevent material leaking from the tubes 9 Discard the old tube and the cleaning cloths These items contain uncured printing material Dispose of them in accordance with environmental and safety requirements 10 Attach the ends of the new tube 11 Place the tube clamp onto the tube as before and insert the tube into the tube holder making sure that the fla...

Страница 110: ...5 12 Insert the tube holder into the pump assembly making sure that the side with the clamp is on the side of the pump marked SUCTION Figure 4 121 Tube clamp on SUCTION side of pump 13 Close the tube latch If there are two roller waste pumps in the printer replace the tube in both pumps ...

Страница 111: ...6000 Rev C 4 86 14 From the Options menu select Maintenance Counters 15 Scroll to the General Pumps section and locate the counters for the roller waste pump tubes Roller Tube Left Roller Tube Right Figure 4 122 Maintenance Counters screen 16 Click Reset for these counters ...

Страница 112: ...aterials or printer malfunctions To calibrate load cells 1 Start the Load Cell Calibration wizard from the Options menu 2 In the following screen select one or more load cells that you want to calibrate Figure 4 123 Load cell selection 3 Make sure that there are no containers on the load cells that you want to calibrate and click Next 4 In the next wizard screen observe the numbers and wait until ...

Страница 113: ...ibration wizard see Testing and Calibrating the UV Lamps on page 4 74 If you need to replace a UV lamp bulb or UV reflector follow these instructions To replace the UV lamp bulb or UV reflector 1 Make sure the printer is in offline mode Figure 4 126 Offline mode indicator red The online offline button at the bottom of the printer interface should be red If not click it to switch the printer to off...

Страница 114: ...art the UV Lamp Replacement wizard from the Options menu Figure 4 127 Selecting the UV Lamp Replacement wizard 3 Make sure that the build tray is empty and confirm this in the wizard screen Then close the printer and click Next Figure 4 128 Tray confirmation The axes move to the home position ...

Страница 115: ... Rev C 4 90 4 Select the UV lamp s to be replaced and click Next Figure 4 129 UV lamp selection screen 5 Disconnect the UV lamp power connector and the UV heat fuse connector Figure 4 130 Disconnecting the UV lamp Note Do not disconnect the power connection to the cooling fans ...

Страница 116: ...e screw securing the UV lamp cover A and pull the cover up B then out C Figure 4 131 Removing the UV lamp cover 7 Pull the UV reflector out of the UV housing Figure 4 132 Removing the UV lamp reflector 8 Using a 2 5 mm hex key remove the UV lamp clamp 2 screws Figure 4 133 Removing the UV lamp clamp ...

Страница 117: ... Removing the UV lamp bulb 10 Before continuing inspect the spring loaded pins If there are burn marks around the pins or if the pins are loose their springs are not functioning properly and do not support the bulb continue with step 15 to replace the UV reflector Otherwise continue with step 8 to replace the UV bulb Figure 4 135 Spring loaded pin ...

Страница 118: ...bulb into the UV reflector Make sure that the tip on the bulb is facing the slot Figure 4 136 Pushing the new UV bulb into the UV reflector 12 Twist the tube by 180 a and continue to insert the UV lamp bulb into the UV reflector b Figure 4 137 Twisting the tube and inserting the UV lamp 13 Use the UV lamp clamp to insert the lamp into place in the UV reflector ...

Страница 119: ...ector and make sure that a black strip is attached to the inside of it If not install one on the side of the reflector opposite not next to the print block Note Extra black strips are included in the printer Start Up Kit If necessary you can remove the black strip from the old reflector and install it in the new reflector as long as the black paint has not faded 16 Discard the old UV reflector and...

Страница 120: ...thod that prevents the generation of mercury vapor such as a syringe packing tape or paper l Place the broken lamp mercury and contaminated materials in an air tight non metallic container 17 Insert the UV reflector unit into the housing next to the print block Figure 4 140 Print block and UV lamp assembly showing correct placement of black strip 18 Replace the UV lamp cover by inserting it into t...

Страница 121: ...DOC 26000 Rev C 4 96 19 Reconnect the power and heat fuse connectors Figure 4 142 Connecting the UV lamp 20 In the wizard screen confirm that you have replaced the UV lamp s and that the black strip is attached then click Next Figure 4 143 UV installation confirmation ...

Страница 122: ...ote The mode currently being checked appears in the lower left corner of the printer interface Figure 4 144 Status during UV lamp check After replacing a UV lamp it is recommended that you calibrate its power for the various printing modes The next screen allows you to continue to the UV Calibration wizard see Testing and Calibrating the UV Lamps on page 4 74 Figure 4 145 Calibration selection scr...

Страница 123: ...est for the current printing mode Figure 4 146 Selecting Dynamic Nozzle Test from the Options menu 3 When the samples are printed check if they have visible gaps Figure 4 147 Dynamic Nozzle Test samples In the left sample shown above there are no gaps In the right sample shown above there are only two gaps which is acceptable Many gaps in the sample indicates that many nozzles in the print head ar...

Страница 124: ...eratures Voltages Encoder repeatability Print head heating Print head filling A clear display of test results and the source of any failures enabling you to determine if printing is possible or worthwhile The ability to monitor test results for specific components Troubleshooting tips Running these tests can help identify problems in the printer hardware and software A large number of hardware def...

Страница 125: ...e of the following From the Options menu select Built In Tests Press Ctrl Alt B Figure 4 148 Selecting Built In Tests from the Options menu The Built In Tests screen lists pre configured tests grouped by component categories In this screen you select and run tests and the results are displayed Figure 4 149 Built In Tests screen ...

Страница 126: ...ach test after you run it Test successfully completed Test failed Double click on a failed test s line to review the failure details Unknown results The test has not been run yet Test Selection Area In the Test Selection area at the bottom of the screen you can quickly select or de select tests by their characteristics All Click to select all of the tests in the list None Click to de select all of...

Страница 127: ...This returns the status of each test to Unknown Save Click to save a report that summarizes the tests run The report is saved as an HTML file You can save any number of reports for the tests you run the name of the file saved is BITReport date time htm By default these files are saved in the printer installation folder but you can save it in any other folder View Click to display the latest test r...

Страница 128: ...nterrupt System Info Compares the following parameter values with the minimum requirements physical memory available memory free space on disk monitor resolution Failure of RAM memory allocation in the printer computer Parameter Sanity Check Compares the values of all printer parameters in cfg files to the required values One or more of the printer parameters is not within the required range Detai...

Страница 129: ...aulty height thermistor UV Lamps Tests each UV lamp Faulty UV lamp Faulty UV power supply Disconnected UV cable Axes Limits Tests the hardware and software limits of all axes Faulty hardware sensors Wrong Max Position parameter Block Filling Analyzes the thermistor readings when the block is full and when it is empty Faulty thermistor Encoder Steps Count Tests the encoder s reliability by comparin...

Страница 130: ...n the printer interface Caution Dispose of full waste containers in accordance with environmental and safety requirements Empty Model material and Support material containers can be used as printer waste containers Cleaning the Exterior Panels The painted exterior plastic panels of the printer has a durable finish offering excellent chemical resistance to common cleaning materials Follow the recom...

Страница 131: ...effective for cleaning commercial products are also available for cleaning acrylic surfaces for example Novus and Brillianize These products give the surface antistatic smudge and scratch resistant properties 3 Soak a micro fiber cloth in the solution Do not use paper towels which can cause scratch marks 4 Thoroughly wet the surface with the cloth Do not wipe 5 Rinse the cloth with clean water 6 A...

Страница 132: ...5 2 Removing the Build Tray From the Printer 5 2 Removing the Support Material 5 3 Removing Support by Hand 5 3 Removing Support with Water Pressure 5 4 Removing SUP705 with Caustic Soda 5 4 Post Printing Treatment 5 5 Photobleaching for Transparent Models 5 5 Storing Models 5 5 ...

Страница 133: ... Tray From the Printer The build tray for the Stratasys J4100 printer is removable which aids in the handling of printed models You use a special cart to remove the build tray and transfer it to the cleaning station To remove the build tray 1 Press F10 or From the Options menu select Go to Tray Lower Position The print block moves forward and the build tray lowers 2 Raise the cart s platform and p...

Страница 134: ...e methods described in this section refer to removing general purpose Support materials from models for most printing applications Use this information as a guide and adapt the methods or a combination of them for cleaning your models For special printing applications refer to documents on the Stratasys Support Center or consult a Stratasys 3D printing expert SUP705 FullCure705 Support material ca...

Страница 135: ... model in the solution depends on how delicate it is and how much Support material needs to be removed but it is typically between half an hour and several hours In any case you should remove as much Support material as possible before the caustic soda treatment and rinse the model thoroughly with a water jet afterwards Warning Caustic soda may cause chemical burns scarring and blindness Mixing it...

Страница 136: ...ly true for models printed with a glossy finish The yellow tint fades naturally over time but you can greatly accelerate this process by using a suitable photobleaching treatment This involves exposing models to intense light immediately after printing Photobleaching methods and instructions are described in the Best Practices for the relevant clear material These are available on the Transparent ...

Отзывы: