Wall
rack User Manual
Wallrack
24x3kw
rack 6x5kw
User Manual v2.2 Fev. 2010 6
rack 6x3kw
Страница 1: ...Armoire Gradateurs Wallrack Manuel d utilisation Distribu par PANADIFFUSION 84000 AVIGNON t l 04 90 88 28 98 Revision Level 2 2 Revision Date Rev F vrier 2010...
Страница 2: ...nual and in compliance with applicable electrical regulations The work should be carried out by a suitably qualified electrician The system is designed to be permanently installed with supply and load...
Страница 3: ...7 Single Phase 8 Load Connections 8 RCD Option 10 Control Signal Connections 12 Processor set up 13 Main Menu 13 Set Level 14 Preset 15 Address 16 Curve 17 Set minimum level 18 Set maximum level 19 S...
Страница 4: ...ack in order for it to be opened for wiring to the load supply and control terminals and allow safe servicing of the equipment Ventilation Adequate ventilation must be provided to maintain an ambient...
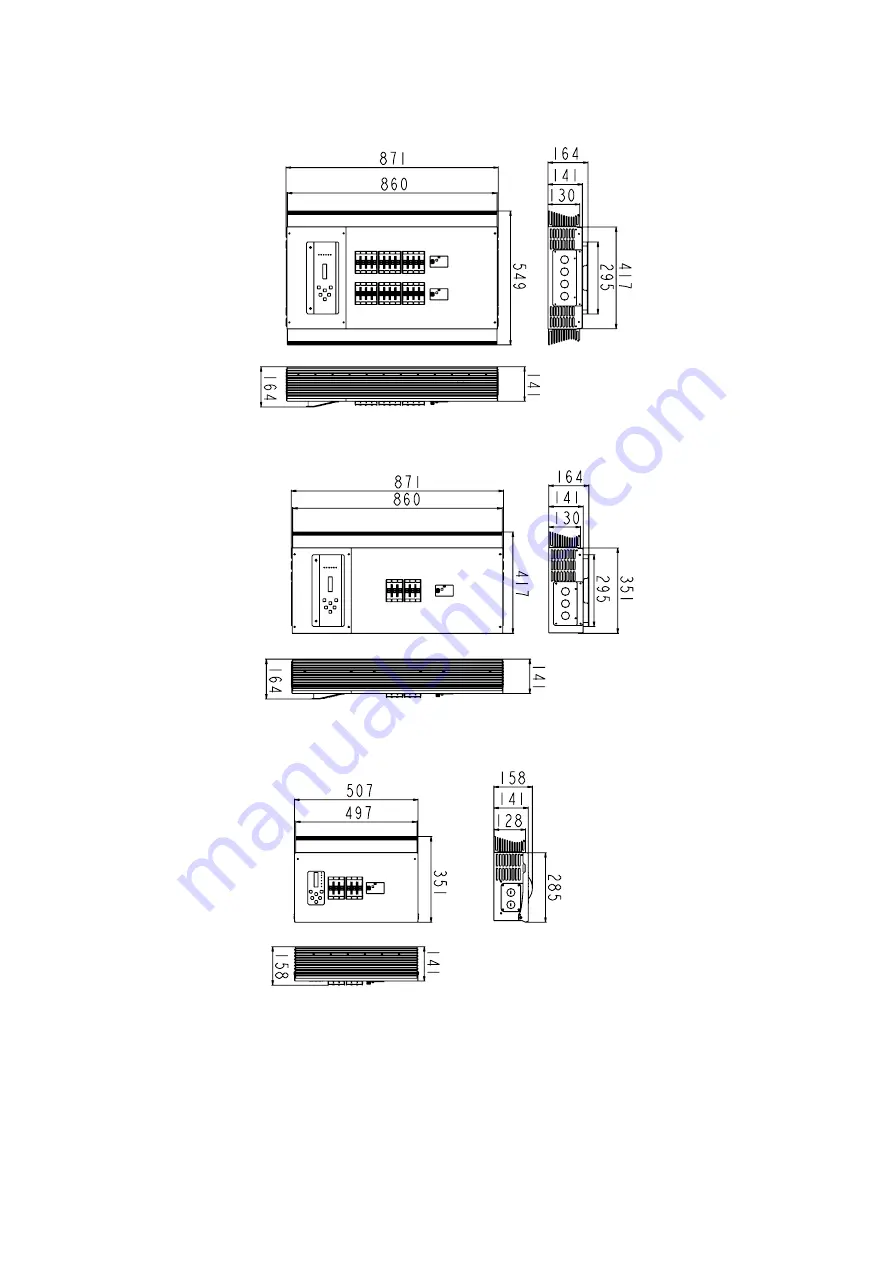
Страница 5: ...Wallrack User Manual Wallrack 24x3kw Wallrack 6x5kw User Manual v2 2 Fev 2010 6 Wallrack 6x3kw...
Страница 6: ...x5kW Wallrack Single Phase 160A Single Phase 150A Three Phase 80A Three Phase 50A For single phase there will be an optional single phase kit The terminals are provided for 2 5kW dimmers are 25 mm 5kW...
Страница 7: ...ngle phase current is higher than the size of the cable additional Live and Neutral wires are recommended to share the current flows Raccordement des Lignes Connections for both LIVE and NEUTRAL are s...
Страница 8: ...he EarthBusbar 24 busbar for 24 ways 12 busbar for 6 ways clampsfor up to 4mm wires areprovided in the installation kit arefitted asrequired 2 User Manual v2 2 Jan 9 Wallrack 6 x 5kW Wallrack 6 x 2 8k...
Страница 9: ...l if required This option only applies when using a 3 phase supply to the dimmer rack it cannot be used on single phase racks To install the RCD simply remove the terminals as shown Wallrack 24 x 3kW...
Страница 10: ...Wallrack User Manual Wallrack 6 x 5kW And replace with the 30mA RCDs Reconnect the power cables as shown below User Manual v2 2 Jan 2007 11 Wallrack 6x2 8kW...
Страница 11: ...8 DMX B input J9 DMX A input J11 J18 Preset 1 8 contact 10mA maximum for each analogue channel Set up of this port refer to Page 19 SW1 1 Termination for Mux B SW1 2 Termination for Mux A Wallrack 24x...
Страница 12: ...ress the ESC escape key OK is the confirmation key Menu Principale Normal display will show Wallrack Press Up Down key to select Set Dimmer Level SET_L_ Preset PRESET Address PATCH_ Curve CURVE_ Minim...
Страница 13: ...t all or channels 24 ways 1 30 6 ways 1 12 Press the Right button to set the level Use Up Down buttons to select Input or an output level of 0 100 Use the Right button to set the level Repeat as neces...
Страница 14: ...anges For Snap shot press Right button to enter Use Up Down to select Preset number 1 8 press OK to snap shot the DMX level or press Esc to exit without saving any changes For Edit press press Right b...
Страница 15: ...ecessary to set the address on other dimmers Press OK to confirm changes press again to save or press Esc to exit without saving any changes The Analogue Patch allows you to patch 0 10v analogue outpu...
Страница 16: ...curve Use Up Down buttons to select Square Nondim Lowcut or Linear Use the Right button to enter Repeat as necessary to set other channels For Lowcut use Up Down buttons to select the lowcut level bet...
Страница 17: ...ttons to select all or channels 24 ways 1 24 6 ways 1 6 Press the Right button to set the level Use Up Down buttons to select a minimum level between 0 30 Use the Right button to enter Repeat as neces...
Страница 18: ...buttons to select all or channels 24 ways 1 24 6 ways 1 6 Press the Right button to set the level Use Up Down buttons to select a maximum level between 70 100 Use the Right button to enter Repeat as n...
Страница 19: ...ight button to enter Vitesse de r ponse des des gradateurs Response Time For Response time use Up Down buttons to select ALL or channels 24 ways 1 24 6 ways 1 6 Press Right button to enter Use Up Down...
Страница 20: ...e Merge option you will also need to select the point that Mux B merges with Mux A Press the Right button and then use the Up Down buttons to select the first Mux B address to merge with DMX 1 of Mux...
Страница 21: ...e Up Down buttons to select preset 1 8 Press Right button to enter If you selected Last Hold the last DMX state will be held in the event of a DMX failure If you selected Delay Fade out time the DMX s...
Страница 22: ...umber press Right button and the display will show the software version number Programmation Usine par d faut Set Factory Defaults To set the factory defaults use Up Down buttons to select either Defa...
Страница 23: ...TRIACs 1 Disconnect the two flat cables 2 Unplug the 2 red 2 brown 4 blue and the green connectors Please mark these cables before unplugging them as you need to replace them 3 Unscrew the 4 choke con...
Страница 24: ...Wallrack User Manual 4 Unscrew the PCB clip 5 Take out the clip as shown 6 Click the PCB out of the slot User Manual v2 2 Jan 2007 25...
Страница 25: ...Wallrack User Manual 7 Replace the Triac 8 Screw back the clip 9 Tighten the choke connections User Manual v2 2 Jan 2007 26...
Страница 26: ...Wallrack User Manual 10 Plug the wires back into their original positions See note 2 11 Connect the flat cables P A N A D I F F U S I O N 27 Fin...