background image

8

ASSEMBLY

Step Three

Attach the Table Bed Assembly 

(FS-1030) to the A-frame 

(FS-1010)

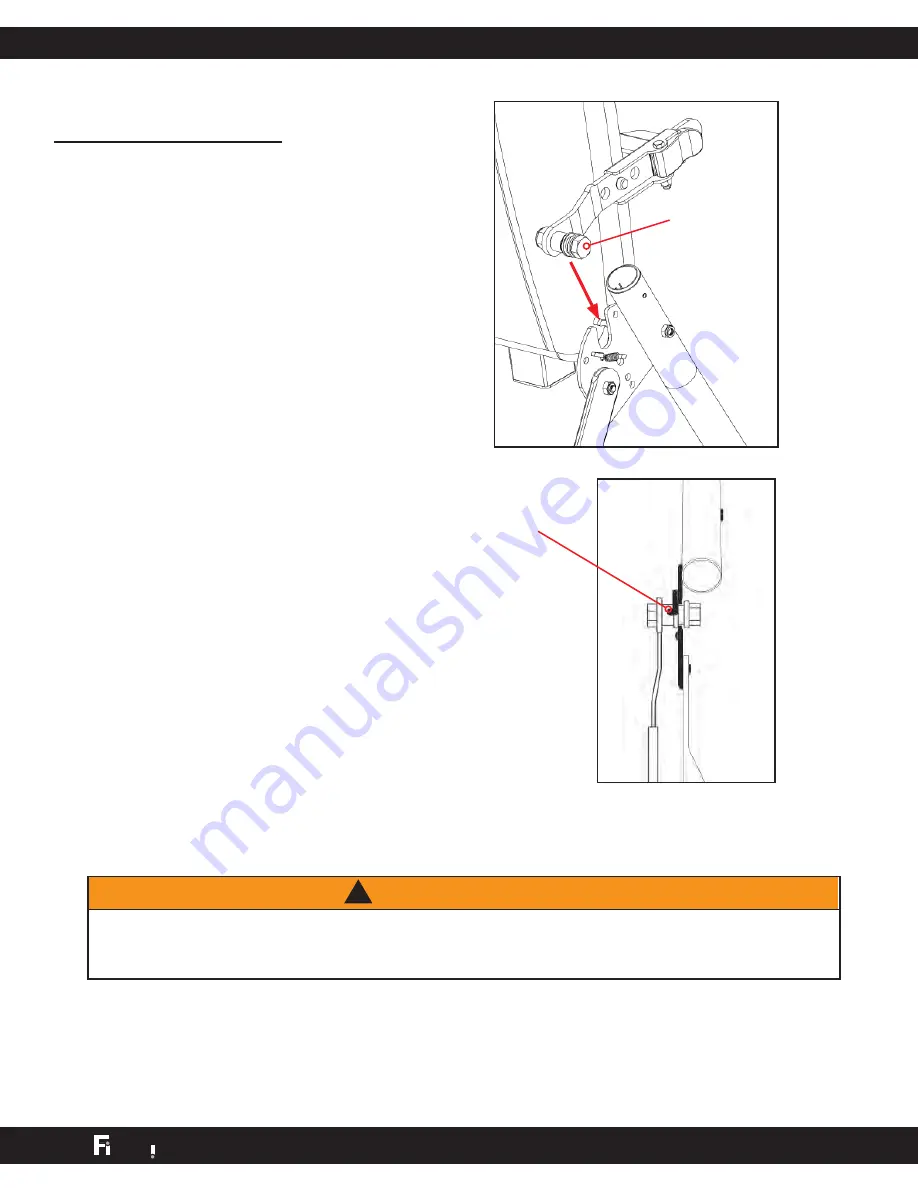
•  Holding each side near the 

Roller Hinges, pick up the Table 

Bed and stand at the front of 

the A-frame where the crossbar 

is located. Lower each pivot pin 

into the A-frame hinge plates at 

the same time (Figure 6). Figure 

7 shows the correct placement 

of the pivot pin into the hinge 

plate.

•  Make sure that both pivot pins 

are seated at the base of the 

slot in the hinge plate. Check to 

make sure that the self-locking 

hooks have closed over both 

pivot pins (Figure 7), and the 

table rotates smoothly.

WARNING

!

Failure of the self-locking hooks to close over both pivot pins is indication of 

improper assembly and if not corrected, could result in serious injury or death! 

Figure 6

Figure 7

Self-locking 

hook

pivot pin

9

ASSEMBLY

Step Four

Insert the Main Shaft 

(FS-1050) into the Table Bed 

Assembly (FS-1030)

•  With the height adjustment 

settings on the Main Shaft facing 

up, slide the end of the Main Shaft 

into the bushing in the Main Shaft 

housing (Figure 9).

•  Pull out the height selector  locking 

pin to allow the Main Shaft to 

slide in further (Figure 10). For the 

purpose of easy assembly, slide 

in the Main Shaft and release the 

pin in the last height setting (Refer 

to the Owner’s Manual for proper 

height adjustment before use).

•  The Main Shaft must rest against 

the crossbar of the A-frame 

(Figure 11). The crossbar prevents 

the table from rotating forward 

when the user steps on the Foot 

Platform. If the Main Shaft does 

not rest on the Crossbar as shown 

in Figure 11 then the Table Bed 

has been assembled backwards 

onto the A-frame and this must be 

corrected before use.

Figure 9

Figure 10

Locking Pin

t p

S

ne

S Y S T E M

T M

t p

S

ne

S Y S T E M

T M

Figure 11

Crossbar

Содержание FitSpine System

Страница 1: ...For more information about your FitSpine System refer to the 1 Owner s Manual 2 Contact Customer Service at 1 800 847 0143 3 Visit www FitSpine System com t p S ne SYSTEM TM Assembly Instructions...

Страница 2: ...dren bystanders and pets away from machine while in use Keep body parts hair loose clothing and jewelry clear of all moving parts The inversion table has no user serviceable parts This product is inte...

Страница 3: ...ly Item Numbers A frame Base FS 1010 Stability Feet IA 1101 Nylon Tether F5 1007 Table Bed Assembly FS 1030 Lumbar Pillow IA 1105B Main Shaft with Ankle Lock System FS 1050 Front Ankle Assembly Ankle...

Страница 4: ...rself with the important components of your new inversion table 5 ASSEMBLY Table Bed A frame Main Shaft Ankle Clamps Adjustable Foot Platform Support Handles Stability Feet Ankle Lock System Lumbar Pi...

Страница 5: ...do not swing open Determine which is the right and left stability foot by the imprinted letters R and L on each foot Place each foot on the frame so that the letters will face inward toward each othe...

Страница 6: ...on each side of the Table Bed Figure 4 The Roller Hinges must slide between the cam locks and the brackets Make sure the Roller Hinges are in the same hole setting on both sides Push down on the cam l...

Страница 7: ...ows the correct placement of the pivot pin into the hinge plate Make sure that both pivot pins are seated at the base of the slot in the hinge plate Check to make sure that the self locking hooks have...

Страница 8: ...ssembly slide in the Main Shaft and release the pin in the last height setting Refer to the Owner s Manual for proper height adjustment before use The Main Shaft must rest against the crossbar of the...

Страница 9: ...the slot Figure 12 Align the bolt holes Insert the Bolt Sleeve through the holes and secure with the Sleeve Screw Figure 13 Position one Allen Wrench on the Sleeve Screw and one on the Bolt Sleeve to...

Страница 10: ...e large hole at the bottom of the Main Shaft Figure 15 Insert the Bolt IA 1116 to secure the Rear Bar to the Main Shaft and attach the washer and nut with the wrenches F5 1088 provided Figure 16 Slip...

Страница 11: ...he Foot Pieces are designed with a High and Low setting Position in the Low setting Screws facing up for ease of assembly Refer to Owner s Manual for a description of the settings Step Eight Install t...

Страница 12: ...the U bar on the underside of the Table Bed Figure 22 See Owner s Manual for detailed instructions Step Eleven Before use Test the table by hand for smooth and steady rotation Ensure that all fastene...

Страница 13: ...the Ankle Lock System Engage the pin in the storage setting Rotate the table opposite from use until the table has turned 180 degrees and rests against the cross bar on the A frame The legs of the A...

Страница 14: ...l info FitSpine System com web www FitSpine System com U S patents apply FitSpine is a registered trademark of STL International Inc Specifications subject to change without notice COPYRIGHT 2010 STL...

Отзывы: