Stillwater Designs KICKER 19119147 Скачать руководство пользователя страница 5

5

Subwoofer Installation

23. Remove the spare tire to retrieve the spare tire safety strap equipped 
with the vehicle, and then replace the spare tire.  (Refer to owner’s 
manual, beginning in section 10-67, for proper removal and 
reinstallation of spare tire.)  The safety strap will be used to insure the 
subwoofer enclosure does not become dislodged in the event of a 
collision.
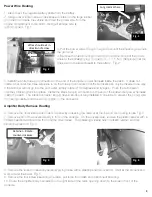
24. On sedan models fi nd the anchor point on the driver’s rear seatback 
approximately 17 inches from the load fl oor and approximately 7 inches 
from the edge of the seatback closest to the center of the vehicle.  Make 
a vertical incision in the carpet approximately 2-3 inch long. Fig. 9.

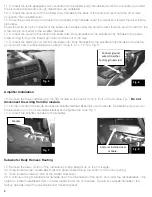
25. Place the supplied foam strip on the plastic quarter panel cover in the 
position shown in Fig. 10 to prevent the enclosure from contacting the 
panel. (Hatchback only)

26. On the hatchback models, remove the intermediate load fl oor. (Intermediate load fl oor cannot be used with 
subwoofer installed.)
27. Lay the poly bag that the subwoofer is packaged in on top of the carpet behind the driver’s side seatback (The 
poly bag prevents the Velcro® from engaging the carpet prematurely).  Set the subwoofer on top of the poly bag 
and connect the subwoofer harness. 
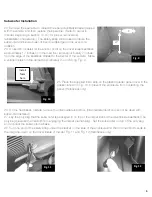
28. Run one end of the safety strap under the bracket on the side of the enclosure and then connect both ends to 
the cargo tie-down on the driver’s side of the car. Fig. 11 and Fig. 12 (Hatchback only)


17” 

7”


Fig. 9 


Install 

foam 

here 

Fig. 10 


Fig. 11 


Fig. 12 

Содержание KICKER 19119147

Страница 1: ... 19119147 Designed for 2012 and newer Chevrolet Sonic vehicles Amplifier Bracket Assembly 25A Fuse Wire Ties x6 Amplifier Power Harness Amplifier Body Harness 2012 Stillwater Designs 19119147 A1 20120615 ...

Страница 2: ...2 Subwoofer Assembly Subwoofer Power Harness 15A Fuse Wire Ties x6 Foam Strip Wire Taps x2 Subwoofer Body Harness ...

Страница 3: ... place Install the black two pin connector on the end of the subwoofer power harness inside the cabin The black connector should have a block out plug installed in one side to prevent the power wire from being inserted into the wrong position in the connector Amplifier Body Harness Routing 6 Remove the driver s side kick threshold panel by loosening the retainer at the top and then pulling loose F...

Страница 4: ...s side kick panel Torque to 9 1 5 Nm Fig 6 Amplifier Installation 16 Remove the three nuts securing the SIR module on the center hump in front of the console Fig 7 Do not disconnect the wiring from the module 17 Lift the module off the studs and set the amplifier bracket assembly over the studs Reinstall the module over the studs and on top of the amplifier bracket and retighten the nuts Fig 8 18 ...

Страница 5: ...roximately 2 3 inch long Fig 9 25 Place the supplied foam strip on the plastic quarter panel cover in the position shown in Fig 10 to prevent the enclosure from contacting the panel Hatchback only 26 On the hatchback models remove the intermediate load floor Intermediate load floor cannot be used with subwoofer installed 27 Lay the poly bag that the subwoofer is packaged in on top of the carpet be...

Страница 6: ...firewall to make sure it is plugged in securely Check the inline connectors near the subwoofer enclosure to make sure they are plugged securely Check the ground wire connection to make sure it is tightly secured to the proper ground in the vehicle Check the audio input signal connection to make sure it is secure and connected to the proper wiring Test with different music in case there is no low f...

Страница 7: ...low frequency information in music Test with several different songs Subwoofer harness not properly completely connected to subwoofer Securely fasten both of the connectors on the subwoofer harness to the subwoofer Check for loose connections Radio Not Coming On Radio connector not properly completely connected Check radio connector to insure it is completely seated Blown radio fuse Refer to owner...

Страница 8: ...8 ...

Отзывы: