stewmac.com
������
���������
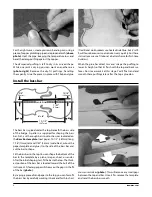
Without a soundpost gauge:
Look through the endpin
hole to see the curve of the top and back. Trim the soundpost
bottom to approximate the back curve. Stand the soundpost
in the F-hole. Mark the angle of the violin top onto the
soundpost in pencil. Use this line as a guide and trim the
post to length, approximating the angle of the surface the
post will rest against. Try fitting the post and remove wood
if necessary to get a good fit. Remove only small amounts
of wood, test-fitting often.
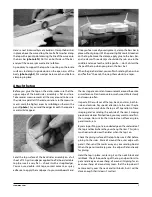
Use the S-shaped soundpost setter to position the
soundpost. The sharp end of the setter is poked into the
side of the soundpost and inserted through the treble side
F-hole. You can sight the position of the soundpost through
the endpin hole and the treble F-hole.
When the soundpost has the proper length and shape,
install it in the violin. Moistening the ends of the post will
help it stay in place.
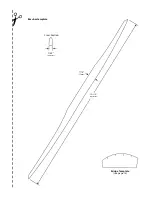
The nut blank comes roughly shaped to the correct size. Be
sure the bottom is flat, as well as the front wall that glues
to the fingerboard. If necessary, square it up on your flat
sanding board.
String spacing at the nut should be 41/64" (16.3mm) be-
tween the two outside strings. With the two inner slots
added, the space between string slots should be 7/32"
(5.43mm).
Slot the nut
The bottom of each string slot should be 1/64" (0.3mm)
above the fingerboard (slightly less than the thickness of a
business card). The depth of the slot should be about 1/3 of
the string’s diameter. Use a triangular file to start the slots,
and finish them with small round files that match the string
diameters. Nut slotting files work well for this.
File the nut to its final shape, smooth its surfaces and make
sure it’s not wider than the neck. You might want to remove
it for this work and glue it back on afterward.
Be very careful and precise when fitting the soundpost since
it determines the overall volume and tone of the violin.
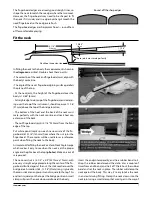
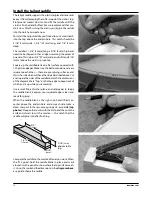
The soundpost is fitted inside the instrument, between the
top and back. It’s installed about 1/8"(3mm) behind the
bridge’s treble foot (see
diagram
) with its grain or annual
rings perpendicular to that of the top and back. Don’t use
glue to secure the soundpost. The fit should be snug, but
doesn’t need to be tight, since pressure from the strings will
provide additional clamping force.
Carefully cut the soundpost to roughly the proper length
(described below). It may take several attempts to get it
right, so consider making one or two practice posts from
scrap. Be patient and do not remove wood too quickly. The
soundpost ends are not parallel. They must be carved to
conform to the inner shapes of the body’s top and back. As
you get close to final size, dampen the end of the soundpost
— this will raise the grain and allow you to trim off a very
thin shaving of wood as you approach the final fit.
Two ways to rough-in the length of the soundpost:
With a soundpost gauge:
Insert the soundpost marking
gauge through the treble f-hole, and hold it in the soundpost
location
(photos)
. Set the gauge and transfer its measure-
ment to the post, using a pencil to mark the approximate
angle of the curve of the top and back. Trim the post to
length, trimming the ends to match the angles of the sur-
faces they will rest against.
Install the soundpost
15
Содержание 5342
Страница 1: ...Violin Kit 5342 Assembly Instructions www stewmac com ...
Страница 2: ......
Страница 9: ... ...
Страница 10: ......
Страница 23: ......


