XRLED
1843 CONVERSION KIT
6/14 STERNBERG LIGHTING. ALL RIGHTS RESERVED. PRINTED IN THE USA.
800-621-3376
555 Lawrence Ave., Roselle, IL 60172
www.sternberglighting.com
INSTALLATION INSTRUCTIONS
WARNING:
TO AVOID FIRE, SHOCK OR DEATH, TURN OFF AND LOCKOUT POWER BEFORE PERFORMING ANY MAINTENANCE.
CAUTION:
THIS FIXTURE MUST BE WIRED IN ACCORDANCE WITH THE NATIONAL ELECTRIC CODE AND ALL APPLICABLE LOCAL
CODES. PROPER GROUNDING IS REQUIRED. ALL WORK SHOULD BE DONE BY A QUALIFIED ELECTRICIAN.
STEP
8
STEP
9B
STEP
9A
If lead mounting clips are not present,
remove the screws on the inner cage
frame and use them to attach the
supplied lead mounting clips. Run
the LED Module lead down the cage
frame, bending the mounting clips
around the lead to secure it. Run the
lead into the driver chamber. Remove
the backing from the supplied adhe-
sive mounting clip and attach it to the
fitter top. Place lead inside the clip to
secure the lead to the fitter top. Run
the lead into the driver chamber.
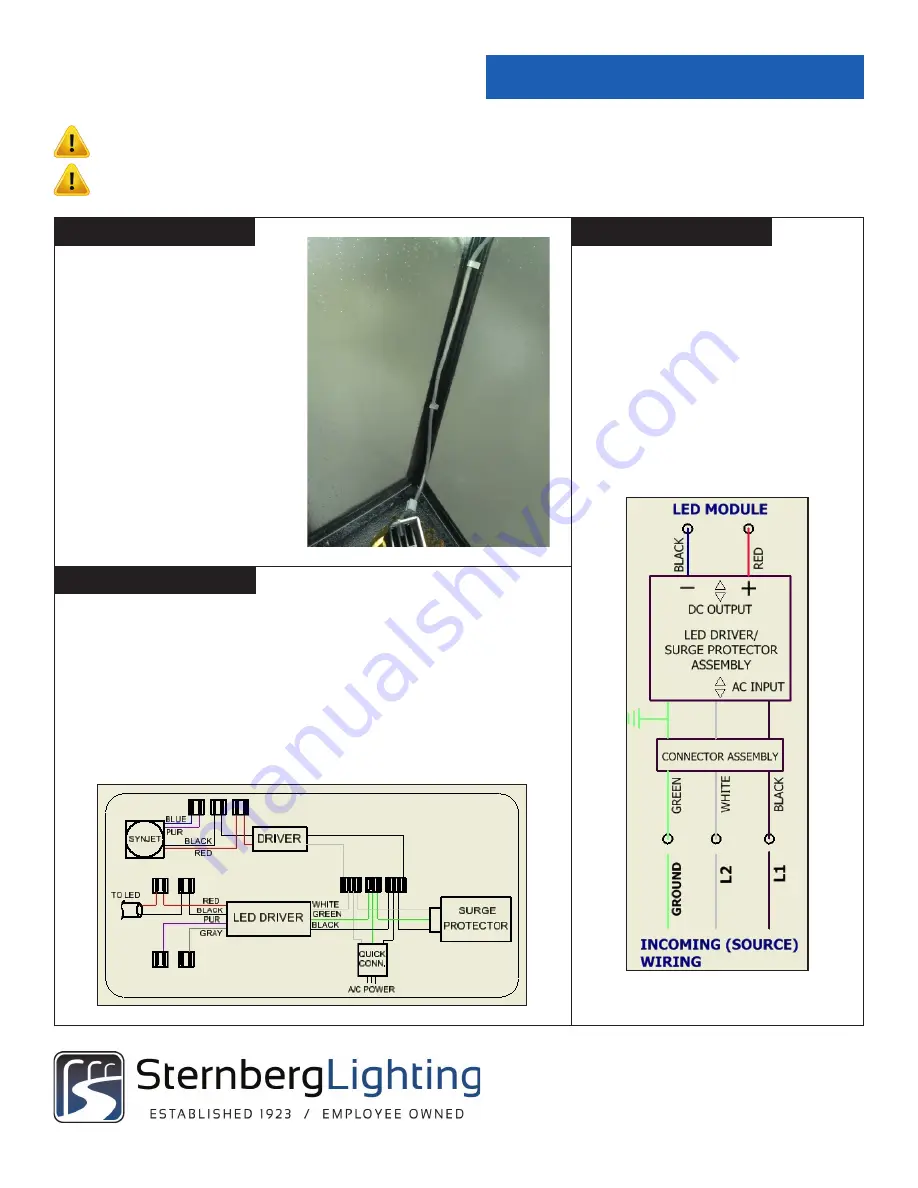
Connect the fixture leads to the appropriate
lever nut connector. The black lead should be
connected to the open port of the two position
connector with the black output lead from the
driver. The red lead should be connected to
the two position connector with the red output
lead from the driver. See wiring diagram.
Connect supply lines. Reattach fitter door.
Close and secure roof.
For 2100mA driver with Synjet only
.
(For units without a Synjet, proceed to 9b)
Connect the LED module leads to the appropriate lever nut connector. The black lead
should be connected to the open port of the two position connector with the black
output lead from the driver. The red lead should be connected to the two position con-
nector with the red output lead from the driver. See wiring diagram. Connect red and
black Synjet leads per wiring diagram to the two position connectors labelled “Synjet
Only”. Red to red. Black to black. Insert the blue and purple leads into supplied two
position connector per wiring diagram and close cam levers. Connect supply lines.
Reattach fitter door. Close and secure roof.
Wiring Schematic (No Synjet)


