background image

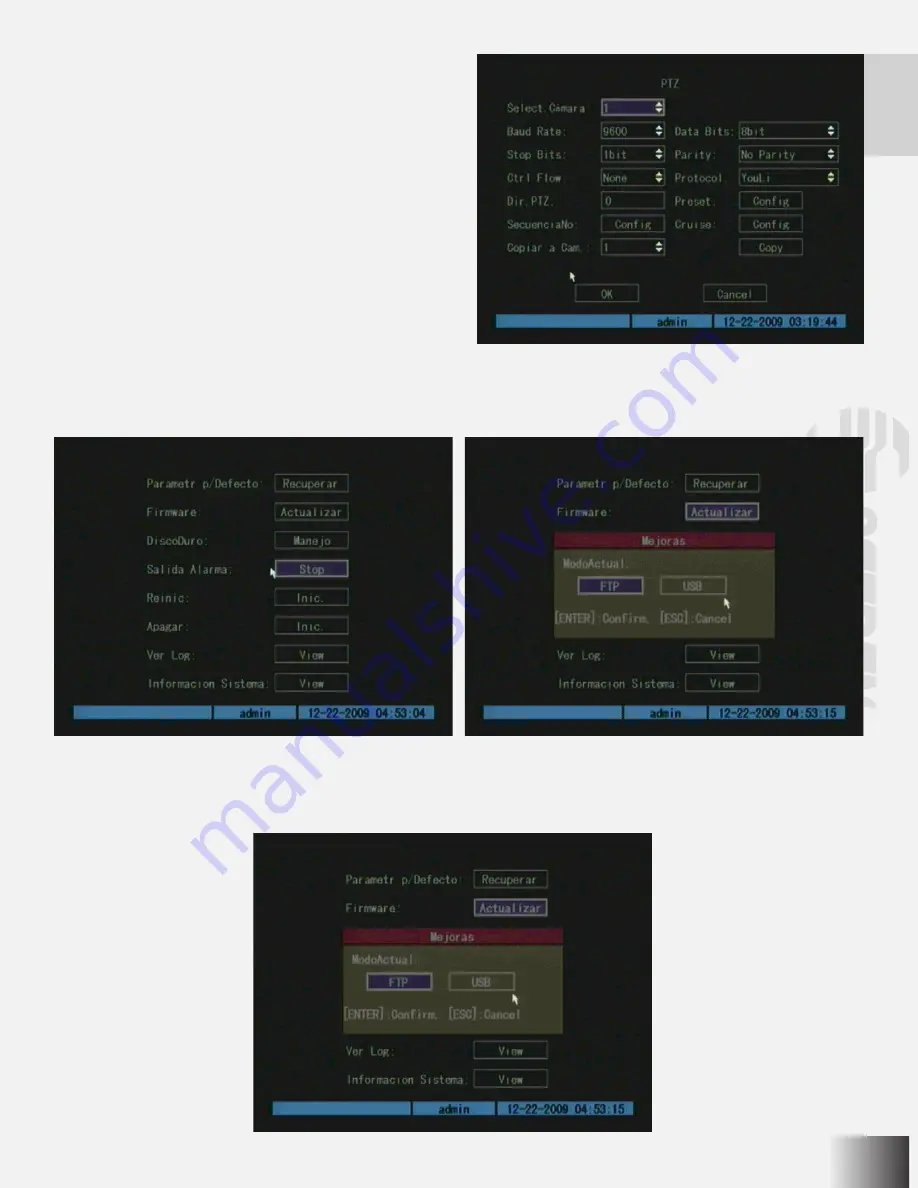
Select a camera: choose a PTZ camera.

In  this  menu  you  can  ser  the  parameters  for  each  PTZ          
camera, plus recording sequence, factory settings, camera 
movements and copy all the parameters for other cameras. 
Please, refer to camera’s instruction manual for details.

Utilities

With  this  menu  you  can  set  some  system  functions.  The 
functions  included  are:  factory  reset,  firmware,  hard  disk, 
alarm  output,  restart,  power  off,  registry  view  and  system    
information.

- Factory parameters: press to back to factory parameters. 

Network parameters won´t be modified.

Update: use it to update the firmware. The file containing new firmware must be stored in an USB flash memory in root 

directory. After update, please restart DVR.

Содержание CCTV-965

Страница 1: ......

Страница 2: ...talar y operar su nuevo Grabadora de video digital de 4 canales con puerto de red Steren Por favor revise el manual completamente para estar seguro de instalar y poder operar apropiadamente este producto Para apoyo compras y todo lo nuevo que tiene Steren visite nuestro sitio Web en www steren com Grabadora de video digital de 4 canales con puerto de red ...

Страница 3: ...etros 16 Copia de seguridad de un segmento de video 16 Administrador y contraseña 17 Modificacion de la contraseña 17 Agregar y borrar un usuario 17 Descripción de los permisos del usuario 19 Dirección MAC 19 Eliminar usuario 19 ID del dispositivo 20 Nombre de cámara y configuración de OSD 20 OSD 21 Posición de la fecha en la pantalla 22 Ajuste de los parámetros de video 22 Configuración del área ...

Страница 4: ...enú 1 En el modo de edición borrar el caracter actual del cursor 2 IRIS en el control PTZ 3 Seleccione o para habilitar o deshabilitar 1 Reproducción local 2 AUTO en el control PTZ 1 Grabación manual 2 SHOT en control PTZ ajuste de parámetro 1 Entrar al modo PTZ 2 IRIS en control PTZ 1 Previsualización de varias cámaras 2 Regresar del menú al modo de previsualización FOCUS en el control PTZ 1 Camb...

Страница 5: ... de 12V Conecte la alimentación del DVR a un tomacorriente casero o de oficina Conecte un monitor a la salida de video 1 conector BNC o a la interfaz VGA Conecte el DVR mediante un cable de red a la entrada de ethernet de su modem Importante Utilice sólo los adaptadores incluidos Se recomienda conectar las cámaras y el DVR a un regulador de voltaje VIDEO IN 13 24 VIDEO OUT 1 2 ETHERNET ...

Страница 6: ...6 O V IN V OUT VGA A OUT V IN ETHERNET POWER USB MONITOR MODEM 2WIRE CAMARAS ADAPTADOR DE CORRIENTE ...

Страница 7: ...ream Resolución Cuad x seg Bit Rate Hab Grab Tpo PreGrab Tpo PostGrab Copiar a Cam Configuración en red IP Port Mask Gateway DNS IP Puerto http Config Avanzada PPPoE DDNS Alarmas Selecc Alarm En Alarm Handling Copiar a AlarmEn Sal Alarm Tpo AlarmSal Copiar a AlarmSal Excepcions Configuración de PTZ Select Cámara Baud Rate y Data Bits Stop Bits y Parity Ctrl Flow y Protocol Dir PTZ y Preset Secuenc...

Страница 8: ...tra sobre un icono usted puede presionar la tecla ENTER para entrar a un submenú Por ejemplo si coloca el Marco Activo sobre el icono de CONFIGURACIÓN DE CÁMARAS y presione la tecla ENTER entrará al siguiente submenú Cada menú tiene distintas clases de opciones El Marco Activo se convierte en un pequeño marco azul que indica que una opción está seleccionada Hay varios tipos de campos en los menús ...

Страница 9: ...ón En la pantalla de previsualización se muestran la fecha la hora y el nombre de la cámara Guía básica de operación En la parte baja de la pantalla se mostrarán los estados de grabación y de alarma de cada cámara Presione la tecla A para mostrar u ocultar la barra de estado Casillas de edición En estas casillas se puede introducir texto Presione la tecla EDIT para entrar al modo de edición e intr...

Страница 10: ...o de previsualización de multipantallas Asegúrese de que los botones numéricos están en modo de función la lámpara STATUS está apagada Utilice la tecla SHIFT para cambiar entre los modos numérico y de función Paso 1 Conecte un monitor extra a la salida de video 2 video out 2 Paso 2 Presione 3 para entrar al modo de video auxiliar Paso 3 Presione SHIFT para entrar al modo numérico Paso 4 Presione l...

Страница 11: ...ente al usuario seleccionado y presione ENTER para salir de la casilla de edición El Marco Activo se moverá al botón de OK Si vuelve a presionar ENTER entrará al menú principal Si no hay respuesta la contraseña ingresada no es correcta Después de tres intentos fallidos de inicio de sesión el DVR regresará al modo de previsualización Modificar contraseña Para modificar la contraseña de un usuario s...

Страница 12: ... Clave e introduzca la nueva contraseña Presione ENTER para confirmar Vaya a la casilla de edición Verifi y confirme la contraseña Vuelva a presionar ENTER para confirmar La contraseña puede no contener nada o ser de hasta 16 caracteres numéricos Nota Use las teclas y para mover el cursor y la tecla EDIT para borrar el carácter anterior al cursor Mueva el Marco Activo al botón de OK y presione ENT...

Страница 13: ...manual tiene las siguientes partes número de canal estado del canal iniciar detener la graba ción comenzar y parar todos los botones Canal Lista de los números de canal tiene el DVR Estado El estado del canal tiene 4 casos significa inactivo El verde significa que el canal está grabando incluyendo la grabación en tiempo real la grabación de alarma grabación por detección de movimiento Rojo signifi...

Страница 14: ... muestran los archivos grabados Además se muestran las características del archivo tiempo de inicio y tamaño del archivo Puede utilizar las teclas para mover la barra de desplazamiento y seleccionar el archivo Dispositivos de copia de seguridad Usted puede seleccionar flash USB disco duro USB para hacer una copia de seguridad de los archivos Copiar Inicio de la copia de seguridad Copia de segurida...

Страница 15: ...empezar a copiar un segmento presione de nuevo para detener Use este botón para esconder la barra de control Haga click derecho con el ratón y seleccione mostrar para volver a ver la barra de control Haga click en este botón para desplegar un aérea rectangular que puede ser movida sosteniendo el botón izquierdo del mouse El aérea marcada por el recuadro será la ampliada Para salir del modo de zoom...

Страница 16: ... Marco Activo hasta el botón Guardar y pulse la tecla ENTER para iniciar la copia de seguridad Se mostrará un cuadro de mensaje para indicar el proceso También puede hacer una copia de seguridad de los segmentos de video durante la reproducción Los pasos son los siguientes Entre a la interfaz de reproducción de archivos o reproducción por el tiempo Pulse el botón EDIT para iniciar la selección de ...

Страница 17: ...egado a ningún usuario el único que aparecerá será admin Puede usar la tecla para ir a la caja de edi ción de contraseña y presionar EDIT para modificarla Utilice las teclas numéricas para ingresar la nueva contraseña que puede ser de hasta 16 números Mueva el Marco Activo a la caja de verificación de contraseña y vuelva a introducirla Por último presione el botón de confirmar Si la contraseña y l...

Страница 18: ...Para hacer esto seleccione un usuario en el recuadro de lista de usuarios y luego mueva el Marco Activo hasta el botón de Permisos por defecto o al de Configuración de derechos Los permisos por defecto incluyen la reproducción local reproducción remota y ver registro Dentro del menú de configuración de permisos puede configurar los permisos a detalle Los permisos de operación están divididos en lo...

Страница 19: ...apagar etc Hablar el puede intercambiar información con el DVR Alarma controlar remotamente la salida de la alarma Salida de video controlar remotamente la salida de video del DVR Control Com salida RS 232 del DVR Esta dirección MAC no es la dirección del DVR sino la de la PC que accede a él Si usted configura esta función sólo la PC con esta dirección puede acceder al DVR En la computadora puede ...

Страница 20: ...VR debe de seleccionar el ID correcto para el equipo sobre todo si hay varios DVRs en el mismo lugar El ID por defecto del DVR es 88 En el menú Display mueva el Marco Activo a la caja de edición y utilice las teclas numéricas para ingresar un nuevo ID El valor del ID del dispositivo debe estar entre 1 y 255 Después de terminar las modificaciones presione el botón de confirmar para salvar o el de c...

Страница 21: ...ntiene habilitada entonces se puede seleccionar la posición de nombre de la cámara Usted puede copiar la posición a cualquier otra cámara Los pasos a seguir son Entre al menú de cámara Seleccione una cámara Habilite la caja junto al nombre de la cámara Luego mueva el Marco Activo al botón de posición presione ENTER para entrar a la interface de posición del nombre En esta interface puede usar las ...

Страница 22: ...uadro de posición que se encuentra al lado derecho de fecha en pantalla y presione ENTER Utilice las teclas para ajustar la posición de la fecha en la pantalla Para obtener la mejor imagen usted puede ajustar los parámetros de video como brillo saturación contraste y color Puede ajustar estos parámetros para cada cámara Los pasos para ajustar estos parámetros son Entre al menú de cámara seleccione...

Страница 23: ...re a ajustes avanzados Seleccionar la sensibilidad Mueva el Marco Activo a la caja de sensibilidad junto a bloqueo de visión Presione la tecla EDIT para poder seleccionar la sensibilidad Use las teclas para escoger entre bajo normal y alto Seleccionar una de estas opciones para activar los menús de configuración de área y póliza Mueva el Marco Activo al botón de área y presione ENTER para entrar a...

Страница 24: ...bién puede seleccionar apagado Puede seleccionar un área en la cual se detectarán movimientos Cuando se seleccione esta opción aparecerá la pantalla dividida en recuadros con uno de color amarillo Seleccione el área presionando la tecla EDIT y moviendo el cursor con las flechas Cuando termine presione de nuevo EDIT Puede seleccionar toda la pantalla presionando la tecla PTZ Use la tecla ENTER para...

Страница 25: ...ede seleccionar nunca para que la pantalla se mantenga en una sola cámara Previsualización de sonido cuando esté en el modo de pantalla sencilla puede escuchar el sonido de la cámara que se está previsualizando para que esta opción funcione la cámara debe tener micrófono integrado Posición de las pantallas aquí puede seleccionar la posición de las cámaras en el modo de cuatro cámaras Presione conf...

Страница 26: ...ección de movimiento Tiempo de postgrabación después de este tiempo se detendrá la grabación después de una detección de movimiento Activar desactivar grabación activa o desactiva la grabación para una cámara Horario aquí podrá seleccionar el horario en que la grabación estará activa para una cámara Podrá seleccionar el día la hora y el tipo de grabación para cada cámara Para el tipo de grabación ...

Страница 27: ...nú podrá usar algunas funciones del sistema Estas funciones incluyen parámetros por defecto firmware disco duro salida de alarma reinicio apagado ver registro e información del sistema Parámetros por defecto aquí podrá regresar el DVR su estado de fábrica Las configuraciones de red no se verán modificadas Actualización aquí podrá actualizar el firmware del DVR El archivo que contiene el nuevo firm...

Страница 28: ... para apagar completamente el equipo Ver registro Aquí podrá ver el registro de todos los eventos desde que encendió el DVR Información del sistema Aquí se desplegará la información del DVR También se mostrará la versión del firmware Tiempo de grabación Puede calcular las horas de grabación aproximada mediante una fórmula el siguiente ejemplo utiliza un disco duro de 120GB con 7 cuadros por segund...

Страница 29: ...ción de pantalla NTSC 720x480 PAL 720x576 Promedio de cuadros de grabación configurable NTSC max 60cps PAL max 50cps Resolución de grabación NTSC 720x240 PAL 720x288 Calidad de grabación 9 niveles de calidad de grabación Espacio en disco duro Un disco duro interno SATA Modo de grabación 24hrs continuo detección de movimiento sensor red Puerto USB USB 2 0 operación de ratón o respaldo Interface de ...

Страница 30: ...tar que se haga efectiva la garantía ante la propia casa comercial donde adquirió el producto Si la presente garantía se extraviara el consumidor puede recurrir a su proveedor para que le expida otra póliza de ga rantía previa presentación de la nota de compra o factura respectiva DATOS DEL DISTRIBUIDOR Nombre del Distribuidor Número de serie Fecha de entrega Producto Grabadora de video digital de...

Страница 31: ......

Страница 32: ...and troubleshooting necessary to install and operate your new 4CH NETWORK CCTV DVR Steren Please review this manual thoroughly to ensure proper installation and operation of this product For support shopping and everything new at Steren visit our website www steren com CCTV 965 4CH NETWORK CCTV DVR ...

Страница 33: ...Control bar descriptions 15 Backup the files that matched your requirement 16 Backup video segment 16 Administrator and Password 17 Password modification 17 Add and Delete User 17 User rights description 19 MAC address 19 Delete user 19 Device ID 20 Camera name and OSD Setup 20 OSD 21 Date OSD Position 22 Video Parameters Setup 22 Mask Area Setup 23 Tampering alarm 23 Lost video signal alarm 24 Mo...

Страница 34: ...TZ control Cancel and back to the menu 1 In edit state delete the current cursor character 2 IRIS in PTZ control 3 Select or to enable or disable 1 Local playback 2 AUTO in PTZ control 1 Manual record 2 SHOT in PTZ control adjust preset 1 Enter PTZ control mode 2 IRIS in PTZ control 1 Multiple screens preview 2 Switch the menu to preview mode FOCUS in PTZ control 1 Input number lower case upper ca...

Страница 35: ...ds to a 12V power source Plug the DVR power cord to an AC outlet Connect a monitor to video output 1 NBC connector or VGA interface Use a network cable to connect the DVR to the modem Important Only use the included adapters We recommend connect the cameras and the DVR to a voltage regulator VIDEO IN 13 24 VIDEO OUT 1 2 ETHERNET ...

Страница 36: ...6 O V IN V OUT VGA A OUT V IN ETHERNET POWER USB MONITOR MODEM 2WIRE CAMERA AC POWER ADAPTER ...

Страница 37: ...lect camera Stream type Resolution Frame rate Bit rate Enable Rec PreRec time PostRec time Network IP Port Mask Gateway Http Port Advanced Settings PPPoE Alarms Select Alarm In Alarm Type Alarm Handling policy PTZ linkage Alarm out time Exceptions PTZ Select Camera Baud Rate Data Bits Stop Bits Protocol PTZ Add Preset Sequence No Cruise Preview Preview Switch type Prev audio Delay Layout User Add ...

Страница 38: ... the ENTER key to enter the sub menu For example move the Active Frame to Camera icon press ENTER to enter the sub menu Each menu contains different kinds of items There is a small rectangular frame named Active Frame which is pointing to the selected item This Active Frame can be moved by direction keys There are several kinds of menu items as follows Check Box Provides two options means enable a...

Страница 39: ...e Basic operating guide On the screen you will see the record and alarm status of each camera Press A key to display or hide the camera status bar Edit Box This is for you to input characters Press EDIT key to enter the edit status you can input text there Press A key to select number upper case lower case or symbols Use and keys to move the cursor Use EDIT key to delete the character in front of ...

Страница 40: ... multi screens preview Make sure that the numeric button is in function mode the STATUS lamp is off Press the SHIFT button to switch between numeric mode and function mode 1 Connect Video out 2 with monitor by a cable 2 Press 3 to enter the auxiliary video mode 3 Press SHIFT to enter the numeric mode 4 Press 1 to 4 button to switch the video spot output from channel 1 to channel 4 Note Make sure t...

Страница 41: ...rd edit box input corresponding password press ENTER key to exit edit box The Active Frame will move to Confirm button You can press the ENTER key to enter the main menu If there is no response it means the user name and password are incorrect After three incorrect entries the DVR will enter the preview mode Modify password The passwords are modified as follows Enter main menu Enter Users submenu ...

Страница 42: ...the new password Press ENTER to confirm Go to the Verify edit box and enter the new password again Press ENTER to confirm The new password can be null or contain up to 16 numeric characters Note In edit box use à ß to move the cursor and the EDIT key to delete the numeral in front of the cursor Move the Active Frame to Confirm button press the ENTER key If the password is modified successfully you...

Страница 43: ...e press the REC key In the pop up login dialog select the name and input the correct password The manual record interface has the following parts channel number channel status start stop record start all and stop all buttons Channel List the channel numbers the DVR has Status Channel work status has 4 cases means idle Green means the channel is recording including real time recording alarm recordi...

Страница 44: ...8 files If the matched files are more than 8 you can select page to list other files 500 pages 4000 files can be searched in one time You can use numeric keys or the keys to select a page File List Box List the matched files File started time file size are displayed in the list box You can use the keys to move the scroll bar to select file Backup Devices You can select USB flash USB HDD to backup ...

Страница 45: ... Click this button to trigger a rectangle area on the screen draw the rectangle with left key of your mouse pressed and move to the area you want to zoom in then double click left key to zoom in that place Click left key again to return to the playback interface Click these buttons to switch to next or previous playback channels It is useless if you only have one channel recorded at that time Back...

Страница 46: ...ackup is started a message box will pop up to indicate the process You can also backup the image segments during playback The steps are Enter the interface of playback the files or playback by time Press EDIT key to start selecting the current playback image and press EDIT again to stop selecting This segment is selected You can repeat step two to select multiple segments up 30 segments can be sel...

Страница 47: ... key move the Active Frame to the password edit box and press the EDIT key to enter edit status Press the numeric keys to input the new password The password can be a maximum of 16 numerals After you have finished inputting the password you can press the ENTER key to exit Move the Active Frame to the Verify password edit box input the same password as above to verify the password Move the Active F...

Страница 48: ...anagement menu use the keys to select the new user name then use the key to the Default Privileges button press ENTER the user will have the default rights The default rights include local playback remote playback and view log If you want to define the detail rights move the Active Frame to the Setup Privileges button and press ENTER Operational rights are divided into Local and Remote You can ass...

Страница 49: ...ut down DVR etc Talk Client talks with DVR Alarm Remote control DVR alarm output Local Video Out Remote control DVR video output Com Control DVR RS 232 This MAC address is not the one of the DVR but the address of the PC that accesses the it If you setup this function only the PC with this MAC address can access the DVR You can use ipconfig in the DOS prompt at the PC to obtain the MAC address In ...

Страница 50: ...ust set the device ID of the DVR especially if there s more than one The default device ID of the DVR is 88 In Display menu move the Active Frame to the device ID edit box in the edit status you can use the numeric keys to input the new device ID The device ID value is ranged between1 255 After you finish the modification press the Confirm button to save and take effect or press Cancel to abort mo...

Страница 51: ...n copy the position to any other camera The setup steps are Enter the Camera menu Select a camera Enable the check box on the right side of camera name then you move the Active Frame to the Position button press ENTER to enter camera name position setup interface Here you can use the y keys to move the camera name position When the position is fixed press ENTER and return to the Camera menu and pr...

Страница 52: ...ate For different cameras and different backgrounds in order to get the best video image you need to adjust the video parameters such as brightness saturation contrast and hue etc You can setup the cameras individually and you can also copy the video parameters of one camera to any of the other cameras Here are the setup steps Enter Camera menu select a camera and enter the Color setup menu Adjust...

Страница 53: ...f you enable this function when someone blocks the camera the DVR will show a visual alarm in status bar Click on camera Select one camera using buttons and select advanced settings Select sensitivity Move the Current Window to sensitivity box near to vision block Press EDIT to select sensitivity Use to choose between low normal or high Select one of the options to activate menus in area setting a...

Страница 54: ... 0 means lowest sensitivity Off is also available You can select a specific area to detect motion When you select this option the screen will be displayed in four sections one of those are colored in yellow Select one are pressing EDIT and moving cursor After selection press EDIT once again You can select whole screen pressing PTZ button Use ENTER to exit Different areas can be selected Use A to d...

Страница 55: ...ameras screens You can select NEVER and the screen will display only one camera Sound preview in single mode you can hear the sound of te current camera remember the camera must have audio function Screen position use it to select the position of the cameras in four camera view mode Press ENTER to save or ESC to abort In recording menu you can set recording parameters for each camera Recording set...

Страница 56: ...et the time after motion detection Post recording time use it to set the time to stop recording after motion detection Enable Disable recording use it to activate or deactivate recording for selected camera Time use to select the time a camera will be activated You can set day time and recording time for each camera For recording type the options are motion detection alarm and motion and alarm Not...

Страница 57: ...for details Utilities With this menu you can set some system functions The functions included are factory reset firmware hard disk alarm output restart power off registry view and system information Factory parameters press to back to factory parameters Network parameters won t be modified Update use it to update the firmware The file containing new firmware must be stored in an USB flash memory i...

Страница 58: ...ption Remember you must use the switch to turn the DVR off completely Registry view All events registry can be checked in this option System information DVR info Firmware Recording time To calculate recording time follow this example with a 120GB HDD 7fps and normal quality Gb x Mb x Kb Kb frame x frame seconds x seconds x minutes 120 x 1024 x 1024 125829120 332 8 hrs 15 x 7 x 60 x 60 378000 Estim...

Страница 59: ...C 720x480 PAL 720x576 Recording frame rate configurable NTSC max 60fps PAL max 50fps Recording resolution NTSC 720x240 PAL 720x288 Recording quality 9 recording quality levels HDD space One fixed HD inside SATA Recording mode 24hrs continuous motion detection sensor triggered network USB port USB 2 0 mouse operation or data backup Network interface RJ45 P T Z RS485 Pelco P Pelco D Remote control i...

Страница 60: ...ural days from the day the claim was received 4 Steren sell parts components consumables and accessories to customer as well as warranty ser vice at any of the addresses mentioned later THIS WARRANTY IS VOID IN THE NEXT CASES If the product has been damaged by an accident acts of God mishandling leaky batteries failure to follow enclosed instructions improper repair by unauthorized personnel impro...

Страница 61: ......

Страница 62: ...Este instructivo puede mejorar con tu ayuda llamanos a Help us to improve this instruction manual call us to www steren com 01800 500 9000 ...

Отзывы: