background image

8

9

26.10.2020

EN

ATTENTION! 

Despite the safe design of the device 

and  its  protective  features,  and  despite  the  use  of 

additional elements protecting the operator, there is 

still a slight risk of accident or injury when using the 

device. Stay alert and use common sense when using 

the device.

e) 

Use  personal  protective  equipment  as  required 

for  working  with  the  device,  specified  in  section  1 

(Legend). The use of correct and approved personal 

protective equipment reduces the risk of injury.

f) 

The device is not a toy. Children must be supervised 

to ensure that they do not play with the device.

2.3. SAFE DEVICE USE

a) 

When  not  in  use,  store  in  a  safe  place,  away  from 

children and people not familiar with the device who 

have not read the user manual. The device may pose 

a hazard in the hands of inexperienced users.

b) 

Keep  the  device  in  perfect  technical  condition. 

Before  each  use  check  for  general  damage  and 

especially check for cracked parts or elements and 

for any other conditions which may impact the safe 

operation  of  the  device.  If  damage  is  discovered, 

hand over the device for repair before use. 

c) 

Keep the device out of the reach of children.

d) 

Device repair or maintenance should be carried out 

by qualified persons, only using original spare parts. 

This will ensure safe use.

e) 

To ensure the operational integrity of the device, do 

not remove factory-fitted guards and do not loosen 

any screws.

f) 

When transporting and handling the device between 

the  warehouse  and  the  destination,  observe  the 

occupational health and safety principles for manual 

transport  operations  which  apply  in  the  country 

where the device will be used.

g) 

Do  not  move,  adjust  or  rotate  the  device  in  the 

course of work.

h) 

Do not leave this appliance unattended while it is in 

use.

i) 

Clean the device regularly to prevent stubborn grime 

from accumulating.

j) 

The device is not a toy. Cleaning and maintenance 

may  not  be  carried  out  by  children  without 

supervision by an adult person.

k) 

It  is  forbidden  to  interfere  with  the  structure  of 

the  device  in  order  to  change  its  parameters  or 

construction.

l) 

It  is  forbidden  to  direct  the  laser  beam  towards 

people, animals and surfaces that reflect light. The 

laser beam can seriously damage eyesight.

3. USE GUIDELINES

The device is used to project straight lines horizontally or 

vertically onto the work surface.

The user is liable for any damage resulting from 

unintended use of the device.

1

3

2

4

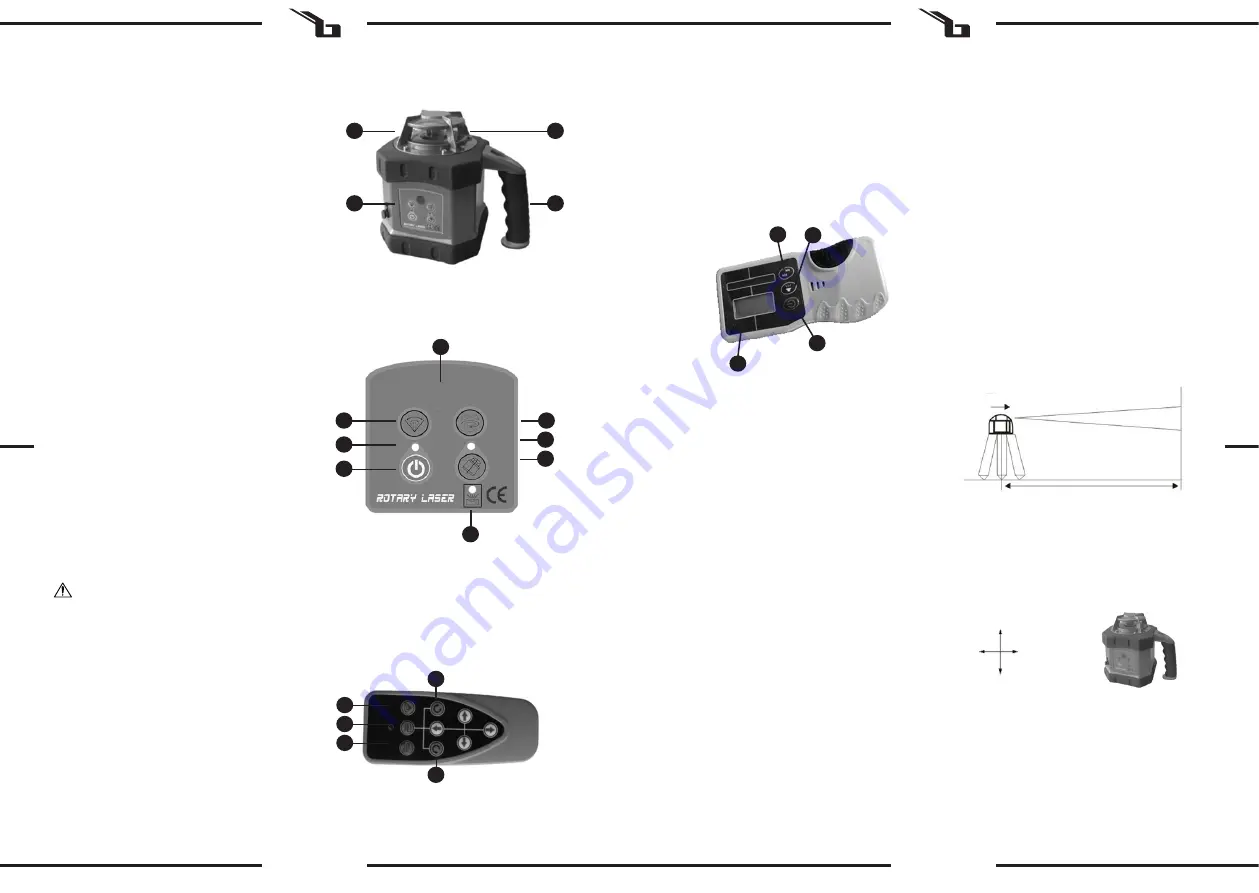
3.1. DEVICE DESCRIPTION

Design:

2
3

4

5

6

7

8

1

1.  

Laser module

2.  

Window

3.  

Control panel

4.  

Handle

Control Panel:

1

2

3

B

A

Y2

Y1

X1

X2

EN

1. 

Infrared receiver

2. 

Scanning direction

3. 

Power LED

4. 

ON/OFF

5. 

Acceleration of rotation 

6  

Automatic rotation system LED

7. 

Automatic motion detection system

8. 

Automatic/ manual mode (the model has a manual 

mode)

Remote

1

2

4

3

1. 

Scanning direction

2. 

Directional scanning

3. 

Acceleration of the rotation

A. 

Right Turn 

B. 

Left Turn 

Please  note!  The  other  directional  buttons  are  not 

supported by this model.

Remote control range:

30m –  indoors 

20m – outdoors

Laser beam receiver

1. 

Display

2. 

ON/OFF

3. 

Beep volume control

4. 

Receiver precision control 

3.2. PREPARING FOR USE 

3.2.1.BATTERY ASSEMBLY 

1. 

Unscrew the screws and remove the housing cover at 

the bottom of the device

2. 

Insert the batteries into the housing according to the 

electrode.

3. 

Close the cover and tighten the screws.

3.2.2. SETTING UP THE DEVICE

1. 

Place the device on a tripod or a stable, flat surface. 

The device can also be hung, for example from the 

wall.

2.      Place the device upright and keep the tilt within the 

range of -5° to 5°.


3.3. DEVICE USE 

3.3.1. 

Turning on and off

To turn the device on, press the On/OFF button until the 

power LED lights up. To turn the device off, press the ON/

OFF button and the power LED will turn off

3.3.2. Rotation

Press the acceleration button to control the rotation speed 

of the laser module. If the acceleration button is pressed 

repeatedly, the spin speed of the laser module will change 

as follows:  0-60-120-300-600-0 RPM.

3.3.3. Incremental  rotation

Use  the  rotation  acceleration  button  to  set  the  laser 

module to 0 rpm. Then press the rotation button (turn right 

or  left)  on  the  remote  control.  The  device  starts  to  turn 

incrementally - in steps - in the selected direction.

3.3.5. Directional scanning

Press  the  scan  direction  button;  the  laser  module  starts 

scanning.  Each  successive  press  on  the  directional  scan 

button increases the scan angle. To change the scanning 

direction,  press  the  right  or  left  rotation  button  on  the 

remote control.

3.3.6. Automatic motion detection system

This  mode  can  detect  any  device  movement.  After 

activating this function, the LED will start blinking slowly, 

when  the  device  has  detected  movement,  the  LED  will 

accelerate and the device will beep. 

3.3.8. Self-levelling

- When you start the device, it will self-levelling, the laser 

beam will blink and the device will start rotating at 600 rpm.

-  If  the  device  is  positioned  incorrectly,  or  its  inclination 

exceeds the range of -3° to 3°, an alarm will sound, the laser 

beam  and  the  power  LED  will  flash  simultaneously.  The 

setting of the device should be corrected without delay.

Please note! The device will turn off automatically after the 

alarm has been active for five minutes.

3.3.9. Checking

Place the device 50 m in front of the selected surface or 

a plank.

X

1,1

X

1,2

X

1

h

1

h

2

50m

Then adjust the level of the base to direct the beam towards 

the surface or plank. Measure the height (h1) of the beam 

incidence  (along  the  X1  axis).  Then,  rotate  the  device  by 

180° and measure the height of the beam incidence (in the 

X2 axis). Perform the same for the Y axis. The difference in 

readings between h1 and h2 should be less than 10mm.

Device axis schematic:

3.3.10. Laser beam receiver

The device is used to receive the laser beam in very sunny 

rooms or outdoors, where the laser beam is invisible to the 

naked eye.

To  accurately  determine  the  place  where  the  laser  beam 

passes, you should:

• 

press the ON/OFF button

• 

place the receiver as close as possible to the place 

where the laser beam should appear

• 

if the receiver  sensor picks up the beam, an arrow 

will  appear  on  the  display,  suggesting  in  which 

direction the receiver should be moved to obtain the 

exact position of the beam

Содержание SBS-RL-300

Страница 1: ...OTATIONSLASER USER MANUAL ROTARY LASER INSTRUKCJA OBSŁUGI LASER OBROTOWY NÁVOD K POUŽITÍ ROTAČNÍ LASER MANUEL D UTILISATION LASER ROTATIF ISTRUZIONI PER L USO LASER ROTANTE MANUAL DE INSTRUCCIONES LÁSER GIRATORIO DE EN PL CZ FR IT ES ...

Страница 2: ...it eingeschränkten physischen sensorischen und geistigen Fähigkeiten oder ohne entsprechende Erfahrung und entsprechendes Wissen bedient werden Dies ist nur unter Aufsicht einer für die Sicherheit zuständigen Person und nach einer Einweisung in die Bedienung der Maschine gestattet c Das Gerät darf nur von körperlich geeigneten Personen bedient werden die zu ihrem Benutzen fähig und entsprechend ge...

Страница 3: ...onsbeschleunigung 6 Automatische Rotationssystem Diode 7 Automatisches Bewegungserkennungssystem 8 Automatischer manueller Modus das Modell hat einen manuellen Modus Fernbedienung 1 2 3 B A Y2 Y1 X1 X2 DE 1 Abtastrichtung 2 Richtungsabtastung 3 Rotationsbeschleunigung A Rotation nach rechts B Rotation nach links Achtung Die anderen Richtungstasten werden bei diesem Modell nicht unterstützt Reichwe...

Страница 4: ...nt may repair the device Do not attempt any repairs independently d Children or unauthorised persons are forbidden to enter a work station A distraction may result in loss of control over the device e Please keep this manual available for future reference If this device is passed on to a third party the manual must be passed on with it f Keep packaging elements and small assembly parts in a place ...

Страница 5: ...s 20m outdoors Laser beam receiver 1 Display 2 ON OFF 3 Beep volume control 4 Receiver precision control 3 2 PREPARING FOR USE 3 2 1 BATTERY ASSEMBLY 1 Unscrew the screws and remove the housing cover at the bottom of the device 2 Insert the batteries into the housing according to the electrode 3 Close the cover and tighten the screws 3 2 2 SETTING UP THE DEVICE 1 Place the device on a tripod or a ...

Страница 6: ...kcję użytkowania f Elementy opakowania oraz drobne elementy montażowe należy przechowywać w miejscu niedostępnym dla dzieci g Urządzenie trzymać z dala od dzieci i zwierząt h W trakcie użytkowania tego urządzenia wraz z innymi urządzeniami należy zastosować się również do pozostałych instrukcji użytkowania 2 2 BEZPIECZEŃSTWO OSOBISTE a Niedozwolone jest obsługiwanie urządzenia w stanie zmęczenia c...

Страница 7: ...spieszenie obrotu 6 Dioda automatycznego systemu obrotu 7 Automatyczny system wykrywania ruchu 8 Tryb automatyczny model posiada tryb manualny Pilot 1 2 3 B A Y2 Y1 X1 X2 PL 1 Kierunek skanowania 2 Skanowanie kierunkowe 3 Przyspieszenie obrotu A Obrót w prawo B Obrót w lewo Uwaga Pozostałe przyciski kierunkowe nie są obsługiwane w tym modelu Zasięg pilota 30m wewnątrz pomieszczeń 20m na zewnątrz O...

Страница 8: ...epovolané osoby Nepozornost může způsobit ztrátu kontroly nad zařízením e Návod k obsluze uschovejte za účelem jeho pozdějšího použití V případě předánání zařízení třetím osobám musí být spolu se zařízením předán rovněž návod k obsluze f Obalový materiál a drobné montážní prvky uchovávejte na místě nedostupném pro děti g Zařízení mějte v dostatečné vzdálenosti od dětí a zvířat h Pokud společně s t...

Страница 9: ... Přijímač laserového paprsku 1 Displej 2 ON OFF 3 Regulátor hlasitosti zvukového signálu 4 Regulátor pracovní přesnosti přijímače 3 2 PŘÍPRAVA K PRÁCI 3 2 1 MONTÁŽ BATERIE 1 Povolte šrouby a sejměte kryt nádobky která je umístěna ve spodní části zařízení 2 Vložte baterie do nádobky podle elektrody 3 Zavřete kryt a dotáhněte šrouby 3 2 2 UMÍSTĚNÍ ZAŘÍZENÍ 1 Zařízení postavte na stativu nebo stabiln...

Страница 10: ...e trouver sur les lieux de travail Le non respect de cette consigne peut entraîner la perte de contrôle sur l appareil e Conservez le manuel d utilisation afin de pouvoir le consulter ultérieurement En cas de cession de l appareil à un tiers l appareil doit impérativement être accompagné du manuel d utilisation f Tenez les éléments d emballage et les pièces de fixation de petit format hors de port...

Страница 11: ...il hors de portée des enfants d La réparation et l entretien des appareils doivent être effectués uniquement par un personnel qualifié à l aide de pièces de rechange d origine Cela garantit la sécurité d utilisation e Pour garantir l intégrité opérationnelle de l appareil les couvercles et les vis posés à l usine ne doivent pas être retirés f Lors du transport de l installation et de l utilisation...

Страница 12: ...enere il posto di lavoro pulito e ben illuminato Il disordine o una scarsa illuminazione possono portare a incidenti Essere sempre prudenti osservare che cosa si sta facendo e utilizzare il buon senso quando si adopera il dispositivo b Se non si è sicuri del corretto funzionamento del dispositivo rivolgersi al servizio assistenza del fornitore c Le riparazioni devono essere eseguite esclusivamente...

Страница 13: ... di rotazione automatica 7 Rilevamento automatico del movimento 8 Modalità automatica manuale il modello ha una modalità manuale Telecomando 1 2 3 B A Y2 Y1 X1 X2 1 Direzione di scansione 2 Scansione 3 Accelerazione di rotazione A Rotazione a destra B Rotazione a sinistra Nota Altri tasti freccia non sono disponibili nel presente modello Portata del telecomando 30m negli spazi interni 20m all este...

Страница 14: ...ce reparaciones por su cuenta d Se prohíbe la presencia de niños y personas no autorizadas en el lugar de trabajo la falta de atención puede llevar a la pérdida de control del equipo e Conserve el manual de instrucciones para futuras consultas Este manual debe ser entregado a toda persona que vaya a hacer uso del dispositivo f Los elementos de embalaje y pequeñas piezas de montaje deben mantenerse...

Страница 15: ...ntes 1 3 2 4 1 Módulo láser 2 ventana 3 Panel de control 4 Mango Panel de control 2 3 4 5 6 7 8 1 1 Receptor de infrarrojos 2 Dirección de escaneo 3 Diodo de encendido 4 ON OFF 5 Aceleración de rotación 6 Diodo del sistema automático de rotación 7 Sistema automático de detección de movimiento 8 Modo automático manual el modelo tiene un modo manual Control remoto 1 2 4 3 1 Dirección de escaneo 2 Es...

Страница 16: ...revé no utilizar el aparato durante un tiempo g No utilizar para la limpieza objetos de metal puntiagudos y o afilados p ej cepillos metálicos o espátulas de metal ya que podrían dañar la superficie del material del que está hecho el aparato h No limpie el aparato con limpiadores que puedan contener sustancias ácidas Los aparatos médicos disolventes carburantes aceites y otros químicos podrían dañ...

Страница 17: ...Verfügung stehenden Möglichkeiten der Rückgabe oder Sammlung von Altgeräten 1 RICHTLINIE 2002 96 EG DES EUROPÄISCHEN PARLAMENTS UND DES RATES ÜBER ELEKTRO UND ELEKTRONIK ALTGERÄTE 2 Gesetz über das Inverkehrbringen die Rücknahme und die umweltverträgliche Entsorgung von Elektro und Elektronikgeräten Elektro und Elektronikgerätegesetz ElektroG Umwelt und Entsorgungshinweise Utylizacja produktu Prod...

Отзывы: