11/10
Pub. No. 570-C
- 7 -
Electrical Outlets
Electrical outlets are not recommended in a sauna room. If
speakers are installed in a sauna, they should not be
installed higher than 3 feet from the floor and should be
located away from the sauna heater.
Room Lights
Room lights should be vapor proof, wall mounted, with a
rough in box mounted flush with the inside paneling. It
should be mounted 78 inches above the finished floor and
not placed directly over the sauna heater or the upper
benches. Light bulb should not exceed 75 watts.
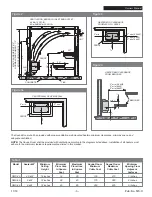
Heater Fence
A heater guard rail is necessary to protect the sauna bathers
from the hot surfaces of the sauna heater. The guard rail
should be attached to the wall and should not be placed
higher than the top of the heater below the rock line. See
Figures 2-4 on page 3 for required guard rail clearances.
Room Construction - General Information
A. Framing - 2" x 4" kiln dried, Douglas Fir, 16" on center.
B. Ceiling height - No higher then 7 feet.
C. Insulation - R11 fiberglass with a foil vapor barrier.
D. Drywall - Refer to local codes.
E. Wall Tongue ad Groove Paneling - Use kiln dried,
vertical grain, clear T&G soft wood. Western Red
Cedar, Redwood and Spruce are most common.
F. Benches - Use wood species matching the wall
materials. Be sure to use vertical grain material. 1" x 4"
or 2" x 2" tops with 2" x 4" rails and spreaders.
G. Heater Guard Rail - Use matching soft wood of 2" x 2"
or 2" x 4" material.
H. Door - Must open out and should not have a lock. 2'0"
x 6'8" with fir rails and sealed tempered glass.
I. Flooring - Concrete, ceramic tile or heavy duty vinyl
with removable decking in walk area.
J. Ventilation - Provide low ventilation, 4" above the floor
near the heater and upper vent on opposite wall. 6"
from the ceiling. See page 3 for specifications.
K. Light - Should be wall mounted, vapor proof. 6" from
the ceiling.
L. Accessories - Bucket, Ladle, Thermometer, Hygrom-
eter, Head and Back Rest, sand timer.
M. Warning Signs - Warning signs are provided with the
sauna heater. The metal "CAUTION" sign should be
fastened to the wall, close to the heater, in a visible
place. The metal "WARNING" sign should be placed
outside or near the sauna door.
WARNINGS!
Do not smoke, use alcohol, or exercise in the sauna.
Do not exceed 30 minutes in the sauna at one time as
excessive exposure can be harmful to your health.
Persons in poor health should consult a physician prior
to using the sauna.
Do not place any combustible material on or over the
sauna heater. At no time should towels, bathing suits,
buckets, or ladles or any other flammable material be
placed on or over the heater.
Use only clean tap water on the sauna stones. Do not
use any chemically treated water (such as spa or pool
water) on the heater at an time. Use of chemically
treated water can result in rapid oxidation of the heater
components, voiding warranty.
1) Use only clean water on the sauna stones. Do not use
any chemically treated water (such as spa or pool
water) on the heater as it will cause rapid oxidation of
the internal heater components.
2) Clean water should always be used in sauna buckets
and water should be dumped out after every use.
Scour buckets and ladles occasionally when film
collects from usage. Use plastic bucket liner in bucket
to prevent leakage.
3) Scrub benches with a soft brush, using soap and water
or a mild disinfectant when needed. Typical mainte-
nance in a commercial application is about once a
week. Each sauna bather should sit or lie on a towel
when taking a sauna, to aid in prolonging the life of the
benches.
4) Remove Super Dek or duckboard flooring and wash
with disinfectant. On wooden duckboards, test disinfec-
tant on a small area to ensure that there is no chemical
reaction that may discolor the wood. Hose off Super
Dek or duckboard and replace in sauna.
5) To maintain appearance of the sauna heater, remove
water stains by wiping with a damp cloth occasionally.
6) Steamist sauna heaters require no special maintenance
when properly installed by a qualified electrical
contractor. After about 1 year of use, inspect the stones
to determine if they need replacement. Rocks may
crack or crumble over time.
7) Steamist strongly recommends that the sauna floor is
made of a material that is easily cleaned. Ceramic tile,
concrete, marble, sheet vinyl, etc. are all suitable for
use in a sauna. When the sauna floor is made of a
non-porous material, it is easy to keep clean, sanitary
and odor free. Carpeting is not recommended for use in
a sauna.
8) A floor drain should be provided in a commercial
application for sanitary cleaning and maintenance.
9) To remove perspiration stains from he walls and
benches, the wood may be lightly sanded with fine
sand paper to restore its appearance. We do not
recommend that stains or sealers be used in the
sauna, as they may produce toxic vapors.
10) The sauna room will heat faster if the high vent is kept
in the closed position during the initial heat up period.
The low vent may always be kept in the open position.
11) Required warning signs should always be posted
according to the instructions.
Owners Manual
Steamist Sauna - General Information
Maintenance Instructions


