11/10
Pub. No. 570-C
- 5 -
Steamist Built-In Timer Controls
Owners Manual
Wall Mount Heater Installation
Wall Mount Sauna Heater Installation
Heaters with a Digital Sauna Control S170-1 or S170-3
see a separate Pub. No. 572.
NOTE: Before connecting electrical supply wires to the
heater junction box, remove capillary tubing and bulb from
the junction box and mount on the wall to the left or right
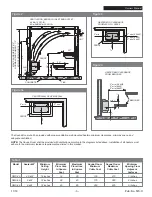
side of the sauna heater as shown in Figure 5. Cover
capillary tubing with wooden chase piece. Coil excess
tubing and position under the heater close to the floor. Be
sure to cover the thermostat bulb with the protective metal
cover by threading the bulb through the holes in the cover
and fasten bulb cover to the wall with the screws provided.
Take care not to puncture, kink or cut the capillary tube.
Refer to Table 2 on previous page for proper wire size and
amperage. See Figures 1-5 for the required clearances. Any
wiring within the sauna walls must be rated for 90°C and all
copper wire must be used. Run wire through flex conduit
from the wall to the heater and connect to the junction box at
the back of the heater with a 90 degree connector. Remove
cover plate from junction box and connect supply wires to
terminals marked 1 and 2. Connect ground wire to lug
marked ground.
If connection to the heater will be made at a later time, bring
flex conduit into the sauna room 4 to 6 inches from the floor
and leave about 3 feet of flex conduit for connection to the
heater. See page 7 for specific instructions regarding the
washing and placement of stones as well as heater opera-
tion.
SMS-45, SMS-60 and SMS-80 Models
The SMS-45, SMS-60, and SMS-80 model sauna heaters
are supplied with a dual-function timer that allows the user
to "pre-set" the the timer up to 8 hours in advance. The timer
has a 60 minute time cycle (the large print "0" and "1" on the
dial). If you wish to use the full 60 minute time cycle, turn the
timer knob clockwise past the "1" setting on the dial. Then
turn counter-clockwise until a "click" is heard. This indicates
that the timer is now engaged. The sauna will now operate
for 60 minutes and shut off automatically.
NOTE: If the time is set past the "1" on the dial, the sauna
heater will not come on until the timer counts down to the 1
hour mark Please note that this is a motorized timer and
does not make a ticking sound.
Allow your sauna heater at least 30 minutes to heat up the
room to the desired temperature.
The timer has the added feature of advance settings of up to
8 hours. To use the advance setting feature, turn the timer
counter-clockwise until you reach the small numbers 1-8.
Set the time clock to the desired advance program. The
sauna heater will begin the countdown to the 60 minute heat
cycle. For example - if you want your heater to begin heating
in 3 hours, just turn the knob counter-clockwise until the
small 3 is reached. Your sauna will be ready for use in
approximately 3 1/2 hours (allowing for a 30 minute heat up
time).
Thermostat Conrol
The SMS-45, SMS-60, and SMS-80 sauna heaters also
come equipped with a thermoastat control. Most sauna
bathers will need to experiment with the thermostat control
for the first few sessions in order to determine the most
suitable temperature. For the initial heat up cycle, set the
thermostat at it's maximum setting. Observe the temperature
within the sauna, as indicated by a separate sauna
thermometer (available separately from your Steamist sauna
dealer). Allow the heater 30 minutes to heat the room. If the
room is too hot, just turn the knob counter-clockwise and
allow the room to cool to the temperature you desire. It may
take a few adjustments to reach the optimal sauna tempera-
ture.
Dual Function Timer


