background image

Instruction Manual

37

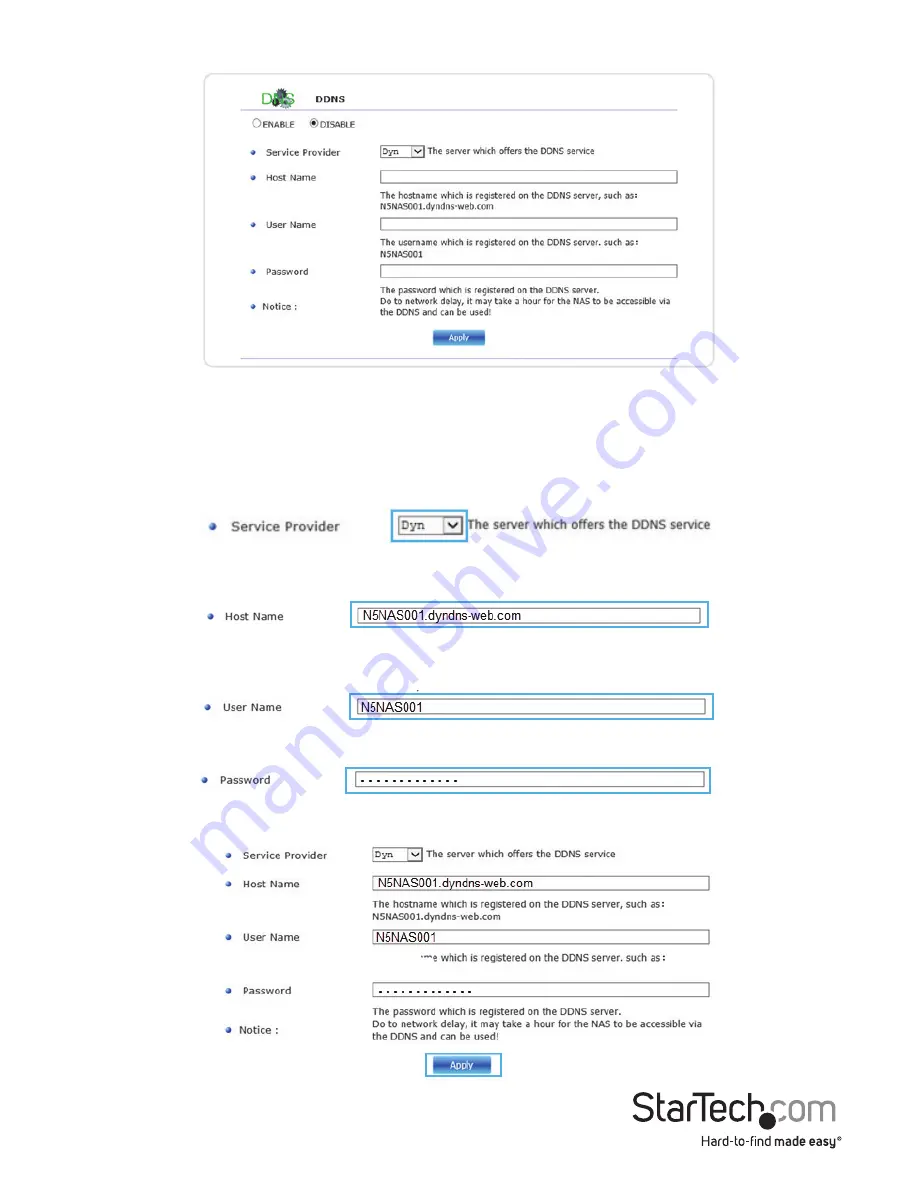
3.  The DDNS window is now displayed.

4.  Select Enable from the bullet menu.
If you are using a generic Dynamic DNS service, select Dyn from the service provider 

drop down menu.  Or if you are using No-IP as your service provider select NO-IP from 

the DDNS service provider drop down menu. 

5.  In the Host Name field, enter your Host Name which you’ve registered on the 

 DDNS 

server. 

6.  In the User Name field, enter the Username for the DDNS server. 

7.  In the password field, enter the Password for your DDNS server. 

8.  Click the apply button.

Содержание S352BMU3N

Страница 1: ...nleitung de startech com FR Guide de l utilisateur fr startech com ES Gu a del usuario es startech com IT Guida per l uso it startech com NL Gebruiksaanwijzing nl startech com PT Guia do usu rio pt st...

Страница 2: ...eceiving antenna Increase the separation between the equipment and receiver Connect the equipment into an outlet on a circuit different from that to which the receiver is connected Consult the dealer...

Страница 3: ...Use your NAS 11 Basic NAS Operation 11 Advanced NAS Operation 24 View Firmware Version 27 View Internal IP 28 View MAC Address 28 View PPPoE IP Address or Connect to PPPoE Internet Service 29 Enable o...

Страница 4: ...NAS Enclosure Reset 51 Enable or Disable SMB Service 53 Enable or Disable WebDAV Service 54 Enable or Disable FTP Service 56 Download and host Torrent Files 57 Manage Accounts 64 Quick Setup Guide Op...

Страница 5: ...ion Manual 1 Product Diagram Front View Rear View Front Panel Drive Activity LEDs Power Button LAN Port Power Jack Reset Button RAID switch USB 3 0 Port Main Power Switch Set RAID Button Drive Fan RAI...

Страница 6: ...Computer system or Network with available LAN port For DAS Operation Computer system with available USB Port 3 0 2 0 Getting Started Step 1 Installing your hard drives WARNING In order to prepare your...

Страница 7: ...Instruction Manual 3 1 Using a Phillips head screw driver not included remove the screw from the bottom of the enclosure 2 Slide the front panel upward toward the top of the enclosure...

Страница 8: ...Instruction Manual 4 3 Lift the panel off to reveal the drive bays...

Страница 9: ...Instruction Manual 5 4 Slide each of your hard drives into the bay...

Страница 10: ...Instruction Manual 6 5 Place the front panel back on by placing it over the drive bay and sliding it into place 6 Replace the screw using the Phillips head screw driver...

Страница 11: ...D switch on the back of the unit set to your desired RAID configuration Available RAID Configurations 3 Toggle the rear power switch to the on position then press and hold the Set RAID button as you p...

Страница 12: ...level protects your data from individual drive failure as a backup of all data is written instantly Striping RAID0 In RAID0 both drives appear together as a larger individual disk the size of both dr...

Страница 13: ...ou can get access to your NAS enclosure at IP address 192 168 0 2 Step 4 Initialize Your Hard Drives Access Web Interface 1 Open the web browser on the connected computer and type the NAS IP address o...

Страница 14: ...formatted into an acceptable format for the NAS enclosure exFAT Please be aware that any data currently on the drives will be lost during this process It is recommended that you back up all data prio...

Страница 15: ...c NAS Operation for day to day operation and configuration Please reference Advanced Operation for detailed configuration options Basic NAS Operation Map the NAS as a Network Drive in Windows 8 1 8 7...

Страница 16: ...Instruction Manual 12 2 Select Map network drive 3 In the folder box type the network path to the NAS Enclosure Note The default network path for the NAS Enclosure is http 192 168 0 2...

Страница 17: ...rk drive In the future when you want to access the NAS it will be available as a listed drive in my Computer Create User Accounts If more than one person is accessing the NAS additional user accounts...

Страница 18: ...Instruction Manual 14 2 Click the Configuration Icon the main settings status window is displayed 3 From the main menu on the left hand side select User Set and select Account...

Страница 19: ...list 5 Enter your desired name and password in the specified fields 6 Next specify whether you would like the account to be Read only can only access files or Read Write Can access save and edit file...

Страница 20: ...isted under folder list Set a Static IP Address It is recommended that you set the NAS IP address to a static IP address to avoid your Router automatically adjusting the assigned IP address To configu...

Страница 21: ...d By Default the Internet Protocol Information is set to Automatic IP To set a static IP address place a bullet in Static IP as below Note It is recommended you keep the settings that have been applie...

Страница 22: ...ur network administrator Manage NAS Files and View Media Through a Web Browser Access files and folders on your NAS through a web browser You can access files and folders currently saved on your NAS u...

Страница 23: ...the file to upload will depend on the network connection and size of the file Once the upload is complete the browser will refresh displaying the newly uploaded file Until the browser refreshes the f...

Страница 24: ...dio playback file formats For optimal support we recommend Google Chrome 3 Double click the file of your choice to play the audio file The program will continue to play all listed files unless stopped...

Страница 25: ...From the 5 option GUI menu click the Video Icon 2 A list of all supported video files that are available to the user will be displayed in the menu on the left hand side Note Supported video playback f...

Страница 26: ...and manage the audio playback View image files directly in your web browser with the web based media player You can view image files saved on your NAS through any web browser through the web based med...

Страница 27: ...tore Google Play or Blackberry world Connecting Your Enclosure for DAS Operation Over USB 3 0 Note NAS Network and DAS USB 3 0 operation cannot be achieved simultaneously If switching between DAS and...

Страница 28: ...onfiguration page you can access advanced configurations and functions Access Configuration Page 1 Access the Web Interface Home Page See Web Interface Access 2 From the 5 option menu select the Confi...

Страница 29: ...ge Note If you have navigated to a different page than the home page select the Status menu from the left hand menu 2 System Information is displayed under the System Information heading in the middle...

Страница 30: ...are hidden used to log into the web GUI Click the change button to alter the username and password used to login into the web GUI Enter your desired Username and Password in the specified fields and r...

Страница 31: ...yourself enter the date and time in the specified fields using the following formula Date yyyy mm dd Time hh mm ss Or if you would prefer to sync the time with the system of the device currently brows...

Страница 32: ...s menu from the left hand menu 2 Network Information is displayed under the Network Information heading toward the bottom of the middle of the window 3 Through the Network Information you can view the...

Страница 33: ...ed for PPPoE Internet access See Network PPPoE for details regarding PPPoE Internet configuration To manually connect the NAS enclosure to your PPPoE Internet service click the Connect button Enable o...

Страница 34: ...ervice Enables you to browse and map folders from the enclosure within the computer s file and folder browsers or network browsers across the network WebDAV Service Enables your local computer tablet...

Страница 35: ...page 2 Click Status in the Main Menu on the left hand side next click Disk Status 3 The Disk Status window is now displayed Through the disk status menu you can view information about the hard drives...

Страница 36: ...isted below Free Space Displays available storage capacity in Gigabytes Used Space Displays the percentage of storage capacity used Total Space Displays the entire storage capacity of your RAID array...

Страница 37: ...Information By Default the Internet Protocol Information is set to Automatic IP If you would prefer to manually set your internet protocol address place a bullet in Static IP address and fill in your...

Страница 38: ...ur desired IP information in each specified field and click Apply Note For detailed information regarding the best configuration for your network please contact your network administrator Configure PP...

Страница 39: ...click the apply button Note Service Name is an option field used for your personal identification of the ISP The Service Name will not impact your connection 5 Optional The service on Demand field al...

Страница 40: ...h DDNS you can assign an Internet Domain Name using a DDNS service for external access to your enclosure over the Internet 1 Access Configuration Page See Access configuration page 2 Click Network in...

Страница 41: ...vider drop down menu Or if you are using No IP as your service provider select NO IP from the DDNS service provider drop down menu 5 In the Host Name field enter your Host Name which you ve registered...

Страница 42: ...ovider Enable and Configure Network Service Ports 1 Access Configuration Page See Access configuration page 2 Click Network in the Main Menu on the left hand side next click Service Port 3 The Service...

Страница 43: ...several seconds If you have chosen to enable UPnP please ensure UPnP has also been enabled on your router For further assistance please contact your network administrator Port mapping and URL Display...

Страница 44: ...ce to communicate FTP URL Displays URL used to access the FTP Service page locally BT Port Displays and enables the user to alter the access port used for the Bit Torrent service to communicate Manage...

Страница 45: ...inactive use the drop down menu to and select the amount of inactive time you would like the drive to wait until it is put to sleep Note Setting the drive to sleep mode may result in slower than expec...

Страница 46: ...cessful click the Ok Button The Disk is now formatted S M A R T SATA0 SATA1 Displays reports regarding the health of each attached drive The HDD Status row at the bottom of each table will indicate wh...

Страница 47: ...age 2 Click System Manage in the Main Menu on the left hand side next click RAID 4 The RAID window is now displayed From the RAID Window you can view your installed drive information and RAID status Y...

Страница 48: ...utton if you wish to continue Upon deletion of the RAID array the enclosure will default to a JBOD configuration and S M A R T table for the main drive will be displayed Note dual drive access while i...

Страница 49: ...Click the OK button if you wish to continue Upon creation of the new RAID array the S M A R T table for available drives will be displayed RAID Status Displays the current RAID array and the S M A R...

Страница 50: ...Access configuration page 2 Click System Manage in the Main Menu on the left hand side next click Firmware Update 3 The Firmware Update window is now displayed From the Firmware Update Window you can...

Страница 51: ...easily access Access the Enclosure web GUI and select System Manage Firmware from the main menu Click the browse button a file explorer window will appear locate and select the firmware download in th...

Страница 52: ...b Interface 1 Access Configuration Page See Access configuration page 2 Click System Manage in the Main Menu on the left hand side next click Reboot 3 The Reboot window is now displayed From the reboo...

Страница 53: ...enclosure will reboot Note It may take several seconds for the system to fully reboot If you have changed the IP address of the enclosure or if the enclosure is set to automatically obtain an IP you m...

Страница 54: ...remotely shutdown the NAS Enclosure through the web interface 4 To power off the enclosure click the Shutdown button You will receive a message alerting you that all open connections will be reset cli...

Страница 55: ...figuration Page See Access configuration page 2 Click System Manage in the Main Menu on the left hand side next click Default 3 The Default window is now displayed From the Default Window you can remo...

Страница 56: ...ity of StarTech com 4 To restore default settings click the Reset button 5 You will receive a message alerting you that all default settings will be restored and advising you not to turn off the enclo...

Страница 57: ...nfiguration page 2 Click App Server in the Main Menu on the left hand side next click SMB Server 3 The SMB Server window is now displayed From the SMB Server Window you can enable or disable the abili...

Страница 58: ...e or disable SMB service Depending on your preference place a bullet in Enable or Disable Enable or Disable WebDAV Service 1 Access Configuration Page See Access configuration page 2 Click App Server...

Страница 59: ...e the ability for your local computer tablet iPhone or smartphone to access files and play media stored on your NAS Enclosure using third party WebDAV file management apps From the WebDAV Status secti...

Страница 60: ...ion page 2 Click App Server in the Main Menu on the left hand side next click FTP Server 3 The FTP Server window is now displayed From the FTP Service Window you can enable or disable the ability of e...

Страница 61: ...le or disable FTP service Depending on your preference place a bullet in Enable or Disable Download and host Torrent Files 1 Access Configuration Page See Access configuration page 2 Click App Server...

Страница 62: ...k the browse button located below Upload a Torrent File a file explorer window will appear allowing you browse your files and locate your desired torrent file Alternatively you can also add the local...

Страница 63: ...til it is removed from your Downloaded Queue The button menu below the Download Queue allows for control and configuration Functionality of each button is listed below Activate Download Enables you to...

Страница 64: ...h field Upload Limits Enter the amount of bandwidth you would like to allocate for uploading your hosting data in Kilobytes Download Limit Enter the amount of bandwidth you would like to allocate for...

Страница 65: ...ng information will be required to send e mail notifications please enter the information in the specified fields Mail Notification SMTP Server Sender Name Recipient Name User Name Password Note To ob...

Страница 66: ...r in the Main Menu on the left hand side next click Media Server 3 The Media Server window now displayed From the Media server window you can build an iTunes music Playlists based on available media a...

Страница 67: ...nd UPnP AV From within the drop down menu select the specific folder you would like pull the selected media type from To build a iTunes playlist form the music folder click the build button to create...

Страница 68: ...The Account window is now displayed From the Account window you can create modify limit disable or delete specific user accounts You can also manage Folders including creating folders deleting folders...

Страница 69: ...esired username and password in the specified fields 2 Next specify whether you would like the account to be Read only can only access files or Read Write Can access save and edit files by placing a b...

Страница 70: ...nt from the account box and click the modify button 2 The modify windows is now displayed From the modify window change the password or the read write access depending on your preference and click the...

Страница 71: ...account box and click the Delete Button 2 You will receive a message alerting you that the account will be deleted click OK if you wish to continue 3 The account has now been deleted Limit Grant Accou...

Страница 72: ...as now been granted access to the specified folder Limit Folder Access 1 If you would like to limit folder access from a specific account select the account from the account box 2 Select the folder fr...

Страница 73: ...er click the Create button located in the Folder List box 2 Enter your preferred folder name in the text box and click the OK Button 3 The folder has now been created and is listed in the Folder List...

Страница 74: ...lete a Folder WARNING Any Data within the folder will be deleted 1 Select the folder from the Folder List box and click the Delete button 2 You will receive an alert notifying you that the folder and...

Страница 75: ...next click Set Guide 3 The Web Language Settings window is now displayed The User Set Guide is an basic setup Wizard that can walk you through initial setup and configuration 4 If you would like to w...

Страница 76: ...returned for repair or replacement with equivalent products at our discretion The warranty covers parts and labor costs only StarTech com does not warrant its products from defects or damages arising...

Страница 77: ...ts and we quickly deliver them wherever they need to go Just talk to one of our tech advisors or visit our website You ll be connected to the products you need in no time Visit www startech com for co...

Отзывы: