background image

16

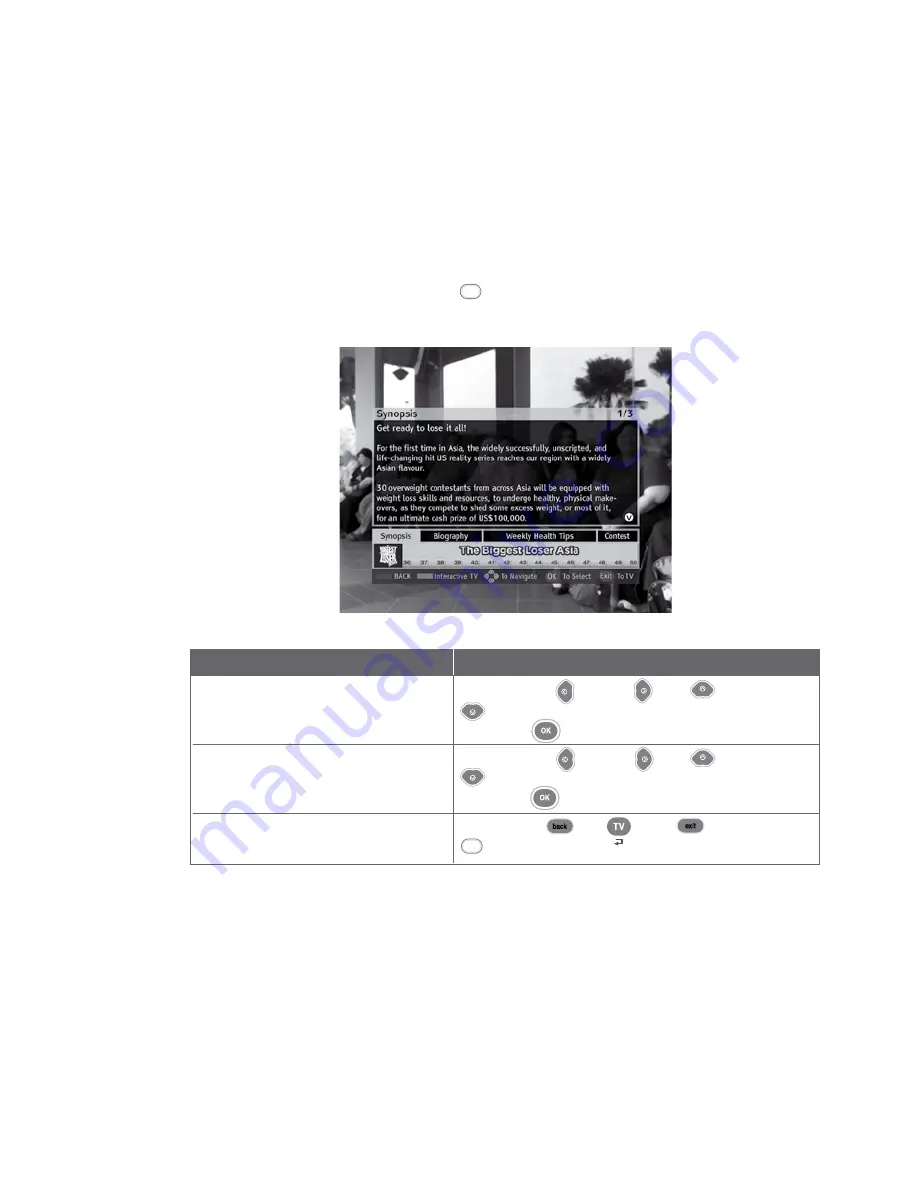
eTV  provides  you  more  interactivity  with  your  favourite  TV  programme.  You  can  get  more 
information on the programme you are watching and even participate in votes and contests 
while watching TV.
 
To access eTV, press the 

GREEN button      on the remote control when the eTV icon appears 

on the top of the screen. 

Guide to Interactive Services

eTV (Available only for eTV supported programmes)

Directions

Use the 

LEFT     , RIGHT     , UP       or DOWN 

      arrow buttons to select the different tabs. Select 
OK button        to confirm.
Use the 

LEFT     , RIGHT     , UP       or DOWN  

      arrow buttons to select the different tabs. Select 
OK button       to confirm.
Press 

BACK      TV      EXIT        or YELLOW   

      buttons.

How To Use

Functions

1. To access the different tabs on eTV

2. To select the categories within eTV

3. To exit eTV and return to the last 
  watched channel

Yellow

Green

Содержание ABQ-1H57-SCV

Страница 1: ......

Страница 2: ...echnical Information Installation Guide Digital Set top Box ABQ 1H57 SCV Option 1 Connection via AV cable Recommended 17 Option 2 Connection via RF cables For TV units without AV inputs 18 Option 3 Connection via AV cables to VCR DVD R 19 Digital Set top Box SCV 2110C Option 1 Connection via AV cable Recommended 20 Option 2 Connection via RF cables For TV units without AV inputs 21 Option 3 Connec...

Страница 3: ...5 Trouble Shooting Tips for Improving TV reception 29 6 Signal Leakage A Reminder 30 7 General Information MACROVISION Product Notice 30 ...

Страница 4: ...progress MUTE Red Muted Front Panel Buttons LED Indicators MESSAGE Yellow Message Waiting ONLINE Green IP address assigned by external cable modem POWER ON OFF Pressing button alternates between ON and STANDBY modes OK Confirmation of selection BACK Moves back one level in MENU system MENU Enters and exits MENU system CHANNEL UP DOWN Channel change or navigates when in MENU system VOLUME UP DOWN V...

Страница 5: ...and by mode for regular software updates Always place your digital set top box on a smooth flat surface Air should circulate freely under and around the box to prevent overheating Do not place anything on top of your digital set top box Do not place the digital set top box near wet or moist areas If the display flickers and the digital set top box does not change channels unplug it from the wall c...

Страница 6: ... change channels using either the digital set top box or the remote control do not attempt your own servicing Check with our Customer Care at 1633 For future use Red Green Yellow Blue Power On Off TV Viewing or Last Channel Recall Mute On Off Audio Track Selection Info Bar On Off Navigation Buttons Up Down Left Right Confirmation Key Channel Change Up Down Back one level in Menu system Access Menu...

Страница 7: ...ge will appear on your TV screen IMPORTANT Please keep the Smart Card in its slot at all times Removal of Smart Card can lead to disruption of programmes or interruption of regular software updates from StarHub Should you suspect that your Smart Card is faulty do not attempt to service it yourself For assistance please contact our Customer Care at 1633 Getting Started Smart Card Smart Card Slot To...

Страница 8: ... and upcoming Press the RIGHT arrow button on your remote programmes list control for Programme Listing The highlight and arrow buttons will move to the programme list on the right 3 To access programme schedules On the Programme Listing Page press the for today UP or DOWN arrow button to scroll 4 To access programme schedules Press the RIGHT arrow button on your remote for tomorrow control 5 To a...

Страница 9: ...button on your remote control On Screen TV Guide according The channels are arranged according to Channel to genre Number by default Press the YELLOW SORT button once to arrange the channels according to Channel Name Press the YELLOW SORT button again to display only the Favourites List Continue to press the YELLOW SORT button to search through the other genres in the sequence above Guide to Digit...

Страница 10: ...l 2 To select a channel Move the highlighted box to the selected channel and press the OK button on your remote control for a full screen view If you have not subscribed to the selected channels you will not be able to have a full screen view 3 To access the On Screen TV Guide Move the highlighted box to the channel for a channel you wish to select and press the GUIDE button 4 To return to Video M...

Страница 11: ...roll through the channel listings on another channel 3 To check the programmes within Press RIGHT arrow button to proceed to the next 24 hours programme Press LEFT arrow button to go back to the previous programme 4 To access more detailed Press the GREEN or INFO button programme information 5 To access additional programme Press the GREEN or INFO button information Info Page 6 To select your pref...

Страница 12: ...button to confirm Use the LEFT or RIGHT arrow button to select Bilingual or English as the Preferred Language Setting Note Chinese programme information is available only for Chinese programmes Directions Press the GUIDE button on your remote control Press the UP or DOWN arrow button to select the channel for programme you want to be alerted of Press the RIGHT arrow button followed by the UP or DO...

Страница 13: ...remote control to access your favourite channels Surf your favourite channels by pressing the FAVOURITE button Option 2 Press the GUIDE button while watching TV and your favourite channels will be listed in alphabetical order Select the channel you want to watch and press the OK button 3 To remove a favourite Press the MENU button on your remote control channel Select TV Guide followed by Favourit...

Страница 14: ...Scroll to the channel using the UP or DOWN arrow button In the Channel Listing screen use the YELLOW LANG button to select the channels you wish to lock Press the BLUE button to confirm and save your selection The channels you have selected will now be accessible only by entering the correct 6 digit numeric PIN 2 To unlock a channel Press the MENU button on your remote control Select TV Guide foll...

Страница 15: ...ate Use the LEFT or RIGHT arrow button on your remote control to set the date for Auto Tune to activate e g Mon 05 Jan 5 To confirm Start Time Using the number buttons on your remote control enter the time you want the digital set top box to switch to the channel of your choice The time is displayed in 12 hour format e g 01 30PM or 11 25AM Use the RIGHT arrow button to select AM or PM 6 To select ...

Страница 16: ...button on your remote control Select Settings followed by Change PIN on the TV screen Enter your current 6 digit numeric PIN The default PIN is set to 000000 Press the BLUE button to confirm your PIN and access the next screen On the next screen enter and confirm your new PIN Press the BLUE OK button to save the new PIN A message will appear on screen to inform you if the change has been successfu...

Страница 17: ...se channels and English text for all other channels Select Settings followed by General Scroll to Preferred Audio and use the LEFT or RIGHT arrow button to select your Preferred Audio language Select Settings followed by General Scroll to Auto Load Ch Apps and use the LEFT or RIGHT arrow button to change the settings The default setting is Yes This mode allows all applications EG HBO On Demand Ch ...

Страница 18: ...matically get to enjoy GV Movie Club membership from first purchase With more upcoming free content there will be no more toggling between mobile and the web as your television will have it all TV Games Playin TV is a round the clock games channel that offers easy to play and exciting interactive TV games your whole family will love There are five complimentary TV games and 19 paid games for your ...

Страница 19: ...e screen Guide to Interactive Services eTV Available only for eTV supported programmes Directions Use the LEFT RIGHT UP or DOWN arrow buttons to select the different tabs Select OK button to confirm Use the LEFT RIGHT UP or DOWN arrow buttons to select the different tabs Select OK button to confirm Press BACK TV EXIT or YELLOW buttons How To Use Functions 1 To access the different tabs on eTV 2 To...

Страница 20: ...V unit Switch your TV to the AV Channel to watch your StarHub TV programmes StarHub CableTV point STEREO AUDIO RIGHT LEFT VIDEO Red White Yellow Viewing Procedure 1 Switch your TV to the AV Channel to watch your programmes 2 Select the desired channel using the remote control of your digital set top box HDMI DVI HDMI DVI TV Back RF IN R Red L White Video Video STEREO AUDIO STEREO AUDIO Video Yello...

Страница 21: ... your digital set top box CABLE IN TV OUT Digital set top box Back ETHERNET POWER CABLE StarHub CableTV point STEREO AUDIO RIGHT LEFT VIDEO Red White Yellow HDMI DVI HDMI DVI TV Back RF IN Component Component R Red L White Video Video STEREO AUDIO STEREO AUDIO Video Yellow Y Green Pb Blue Video Video Pr Red Video Yellow L White R Red Audio Audio RF IN TV Back Tune TV unit to receive programmes fro...

Страница 22: ...IDEO Red White Yellow AV 1 AV 2 RF IN RF OUT VCR DVD R Back To TV AV In POWER CABLE STEREO AUDIO RIGHT LEFT VIDEO Red White Yellow To TV AV In To TV RF In 2 3 4 6 5 1 Connect RF cable from VCR DVD R RF Out to TV RF In Connect RF cable from the cable TV point to the digital set top box Cable In Connect AV cable from digital set top box AV Out to TV AV In Connect AV cable from digital set top box AV...

Страница 23: ...E IN Digital set top box Back ETHERNET Audio Do Not Open Video VCR R L 3 Power on the digital set top box and TV unit 1 Connect RF cable from the cable TV point to the digital set top box Cable In StarHub CableTV point POWER CABLE Audio Do Not Open Video TV R L To TV AV In HDMI DVI HDMI DVI TV Back RF IN R Red L White Video Video STEREO AUDIO STEREO AUDIO Video Yellow Y Green Pb Blue Pr Red TV Bac...

Страница 24: ... ETHERNET Audio Do Not Open Video VCR R L 3 Power on the digital set top box and TV unit 1 Connect RF cable from the cable TV point to the digital set top box Cable In StarHub CableTV point POWER CABLE Audio Do Not Open Video TV R L 4 2 HDMI DVI HDMI DVI TV Back RF IN Component Component R Red L White Video Video STEREO AUDIO STEREO AUDIO Video Yellow Y Green Pb Blue Video Video Pr Red Video Yello...

Страница 25: ... R tuning procedures refer to the VCR DVD R manual TV must be tuned to all free to air frequencies so that you can watch free to air channels on your TV while recording a StarHub TV channel on your VCR DVD R TV OUT CABLE IN Model SCV 3110C Back ETHERNET Audio Do Not Open Video VCR R L 5 Connect the RF cable from the digital set top box TV Out to VCR DVD R RF In 3 Power on the digital set top box a...

Страница 26: ...to the AV Channel to watch your StarHub TV programmes TV OUT CABLE IN Digital set top box Back ETHERNET POWER CABLE VIDEO Yellow LEFT White RIGHT Red VIDEO Yellow LEFT White RIGHT Red VIDEO Yellow SPDIF Black TV VCR 1 Connect RF cable from the cable TV point to the digital set top box Cable In StarHub CableTV point To TV AV In HDMI DVI HDMI DVI TV Back RF IN R Red L White Video Video STEREO AUDIO ...

Страница 27: ... box Refer to Tuning Procedures 3 Power on the digital set top box and TV unit TV OUT CABLE IN Digital set top box Back ETHERNET POWER CABLE VIDEO Yellow LEFT White RIGHT Red VIDEO Yellow LEFT White RIGHT Red VIDEO Yellow SPDIF Black TV VCR 1 Connect RF cable from the cable TV point to the digital set top box Cable In To TV AV In HDMI DVI HDMI DVI TV Back RF IN Component Component R Red L White Vi...

Страница 28: ...o the VCR DVD R manual TV must be tuned to all free to air frequencies so that you can watch free to air channels on your TV while recording a StarHub TV channel on your VCR DVD R TV OUT CABLE IN Digital set top box Back ETHERNET POWER CABLE VIDEO Yellow LEFT White RIGHT Red VIDEO Yellow LEFT White RIGHT Red VIDEO Yellow SPDIF Black TV VCR RF IN RF OUT VCR DVD R Back To TV AV In POWER CABLE STEREO...

Страница 29: ...ss the CHANNEL NUMBER that has been assigned to receive the StarHub TV channel Tuning Procedures Auto 1 Turn on your digital set top box Wait one minute for initialisation to complete before you press the MOSAIC button on the remote control of the digital set top box 2 Select an unused CHANNEL on the TV unit 3 Press the TUNING button on the TV remote control or at the front panel of the TV unit co...

Страница 30: ... To view StarHub TV channel Please follow steps 1 and 2 of Scenario A RF OUT RF IN VCR DVD R Back TV OUT Digital set top box Back CABLE IN StarHub CableTV point Digital set top box Back STEREO AUDIO RIGHT LEFT VIDEO Red White Yellow AV 1 AV 2 VCR DVD R Back STEREO AUDIO RIGHT LEFT VIDEO Red White Yellow Technical Information Recording To TV AV In CABLE IN TV OUT Digital set top box Back ETHERNET P...

Страница 31: ...eo tape into VCR and press Play DVD R Load CD ROM into DVD R and press Play 2 Play back to new tape VCR DVD R Select the correct channel i e AV 1 2 or AUX etc RF OUT RF IN RF IN TV Back TV OUT Digital set top box Back VCR DVD R Back CABLE IN StarHub CableTV point VCR DVD R Back To TV AV In STEREO AUDIO RIGHT LEFT VIDEO Red White Yellow STEREO AUDIO RIGHT LEFT VIDEO Red White Yellow TV Back Digital...

Страница 32: ...cture too Adjust brightness control of TV unit bright or dark Blank screen Check if TV brightness and contrast controls are adjusted sound ok Picture rolling Adjust vertical hold of TV unit No sound Adjust TV or digital set top box volume control picture ok Check if either are in MUTE mode Washed out picture Adjust TV contrast control No picture Turn OFF and turn ON the main power to the digital s...

Страница 33: ...actor who is trained to do this work If you need help regarding signal leakage or the cabling in your home call StarHub s Public Hotline at 6873 2828 IMPORTANT Causing signal leakage is a very serious offence as it disrupts the communication services of legitimate users Infocomm Development Authority of Singapore IDA manages and polices the airwaves When the need arises StarHub may have to enter y...

Отзывы: