Stardom SOHORAID SR4-SB3PLUS Скачать руководство пользователя страница 6

SR4-SB3+ User Manual

4

4. Hardware Installation Procedure

Please follow the instructions below to complete the hardware installation.

Place the system on a stable surface. Ensure that it is well ventilated without blockage tothe 

vent and kept away from areas near water and damage prone areas.
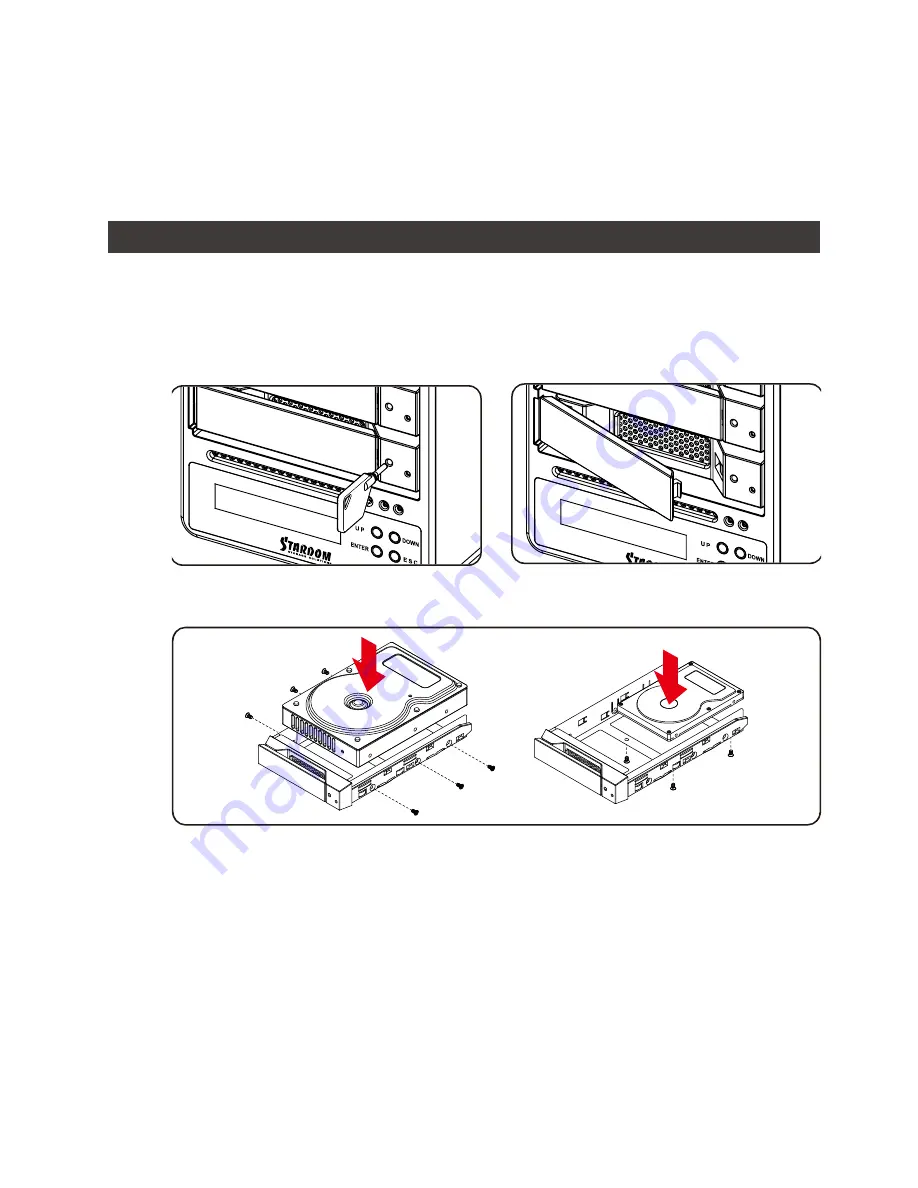
Use the key included in the accessory kit and inserted into the key access opening to eject 

the removable drive tray latch and extract the removable drive tray.

Step 1

Step 2

Mount your hard drives onto the removable drive tray and secure it with the screws included 

in the accessory kit to avoid any damage to the hard drive due to accidental movements.

Step 3

Step 4

Step 5

Step 6

Step 7
Step 8

When the hard drive installation has been completed, insert the hard drive tray into the 

system horizontally and secure the latch into place.
Connect the AC power cable to the SR4-SB3+, and then plug the AC power to the wall 

socket. Boot-up the unit.
Set the storage mode using the LCD and buttons on the front (please refer to section 5 for 

front panel and LCD information).
Connect the cable to the PC and the SR4-SB3+ port.
After boot-up, your operating system will automatically detect the storage capacity of your 

hard drives. Please follow the operating system instructions to configure and format your 

drives. The formatted drives can be configured for the RAID setup.

10. It is highly recommended for users to back up important data contained within the SR4-SB3+ 

unit on a regular basis or whenever the user feels necessary to a remote or a separate storage 

device. STARDOM will not be responsible for any lost of data caused during the use of the unit or 

the recovery of the data lost.

Содержание SOHORAID SR4-SB3PLUS

Страница 1: ...SOHORAID User Manual SR4 SB3...

Страница 2: ...nd Precautions 3 4 Hardware Installation Procedure 4 5 Description of Front Panel Operation and LCD Information 5 6 Replacement of Malfunctioning Drive and Data Rebuild Instructions 6 7 System Tempera...

Страница 3: ...pping Latest product specifications and updates can be found at www STARDOM com tw No separate notifications will be provided by our company If you would like to receive the latest STARDOM product inf...

Страница 4: ...ive position 4 A HDD access light B HDD enclosure handle C HDD tray key lock D LCM display E System status light F Power status light G UP button H DOWN button I ENTER button J ESC button K Fan L Mute...

Страница 5: ...failure is taking place go to Section 6 Replacement of Malfunctioning Drive and Data Rebuild Instructions and follow the steps accordingly 7 Whenever turning off or unplugging the SR4 SB3 from your c...

Страница 6: ...leted insert the hard drive tray into the system horizontally and secure the latch into place Connect the AC power cable to the SR4 SB3 and then plug the AC power to the wall socket Boot up the unit S...

Страница 7: ...evel 3 Level 4 External 4BAY HARDWARE RAID Quick Setup Create One RAID RAID 0 RAID 5 Select Disk Delete All RAID Disk Manager Identify Disk Disk 1 Check Disk LED Disk 2 Check Disk LED Disk 3 Check Dis...

Страница 8: ...ndicator of the replacement drive will interchangeably blink red and purple to inform that the data is being rebuilt to the replacement drive During data rebuild you may operate the SR4 SB3 as normal...

Страница 9: ...B3 0 x1 eSATA x1 AC x1 x1 x 1 SafeTANK SR4 SB3 STARDOM STARDOM SR8 TB3 STARDOM SR8 TB3 www STARDOM com tw STARDOM STARDOM www STARDOM com tw 1 0 40 o C 32 104 o F 20 47 o C 4 116 o F 5 95 100 240V AC...

Страница 10: ...SR4 SB3 User Manual 8 R 1 3 2 4 A B C D LCM E F G UP H DOWN I ENTER J ESC K L M USB3 0 N eSATA O P Q R...

Страница 11: ...SR4 SB3 User Manual 9 RAID JBOD RAID JBOD YES YES YES 3 1 2 RAID 5 RAID 0 20GB 3 SR4 SB3 4 5 RAID 6 6 7 SR4 SB3 8 RAID 5 RAID 0 9 Auto 50 10 C 10 SR4 SB3 SR4 SB3 STARDOM...

Страница 12: ...SR4 SB3 User Manual 10 4 1 2 3 AC Power SR4 SB3 AC Power LCD LCD PC SR4 SB3 RAID RAID 4 5 6 7 8...

Страница 13: ...eck Disk LED Disk 3 Check Disk LED Disk 4 Check Disk LED Show Disk Info Disk Info RAID Manager Identify RAID Select RAID Create RAID RAID 0 RAID 5 Select Disk Delete RAID Select RAID RAID Info Change...

Страница 14: ...00 XP Vista 7 8 10 NTFS 2 Mac OS X HFS Mac OS Extended 3 PC Mac FAT32 4GB Q2 SR4 SB3 eSATA 200MB s A 1 PCI E SATA PCI E 1X 135MB s 2 SR4 SB3 RAID 0 RAID 5 6 7 8 1 2 SR4 SB3 3 RAID 5 SR4 SB3 RAID 0 SR4...

Страница 15: ...SR4 SB3 User Manual 13 http www stardom com tw...

Отзывы: